If your system can boot to one or more operating
systems other than Windows Vista, or to multiple installations of
Windows Vista, you’ll see a menu similar to the following during
startup:
Choose the operating system or tool you want to start:
(Use the arrow keys to highlight your choice.)

     Earlier version of Windows
     Microsoft Windows Vista

To specify an advanced option for this choice, press F8.
Seconds until highlighted choice will be started automatically: 30

Tools:
     Windows Memory Diagnostic
If
you do nothing at this point, Windows Vista will boot automatically
after 30 seconds. Otherwise, you select the operating system you want
and then press the Enter key to boot it. (To switch between the
operating system menu and the Tools menu, press the Tab key.) The
specifics of this menu are determined by the Boot Configuration Data, a new data store that replaces the BOOT.INI file used in previous versions of Windows. BOOT.INI
still exists, but it’s used only for loading the legacy operating
systems in multiboot setups. Why the change? There are three main
reasons:
It didn’t make
sense to have two different types of boot information stores: one for
BIOS-based systems and another for EFI-based systems. BCD creates a
common store for both types of operating systems. The need to support boot applications,
which refers to any process that runs in the boot environment that the
Windows Boot Manager creates. The main types of boot applications are
Windows Vista partitions, legacy installations of Windows, and startup
tools, such as the Windows Memory Diagnostic that appears in the Windows
Boot Manager menu. In this sense, Windows Boot Manager is a kind of
miniature operating system that displays an interface (the Windows Boot
Manager menu) that lets you select which application you want to run. The
need to make boot options scriptable. The BCD exposes a scripting
interface via a Windows Management Instrumentation (WMI) provider. This
enables you to create scripts that modify all aspects of the BCD.
Windows Vista gives you four methods to modify some or all the data in the BCD store:
The Startup and Recovery feature The System Configuration Utility The BCDEDIT command-line utility The BCD WMI provider
Using Startup and Recovery to Modify the BCD
You
can modify a limited set of BCD options using the Startup and Recovery
dialog box: the default operating system, the maximum time the Windows
Boot Manager menu is displayed, and then maximum time the Windows Vista
startup recovery options are displayed. Here are the steps to follow:
1. | Select Start, right-click Computer, and then click Properties. Vista displays Control Panel’s System window.
| 2. | Click Advanced System Settings.
| 3. | If
you see the User Account Control dialog box, either click Continue or
type an administrator password and click Submit. The System Properties
dialog box appears.
Tip
A quicker way to get to
the System Properties dialog box is to press Windows Logo+R (or select
Start, All Programs, Accessories, Run), type systempropertiesadvanced, and click OK.
| 4. | In
the Advanced tab, click the Settings button in the Startup and Recovery
group. Vista displays the Startup and Recovery dialog box, shown in Figure 1.
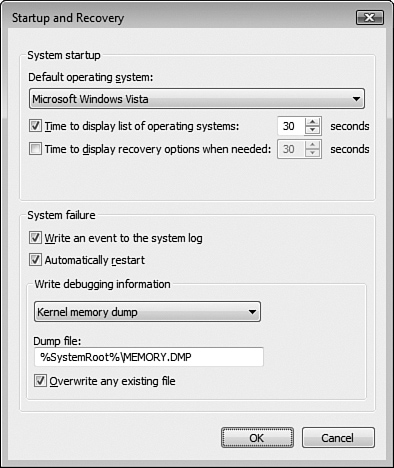
| 5. | Use
the Default Operating System list to click the operating system that
Windows Boot Manager highlights by default at startup. (In other words,
this is the operating system that runs automatically if you do not make a choice in the Windows Boot Manager menu.)
| 6. | Use
the Time to Display List of Operating Systems spin box to set the
interval after which Windows Boot Manager launches the default operating
system. If you don’t want Windows Boot Manager to select an operating
system automatically, deactivate the Time to Display List of Operating
Systems check box.
| 7. | If
Windows Vista is not shut down properly, Windows Boot Manager displays a
menu of recovery options at startup. If you want the default options
selected automatically after a time interval, activate the Time to
Display Recovery Options When Needed check box and use the associated
spin box to set the interval.
| 8. | Click OK in all open dialog boxes to put the new settings into effect.
|
Using the System Configuration Utility to Modify the BCD
For more detailed control
over the BCD store, you can modify the data by using the System
Configuration Utility. To start this program, follow these steps:
1. | Press Windows Logo+R (or select Start, All Programs, Accessories, Run) to open the Run dialog box.
| 2. | Type msconfig and then click OK.
| 3. | If
you see the User Account Control dialog box, either click Continue or
type an administrator password and click Submit. The System
Configuration Utility window appears.
| 4. | Select the Boot tab, shown in Figure 2.
|
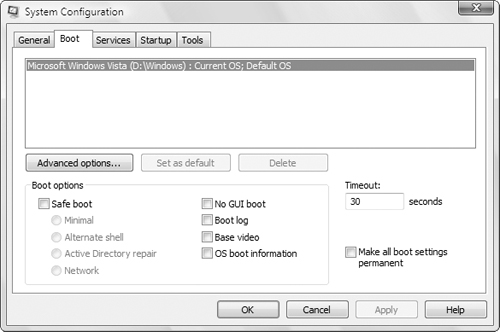
The large box near the top of the tab displays the Vista installations on the current computer. You see Current OS beside the Vista installation you are running now; you see Default OS beside the Vista installation that is set up as the default. There are four main tasks you can perform:
Click the Set as Default button to set the highlighted Vista install as the default for the Windows Boot Manager menu. Use the Timeout text box to set the maximum time that Windows Boot Manager waits before selecting the default OS. Use the check boxes in the Boot Options group to set the following startup options for the currently highlighted Vista install:
|
|
|---|
| Safe Boot: Minimal | Boots Windows Vista in Safe mode,
which uses only a minimal set of device drivers. Use this switch if
Windows Vista won’t start, if a device or program is causing Windows
Vista to crash, or if you can’t uninstall a program while Windows Vista
is running normally. | | Safe Boot: Minimal (Alternate Shell) | Boots
Windows Vista in Safe mode but also bypasses the Windows Vista GUI and
boots to the command prompt instead. Use this switch if the programs in
which you need to repair a problem can be run from the command prompt or
if you can’t load the Windows Vista GUI. |
Note
The shell loaded by the /safeboot:minimal(alternateshell) switch is determined by the value in the following Registry key:
HKEY_LOCAL_MACHINE\SYSTEM\CurrentControlSet\SafeBoot\AlternateShell The default value is CMD.EXE (the command prompt).
|
|
|---|
| Safe Boot: Active Directory Repair | Boots
Windows Vista in Safe mode and restores a backup of the Active
Directory service (this option applies only to domain controllers). | | Safe Boot: Network | Boots
Windows Vista in Safe mode but also includes networking drivers. Use
this switch if the drivers or programs you need to repair a problem in
exist on a shared network resource, if you need access to email or other
network-based communications for technical support, or if your computer
is running a shared Windows Vista installation. | | No GUI Boot | Tells
Windows Vista not to load the VGA display driver that is normally used
to display the progress bar during startup. Use this switch if Windows
Vista hangs while switching video modes for the progress bar, or if the
display of the progress bar is garbled.
| | Boot Log | Boots Vista and logs the boot process to a text file named ntbtlog.txt that resides in the %SystemRoot%
folder. Move to the end of the file and you might see a message telling
you which device driver failed. You probably need to reinstall or roll
back the driver . Use this switch if the
Windows Vista startup hangs, if you need a detailed record of the
startup process, or if you suspect (after using one of the other Startup
menu options) that a driver is causing Windows Vista startup to fail. |
Note
%SystemRoot% refers to the folder into which Windows Vista was installed. This is usually C:\Windows.
|
|
|---|
| Base Video | Boots
Vista using the standard VGA mode: 640×480 with 256 colors. This is
useful for troubleshooting video display driver problems. Use this
switch if Windows Vista fails to start using any of the Safe mode
options, if you recently installed a new video card device driver and
the screen is garbled, the driver is balking at a resolution or color
depth setting that’s too high, or if you can’t load the Windows Vista
GUI. After Windows Vista has loaded, you can reinstall or roll back the
driver, or you can adjust the display settings to values that the driver
can handle. | | OS Boot Information | Displays
the path and location of each device driver as it loads, as well as the
operating system version and build number, the number of processors,
the system memory, and the process type. |
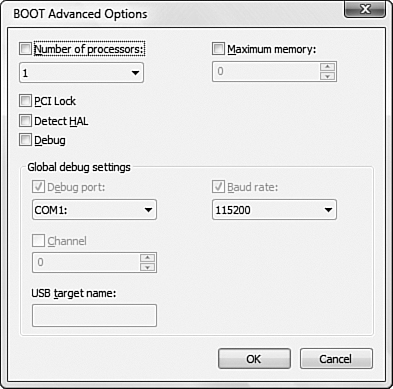
Click the Advanced Options button to display the BOOT Advanced Options dialog box shown in Figure 3.
|
|
|---|
| Number of Processors | In
a multiprocessor system, specifies the maximum of processors that
Windows Vista can use. Activate this check box if you suspect that using
multiple processors is causing a program to hang.
| | Maximum Memory | Specifies
the maximum amount of memory, in megabytes, that Windows Vista can use.
Use this value when you suspect a faulty memory chip might be causing
problems. | | PCI Lock | Activate
this check box to tell Vista not to dynamically assign hardware
resources for PCI devices during startup. The resources assigned by the
BIOS during the POST are locked in place. Use this switch if installing a
PCI device causes the system to hang during startup. | | Detect HAL | Activate
this check box to force Vista to detect the computer’s hardware
abstraction layer (HAL) at startup. The HAL is a software layer that
resides between the computer’s hardware and the operating system kernel,
and its job is to hide hardware differences so that the kernel can run
on a variety of hardware. If you force Vista to detect the HAL, it can
use the HAL to interact with the computer’s hardware at startup. This is
useful if dealing with the hardware directly is causing startup
problems. | | Debug | Enables
remote debugging of the Windows Vista kernel. This sends debugging
information to a remote computer via one of your computer’s ports. If
you use this switch, you can use the Debug Port list to specify a serial
port, IEEE 1394 port, or USB port. If you use a serial port, you can
specify the transmission speed of the debugging information using the
Baud Rate list; if you use an IEEE 1394 connection, activate Channel and
specify a channel value; if you use a USB port, type the device name in
the USB Target Name text box. |
|
