Control Panel is a folder that contains a large
number of icons—there are more than 50 icons in the Classic View
(depending on your version of Vista) of a default Windows Vista setup,
but depending on your system configuration, even more icons could be
available. Each of these icons deals with a specific area of the Windows
Vista configuration: hardware, applications, fonts, printers,
multimedia, and much more.
Opening
an icon displays a window or dialog box containing various properties
related to that area of Windows. For example, launching the Add or
Remove Programs icon enables you to install or uninstall third-party
applications and Windows Vista components.
To display the Control Panel folder, use any of the following techniques:
Select Start, Control Panel
In Windows Explorer, display the Folders list and select the Desktop\Control Panel folder
Press Windows Logo+R (or select Start, All Programs, Accessories, Run) to open the Run dialog box, type control, and click OK
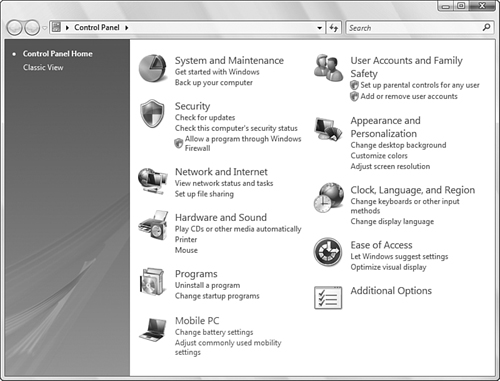
By default, Windows Vista displays the Control Panel Home page, shown in Figure 1,
which displays icons for 11 different categories (System and
Maintenance, Security, and so on), as well as two or three links to
common tasks under each category icon. Windows XP’s version of Control
Panel offered a similar Category View, which was designed to help novice
users, but it just delayed the rest of us unnecessarily and I always
counseled my students to switch to Classic View as soon as possible.
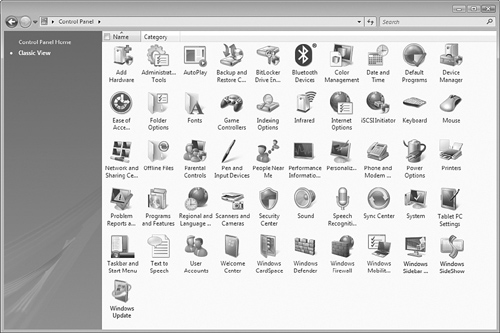
I
don’t do that with Windows Vista, however. After I got used to the
layout of the Home page and its offshoots, I can find what I want quite
quickly. However, when I switch to Classic View, I find that trying to
pick out the one icon I want out of 50-plus icons (see Figure 2) is frustrating and time-consuming. Therefore, I recommend sticking with the Home page view until you get used to it.
Reviewing the Control Panel Icons
To help you
familiarize yourself with what’s available in Control Panel, this
section offers summary descriptions of the Control Panel icons found in a
standard Windows Vista installation. Note that your system might have
extra icons, depending on your computer’s configuration and the programs
you have installed.
Add Hardware—
Launches the Add Hardware Wizard, which searches for new Plug and Play
devices on your system, and can run a more in-depth hardware detection
to look for non–Plug and Play devices. You can also use this wizard to
install device drivers by hand by choosing the one you want from a list
or from a disc that came with your device.
Administrative Tools— Displays a window with more icons, each of which enables you to administer a particular aspect of Windows Vista:
Computer Management—
Enables you to manage a local or remote computer. You can examine
hidden and visible shared folders, set group policies, access Device
Manager, manage hard disks, and much more.
Data Sources (ODBC)— Enables you to create and work with data source names, which are connection strings that you use to connect to local or remote databases.
Event Viewer— Enables you to examine Windows Vista’s list of events,
which are unusual or noteworthy occurrences on your system, such as a
service that doesn’t start, the installation of a device.
iSCSI Initiator— Displays the iSCSI Initiator properties sheet, which enables you to manage connections to iSCSI devices such as tape drives.
Local Security Policy—
Displays the Local Security Settings snap-in, which enables you to set
up security policies on your system.
Memory Diagnostics Tool—
Runs the Windows Memory Diagnostics Tool, which checks your computer’s
memory chips for problems.
Print Management— Displays the Print Management console, which enables you to manage, share, and deploy printers and print servers.
Reliability and Performance Monitor—
Enables you to monitor the performance of your system using Performance
Monitor and Reliability Monitor.
Services—
Displays a list of the system services available with Windows Vista.
System services are background routines that enable the system to
perform tasks such as network logon, disk management, Plug and Play,
Internet Connection Sharing, and much more. You can pause, stop, and
start services, as well as configure how service load at startup.
System Configuration— Opens the System Configuration utility.
Task Scheduler— Runs the Task Scheduler console, which enables you to runs programs or scripts on a schedule.
Windows Firewall with Advanced Security— Enables you to control every aspect of Vista’s bi-directional firewall.
AutoPlay— Opens the AutoPlay window, which enables you to configure AutoPlay defaults for various media.
Backup and Restore Center— Operates as a front-end for Windows Backup .
BitLocker Drive Encryption— Turns on and configures BitLocker, which encrypts your Vista system drive to protect it from unauthorized viewing.
Bluetooth Devices—
Enables you to add, configure, and manage devices that use the
Bluetooth wireless networking standard. This icon appears only if you’ve
installed a Bluetooth device on your system.
Color Management— Enables you to configure the colors of your monitor and printer to optimize color output.
Date and Time—
Enables you to set the current date and time, select your time zone,
and set up an Internet time server to synchronize your system time. You
can also display extra clocks to monitor other time zones.
Default Programs—
Displays the Default Programs window, which enables you to change the
programs that are associated with Vista’s file types.
Device Manager— Launches Device Manager, which enables you to view and work with your system devices and their drivers.
Ease of Access Center—
Enables you to customize input—the keyboard and mouse—and output—sound
and display—for users with special mobility, hearing, or vision
requirements.
Folder Options—
Enables you to customize the display of Windows Vista’s folders, set up
whether Windows Vista uses single- or double-clicking, work with file
types, and configure offline files.
Fonts— Displays the Fonts folder, from which you can view, install, and remove fonts.
Game Controllers— Enables you to calibrate joysticks and other game devices.
Indexing Options— Enables you to configure the index used by Vista’s new search engine.
Infrared— Enables you to configure infrared settings, file transfers, and photo downloads from digital cameras with infrared support.
Internet Options—
Displays a large collection of settings for modifying Internet
properties (how you connect, the Internet Explorer interface, and so
on).
iSCSI Initiator— Displays the iSCSI Initiator property sheet, which enables you to manage connections to iSCSI devices such as tape drives.
Keyboard— Enables you to customize your keyboard, work with keyboard languages, and change the keyboard driver.
Mouse— Enables you to set various mouse options and to install a different mouse device driver.
Network and Sharing Center—
Displays general information about your network connections and sharing
settings.
Offline Files— Enables you to enable and configure working with network files offline.
Parental Controls—
Enables you to restrict computer usage for other users of the computer.
Pen and Input Devices— Displays the Pen and Input Devices dialog box, which enables you to configure your Tablet PC’s digital pen.
People Near Me—
Identifies people nearby on your network so that you can collaborate
with them using a program such as Windows Meeting Space.
Performance Information and Tools— Displays the performance rating for your computer and lets you know if your system has performance problems.
Personalization—
Offers a large number of customization options for the current Vista
theme: glass effects, colors, desktop background, screensaver, sounds,
mouse pointers, and display settings.
Phone and Modem Options— Enables you to configure telephone dialing rules and to install and configure modems.
Power Options—
Enables you to configure power management properties for powering down
system components (such as the monitor and hard drive), defining
low-power alarms for notebook batteries, enabling sleep and hibernation
modes, and configuring notebook power buttons.
Printers— Enables you to install and configure printers and the Windows Vista Fax service.
Problem Reports and Solutions—
Enables you to search for and implement solutions that Microsoft has
found for problems on your computer.
Programs and Features— Enables you to install and uninstall applications, add and remove Windows Vista components, and view installed updates.
Regional and Language Options— Enables you to configure international settings for country-dependent items such as numbers, currencies, times, and dates.
Scanners and Cameras— Enables you to install and configure document scanners and digital cameras.
Security Center—
Displays the Security Center window, which shows the current status of
Windows Firewall, Windows Update, virus protection, and Windows
Defender. You can also manage your computer’s security settings.
Sound—
Enables you to control the system volume, map sounds to specific
Windows Vista events (such as closing a program or minimizing a window),
specify settings for audio, voice, and other multimedia devices.
Speech Recognition Options— Enables you to configure Windows Vista’s speech recognition feature.
Sync Center— Enables you to set up and maintain synchronization with other devices and with offline files.
System—
Displays basic information about your system including the Vista
edition, system rating, processor type, memory size, computer and
workgroup names, and whether Vista is activated. Also gives you access
to Device Manager and settings related to performance, startup, System
Protection, Remote Assistance, and the Remote Desktop.
Tablet PC Settings—
Displays settings for configuring handwriting and other aspects of your
Tablet PC.
Taskbar and Start Menu— Enables you to customize the taskbar and Start menu.
Text to Speech— Enables you to select a voice and voice speed for text-to-speech translation.
User Accounts— Enables you to set up and configure user accounts.
Welcome Center— Displays general information about your computer and icons to common Vista tasks.
Tip
The Welcome Center
window appears by default each time you start your computer. This window
is clearly aimed at novice users and is of no earthly use for anyone
with even a bit of computer experience. Fortunately, you can disable the
Welcome Center by deactivating the Run at Startup check box at the
bottom of the window.
Windows CardSpace— Enables you to use Microsoft’s new CardSpace system to manage your personal online data.
Windows Defender— Launches Windows Defender, Vista’s antispyware program.
Windows Firewall— Enables you to configure Windows Firewall.
Windows Mobile Device Center— Enables you to connect with a Windows Mobile device for synchronizing files and Outlook data.
Windows Mobility Center— Displays Vista’s new Mobility Center for notebooks.
Windows Sidebar— Displays the property sheet for Windows Sidebar.
Windows SideShow—
Displays a list of gadgets installed for use with a Windows
SideShow-compatible notebook.
Windows Update—
Enables you to configure Vista’s Windows Update feature, check for
updates, view update history, and set up a schedule for the download and
installation of updates.
Understanding Control Panel Files
Many of the Control Panel icons represent by Control Panel extension files, which use the .cpl extension. These files reside in the %SystemRoot%\System32
folder. When you open Control Panel, Windows Vista scans the System32
folder looking for CPL files, and then displays an icon for each one.
The CPL files offer an alternative method for launching individual Control Panel dialog boxes. The idea is that you run control.exe
and specify the name of a CPL file as a parameter. This bypasses the
Control Panel folder and opens the icon directly. Here’s the syntax:
control
CPLfile [,option1 [, option2]]
CPLfile— The name of the file that corresponds to the Control Panel icon you want to open (see Table 1 later in this article).
option1— This option is obsolete and is included only for backward compatibility with batch files and scripts that use Control.exe for opening Control Panel icons.
option2—
The tab number of a multitabbed dialog box. Many Control Panel icons
open a dialog that has two or more tabs. If you know the specific tab
you want to work with, you can use the option2
parameter to specify an integer that corresponds to the tab’s relative
position from the left side of the dialog box. The first (leftmost) tab
is 0, the next tab is 1, and so on.
Note
If
the dialog box has multiple rows of tabs, count the tabs from left to
right and from bottom to top. For example, if the dialog box has two
rows of four tabs each, the tabs in the bottom row are numbered 0 to 3
from left to right, and the tabs in the top row are numbered 4 to 7 from
left to right.
Also, note that even though you no longer use the option1 parameter, you must still display its comma in the command line.
For example, to open Control Panel’s System icon with the Hardware tab displayed, run the following command:
control sysdm.cpl,,2
Table 1
lists the various Control Panel icons and the appropriate command line
to use. (Note, however, that some Control Panel icons—such as Taskbar
and Start Menu—can’t be accessed by running Control.exe.)
Table 1. Command Lines for Launching Individual Control Panel Icons
| Control Panel Icon | Command | Dialog Box Tabs |
|---|
| Add Hardware | control hdwwiz.cpl | N/A |
| Administrative Tools | control admintools | N/A |
| Bluetooth Devices | control bthprops.cpl | 4 |
| Date and Time | control timedate.cpl | 3 |
| Personalization (Display Settings) | control desk.cpl | 1 |
| Ease of Access Center | control access.cpl | N/A |
| Folder Options | control folders | N/A |
| Fonts | control fonts | N/A |
| Game Controllers | control joy.cpl | N/A |
| Internet Options | control inetcpl.cpl | 7 |
| Infrared | control irprops.cpl | 3 |
| iSCSI Initiator | control iscsicpl.cpl | N/A |
| Keyboard | control keyboard | N/A |
| Mouse | control mouse | N/A |
| Network Connections | control ncpa.cpl | N/A |
| People Near Me | control collab.cpl | 2 |
| Pen and Input Devices | control tabletpc.cpl | N/A |
| Phone and Modem Options | control telephon.cpl | N/A |
| Power Options | control powercfg.cpl | N/A |
| Printers | control printers | N/A |
| Programs and Features | control appwiz.cpl | N/A |
| Regional and Language Options | control intl.cpl | 4 |
| Scanners and Cameras | control scannercamer | N/A |
| Security Center | control wscui.cpl | N/A |
| Sound | control mmsys.cpl | 3 |
| System | control sysdm.cpl | 5 |
| TabletPC | control tabletpc.cpl | 3 |
| User Accounts | control nusrmgr.cpl | N/A |
| Windows CardSpace | control infocardcpl.cpl | N/A |
| Windows Firewall | control firewall.cpl | N/A |
| Windows Security Center | control wscui.cpl | N/A |
Note
If
you find your Control Panel folder is bursting at the seams, you can
trim it down to size by removing those icons you never use. There are a
number of ways you can do this in Windows Vista, but the easiest is
probably via group policies.
Easier Access to Control Panel
Control Panel is
certainly a useful and important piece of the Windows Vista package.
It’s even more useful if you can get to it easily. I’ll close this
section by looking at a few methods for gaining quick access to
individual icons and the entire folder.
Alternative Methods for Opening Control Panel Icons
Access to many
Control Panel icons is scattered throughout the Windows Vista interface,
meaning that there’s more than one way to launch an icon. Many of these
alternative methods are faster and more direct than using the Control
Panel folder. Here’s a summary:
Date and Time— Right-click the clock in the notification area and then click Adjust Date/Time.
Personalization— Right-click the desktop and then click Personalize.
Folder Options— In Windows Explorer, select Organize, Folder and Search Options.
Fonts— In Windows Explorer, open the %SystemRoot%\Fonts folder.
Internet Options— In
Internet Explorer, select Tools, Internet Options. Alternatively, click
Start, right-click Internet, and then click Internet Properties.
Network and Sharing Center— Click (or right-click) the Network icon in the notification area and then click Network and Sharing Center.
Power Options— Double-click the Power icon in the notification area.
Default Programs— Select Start, Default Programs.
Sound— Right-click the Volume icon in the notification area and then click Audio Devices.
System— Click Start, right-click Computer, and then click Properties.
Taskbar and Start Menu— Right-click the Start button or an empty section of the taskbar, and then click Properties.
Windows Update— Click Start, All Programs, Windows Update.
Putting Control Panel on the Start Menu
You can turn the Start menu’s Control Panel command into a menu that displays the Control Panel icons by following these steps:
1. | Select Start, Control Panel, Appearance and Personalization, Taskbar and Start menu.
|
2. | Display
the Start Menu tab, ensure that the Start Menu option is activated, and
then click Customize. The Customize Start Menu dialog box appears.
|
3. | In the list of Start menu items, find the Control Panel item and activate the Display as a Menu option.
Tip
To add
the Administrative Tools icon directly to the Start menu, find the
System Administrative Tools item and activate the Display on the All
Programs Menu and the Start Menu option.
|
4. | Click OK.
|
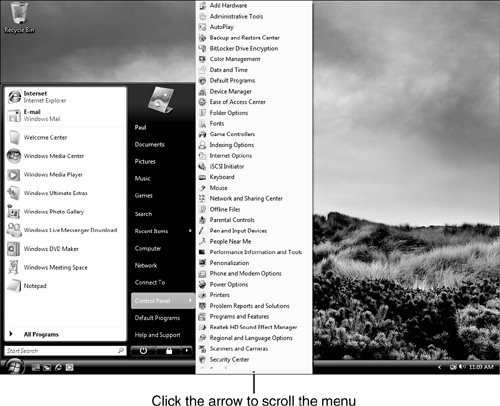
Figure 3
shows the Start menu with the Control Panel item configured as a menu.
Depending on the screen resolution you are using, not all the Control
Panel icons might fit on the screen. In that case, hover the mouse
pointer over the downward-pointing arrow at the bottom of the menu to
scroll through the rest of the icons. (To scroll up, hover the pointer
over the upward-pointing arrow that appears at the top of the menu.)