In theory, theory and practice are the same thing; in
practice, they’re not. That old saw applies perfectly to data backups.
In theory, backing up data is an important part of everyday computing
life. After all, we know that our data is valuable to the point of being
irreplaceable, and you saw earlier that there’s no shortage of causes
that can result in a hard disk crashing: power surges, rogue
applications, virus programs, or just simple wear and tear. In practice,
however, backing up our data always seems to be one of those chores
we’ll get to “tomorrow.” After all, that old hard disk seems to be
humming along just fine, thank you—and anyway, who has time to work
through the few dozen floppy disks you need for even a small backup?
When it comes to backups, theory and practice don’t usually converge until that day you start your system and you get an ugly Invalid system configuration or Hard disk failure
message. Believe me: Losing a hard disk that’s crammed with unarchived
(and now lost) data brings the importance of backing up into focus real
quick. To avoid this sorry fate, you have to find a way to take some of
the pain out of the practice of backing up.
Unfortunately, in
previous versions of Windows, backing up files was never as easy as it
should have been. The Microsoft Backup program from the past few
versions of Windows seemed, at best, an afterthought, a token thrown in
because an operating system should have some
kind of backup program. Most users who were serious about backups
immediately replaced Microsoft Backup with a more robust third-party
alternative.
That might not happen in
Windows Vista because the new backup program—now called Windows
Backup—is quite an improvement on its predecessors:
You can back up to a writeable optical disc, USB Flash drive, external hard disk, or other removable medium.
You can back up to a network share.
After
you set up the program, backing up is completely automated,
particularly if you back up to a resource that has plenty of room to
hold your files (such as a hard disk or roomy network share).
You can create a system image backup—which Microsoft calls a Complete PC backup—that
saves the exact state of your computer and thus enables you to
completely restore your system if your computer dies or is stolen.
If there’s a downside to
Windows Backup, it’s that it’s not very friendly to power users. It’s
completely wizard-driven, and there’s no way to configure a backup
manually.
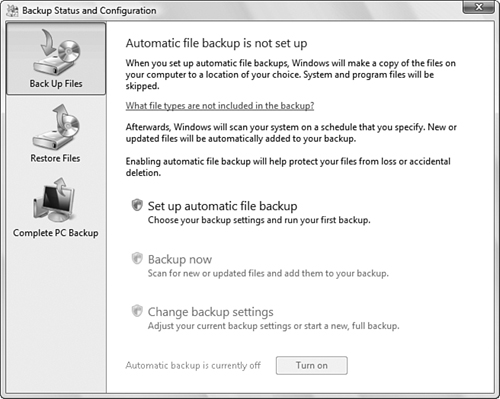
As a measure of how
important automated backups are in Windows Backup, when you first launch
the program (select Start, All Programs, Accessories, System Tools,
Backup Status and Configuration), it displays the page shown in Figure 1.
Configuring Automatic File Backups
Follow these steps to configure and activate Vista’s Automatic File Backup feature:
1. | Click Set Up Automatic File Backup and then enter your UAC credentials to load the Back Up Files Wizard.
|
2. | The wizard first wants to know the backup destination. You have two choices (click Next when you’re ready to continue):
On a Hard Disk, CD, or DVD—
Select this option if you want to use a disk drive on your computer. If
you have multiple drives, use the list to select the one you want to
use.
On a Network—
Select this option if you want to use a shared network folder. Either
type the UNC address of the share or click Browse to use the Browse for
Folder dialog box to select the shared network folder.
|
3. | If
your system has multiple hard drives, the wizard asks you to select
which of them you want to include in the backup. Deactivate the check
box beside any drive you don’t want to include in the backup (you can’t
exclude the system drive, however), and then click Next.
|
4. | The
next dialog box provides you with a long list of file types to back up,
including documents, pictures, videos, and e-mail, as shown in Figure 2. Leave the check boxes activated for those document types you want to include in the backup and then click Next.

|
5. | The next dialog box asks you to set up a backup schedule:
How Often— Select Daily, Weekly, or Monthly.
What Day—
If you chose Weekly, select the day of the week you want the backups to
occur; if you chose Monthly, select the day of the month you want the
backups to occur.
What Time— Select the time of day you want the backup to run. (Choose a time when you won’t be using your computer.)
|
6. | Click
Save Settings and Start Backup to save your configuration and launch
the backup. Windows Backup lets you know that it will perform a full
backup of your system now.
|
7. | Click Yes.
|
8. | Follow
any instructions that appear on screen, particularly if Windows Backup
asks you to insert or format a disc. After the backup starts, click the
File Backup is Running icon in the notification area to watch the
progress.
|
9. | When the backup is done, click Close.
|
The next time you run
Windows Backup, the initial window shows you the backup status, when
your system was last backed up, and when the next backup will occur. The
window also sprouts several new options:
Back Up Now— Click this option to rerun the entire backup.
Change Backup Settings— Click this option to change your backup configuration by running through the Back Up Files Wizard’s dialog boxes again.
Automatic Backup is Currently On— Click the Turn Off button to disable the automatic backup feature.
Creating a System Image Backup
The worst-case scenario for PC problems is a system crash that
renders your hard disk or system files unusable. Your only recourse in
such a case is to start from scratch with either a reformatted hard disk
or a new hard disk. This usually means that you have to reinstall
Windows Vista and then reinstall and reconfigure all your applications.
In other words, you’re looking at the better part of a day or, more
likely, a few days, to recover your system. However, Windows Vista has a
feature that takes most of the pain out of recovering your system.
The safety net used by Complete PC Backup is actually a complete backup of your Windows Vista installation; this is a system image.
It takes a long time to create a system image (at least several hours,
depending on how much stuff you have), but it’s worth it for the peace
of mind. Here are the steps to follow to create the system image:
1. | Select Start, All Programs, Accessories, System Tools, Backup Status and Configuration.
|
2. | Select Complete PC Backup.
|
3. | Click Create a Backup Now and enter your UAC credentials to launch the Windows Complete PC Backup Wizard.
|
4. | The wizard asks you to specify a backup destination. You have two choices (click Next when you’re ready to continue):
On a Hard Disk—
Select this option if you want to use a disk drive on your computer. If
you have multiple drives, use the list to select the one you want to
use.
On One or More DVDs— Select this option if you want to use DVDs to hold the backup.
|
5. | Windows
Complete PC Backup automatically includes your internal hard disk in
the system image, and you can’t change that. However, if you also have
external hard drives, you can add them to the backup by activating their
check boxes. Click Next. Windows Complete PC Backup asks you to confirm
your backup settings.
|
6. | Click Start Backup. Windows Complete PC Backup creates the system image.
|
7. | When the backup is complete, click Close. |
