Using Windows Meeting Space
An
important design goal for Windows Vista is to give users the ability to
share information easily. All too often, users have to share files
through removable media (such as USB flash memory drives) or by using
e-mail to transmit files. Although these methods work, it’s often much
simpler for people to connect directly to a shared workspace. For
example, if several users are located in a meeting room, they might
already have available network connections. All that is required is some
type of application for making the files available. Of course, an
important requirement is for the data to remain secure by allowing only
authorized users to connect to it.
Microsoft designed
Windows Meeting Space to meet the security and usability requirements to
share information.
Setting Up a Meeting Space
The first step in
working with Windows Meeting Space is to set up this feature. To start
the process, launch Windows Meeting Space from the Start menu by
searching for it or clicking the appropriate icon on the All Programs
menu. Figure 27 shows the first screen of the setup process.
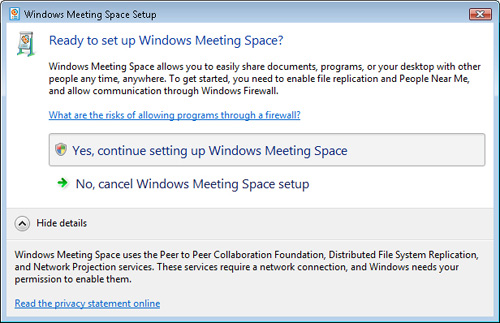
The details section of the dialog box provides a list of the required services and configuration details as follows:
A current network connection
Peer to Peer Collaboration Foundation
Distributed File System Replication
Network Project services
Typically,
the relevant components are enabled automatically. After you click the
button to start the setup process, you’ll see the People Near Me dialog
box (see Figure 28).
This configuration is necessary to identify other users uniquely in the
environment. The display name is what users see when you are
participating in a meeting. You can also choose to specify from which
types of people you can receive invitations. The options are as follows:
Anyone This setting allows any user to send an invitation (although you must still accept it to connect).
Trusted Contacts These people appear in your Windows Contacts list or have a security certificate on the local computer.
No One This setting effectively disables the ability to receive invitations.
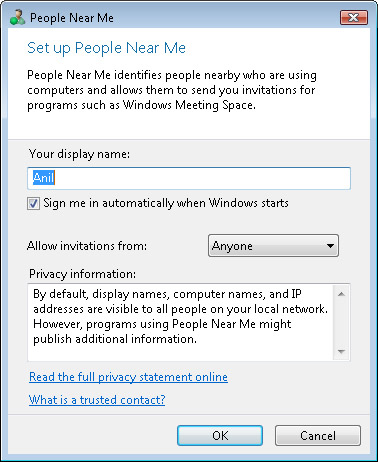
After you define the
People Near Me settings, Windows Meeting Space retains them for the next
time you use Windows Meeting Space or other collaboration features.
Starting a New Meeting
One member of the group that would like to create a meeting should use the Start A New Meeting link to create a meeting space. Figure 29 shows the available options.
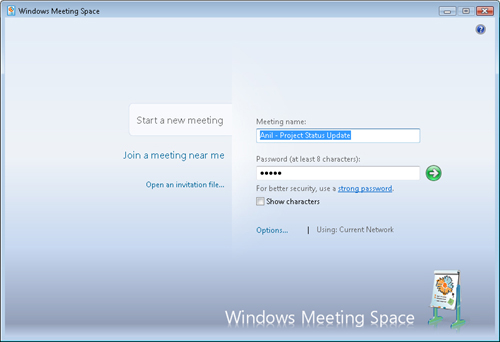
The main setting is the
name of the meeting. This is what other users see when they launch
Windows Meeting Space. Additionally, you must enter a password to be
used by the attendees. Because anyone on the network could potentially
connect, it is recommended that you use a strong password. Clicking the
Options link enables you to configure additional functions. You use the
Visibility Options section to specify whether the meeting is
automatically seen by others on the network. In typical small-business
and home environments, this makes it much easier for people to connect.
If a wireless network adapter is present in the computer, the Network
Options section enables you to create an ad hoc wireless network.
More Info: Creating a strong password
The strength of a
password is based on several different characteristics. For example, the
length of the password, inclusion of different types of characters such
as numbers and symbols, and avoiding obvious personal information can
help keep information secure. For more tips and guidelines, see “Strong
Passwords: How to Create and Use Them” at http://www.microsoft.com/protect/yourself/password/create.mspx.
After you create the meeting, you see a screen that is similar to the one in Figure 30.
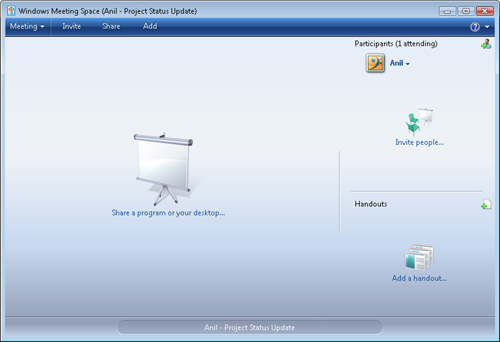
Inviting Meeting Attendees
After you create a new
meeting space, you can choose to invite attendees to the meeting by
clicking the Invite People link or by clicking the Invite button on the
toolbar. You can send an invitation through e-mail or by creating an
invitation file. Both methods generate a Windows Meeting Space
invitation file with a .wcinv extension.
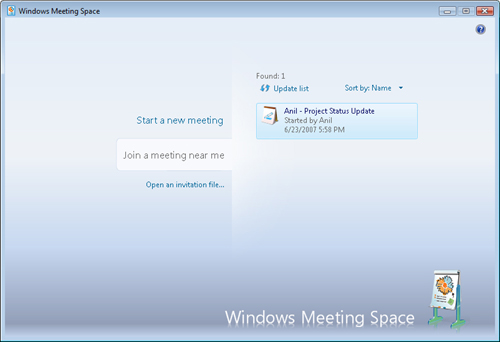
Joining a Meeting
After you have
started Windows Meeting Space, the program automatically searches for
meetings that are located on the network. If a meeting space is found,
you can see the details as shown in Figure 31. To join the meeting, simply click it and provide the password.
You can also join a meeting
by using the Open An Invitation File command. This is useful if you
have received a .wcinv file through e-mail or if one is located on the
network. After the meeting has been joined, all of the attendees see a
similar view.
Sharing Information in Windows Meeting Space
When
multiple users are present in a meeting space, they can share
information in a variety of ways. The first option is to set personal
status information done by selecting the user’s own identity in the
Participants section and choosing a status. The available options are as
follows:
Available
Busy
Be Right Back
Away
The main
information sharing options include sharing handouts and sharing either a
program or the desktop. To share a handout, click the Add A Handout
link. The notice informs you about how handouts work. The handout file
itself is copied to each of the participants’ computers. Only one
participant can modify the contents of the file at a time because the
changes are copied for each of them. The original shared file, however,
remains unmodified.
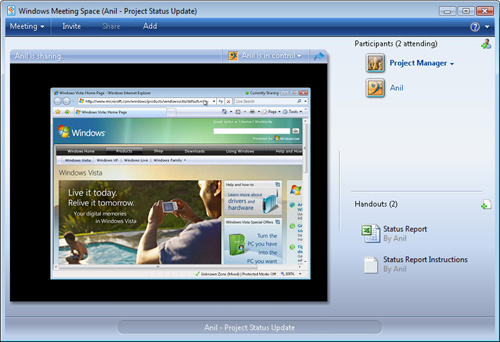
The second option is to
share the desktop or a program. This feature enables others to view
information on one participant’s computer. To start sharing, click the
Share A Program Or Your Desktop link. The resulting dialog box enables
you to specify whether you want to share the entire desktop or only a
specific application window.
After
sharing starts, all of the participants are able to see the user’s
application or desktop window within Windows Meeting Space. Figure 32 shows an example. If an application is shared, a status message of Currently Sharing appears in the program’s title bar.
At any given time, only
one user can have control of the program. Participants can click Request
Control at the top of the interface to request the ability to interact
with the program or the desktop. The user who has control can choose to
view the window as others see it for verification purposes. There is
also an option to view the shared content in full screen mode.
Ending a Meeting
When the meeting is
finished, participants can choose the Leave Meeting item on the Meeting
menu. If handouts were created and modified, each participant is given
the option of saving them. After all participants leave the meeting, the
meeting is ended.
Windows Meeting
Space provides a very useful method of sharing documents and program
windows between users who are located on the same network.
