Working with Windows Mail
After you have properly
configured Windows Mail, most users find the user interface to be
intuitive. In this section, you learn about the major features of the
user interface.
Understanding Default Mail Folders
The main folders that are shown on the left side of the Windows Mail interface include the following:
Inbox This is the location into which all new mail messages are placed.
Outbox
Messages that are waiting to be sent are located in this folder. Unless
there is a configuration issue, Windows Mail sends these messages
during the next send and receive operation.
Sent Items This folder contains a copy of all of the messages that a user sends using Windows Mail.
Deleted Items
This folder acts much like the Recycle Bin in Windows Vista. By
default, Windows Mail stores deleted messages here, so you can restore
them if necessary. You can permanently delete the items by
right-clicking the folder and selecting Empty ‘Deleted Items’ Folder.
Drafts This folder stores all messages that a user creates and saves. Windows Mail does not automatically send these messages.
Junk E-mail This
folder contains suspected junk e-mail messages. Users should
periodically review the contents of this folder to look for any
incorrectly categorized messages.
In addition to the
default mail folders, users can create their own personal folders for
organizing and categorizing messages. Dragging and dropping is the
easiest method for moving messages into such folders.
Configuring Junk E-Mail Settings
A common annoyance
related to sending and receiving e-mail messages is that of junk
e-mails. As a Consumer Support Technician, you’re very likely to be
asked for advice about reducing the wasted time and space junk e-mail
can cause. Most of these messages are sent as unsolicited commercial
communications, but they can also be a serious security concern. It is
very difficult to keep e-mail addresses truly private. Fortunately,
Windows Mail provides an automatic junk e-mail filtering feature. You
can access its settings by clicking Tools and selecting Junk E-mail
Options (see Figure 10).
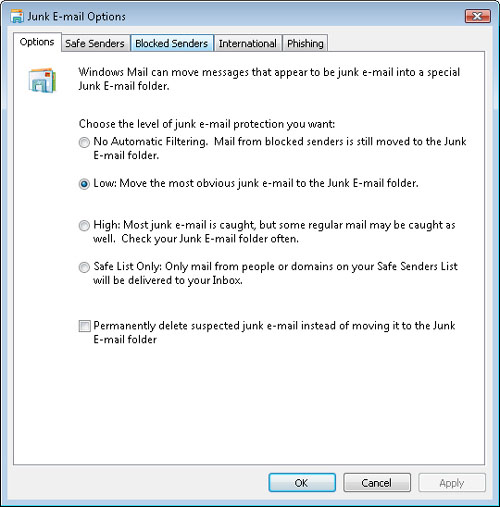
The primary concern
with automatic junk e-mail filtering is the potential of filtering out
legitimate messages. Preventing these “false positives” has to be
balanced with the ability to filter out as many unwanted messages as
possible. The available options with their descriptions are as follows:
No Automatic Filtering Mail from blocked senders is still moved to the Junk E-mail folder.
Low This moves the most obvious junk e-mail to the Junk E-mail folder.
High Most junk e-mail is caught, but some regular mail could be caught as well. Check your Junk E-mail folder often.
Safe List Only Only mail from people or domains on the Safe Senders List is delivered to the Inbox.
The default setting, Low,
is designed to err on the side of caution (that is, it is least likely
to mark legitimate messages incorrectly as junk e-mail). By default,
Windows Mail stores suspected junk e-mail messages in the Junk E-mail
folder, so users can review them manually. There is also an option to
delete these messages permanently if users are confident with their
settings.
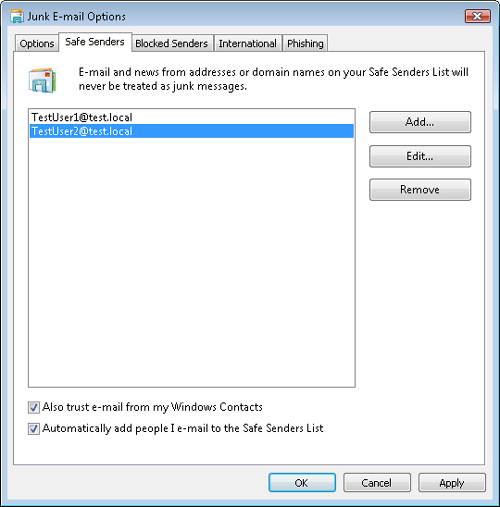
In addition to using the
automatic filtering options, users can choose to create their own Safe
Senders and Blocked Senders e-mail lists, as shown in Figure 11.
Although it can be difficult to maintain these lists manually, the Safe
Senders tab offers two helpful options. The first is to trust any
e-mail addresses automatically that are in the Windows Contacts list
(enabled by default). The second option is to include people
automatically to whom the user sends e-mail messages.
Many junk e-mail
messages are sent from countries other than the user’s home country,
sometimes written in foreign languages. These are obvious indications
that the message is not legitimate. The International tab (shown in Figure 12) provides users with the ability to filter out messages automatically that are sent from certain top-level Internet domains. Figure 13
shows some of the options. Most top-level domain names are based on the
country of origin, and users who don’t often interact with people
outside their country can use these options to reduce the number of junk
messages they receive.
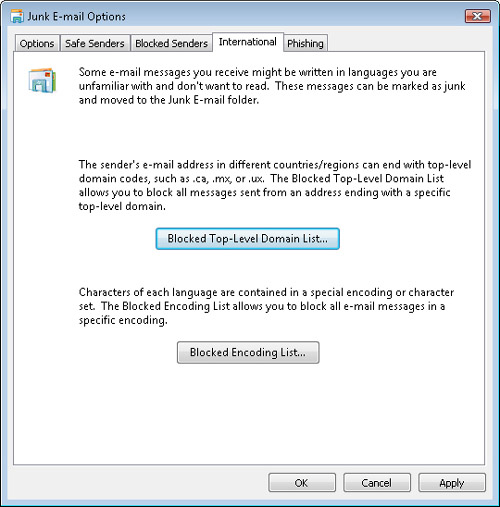

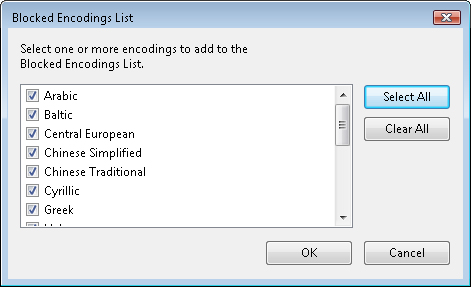
Another
option on the International tab is to block messages based on their
regional encoding. Encoding options are used to specify the language in
which the message is written. Figure 14 provides an example of the available options.
The final tab in the Junk
E-mail Options dialog box is Phishing. Phishing is a method by which
seemingly legitimate e-mails attempt to trick users into accessing Web
sites and providing sensitive information. For example, a message might
appear to have come from a bank or credit card provider and require the
user to access the site to log on. Windows Mail can attempt to detect
these messages automatically and optionally move them to the Junk E-mail
folder.
Junk
e-mail can be annoying and potentially dangerous. By enabling the
advanced filtering options of Windows Mail, however, users can save time
and keep their computers secure.
Configuring Message Rules
Managing large volumes of
e-mail messages can be a time-consuming and error-prone process. For
example, users who receive many messages every day are likely to
overlook important messages or spend too much time trying to manage
lower priority communications. One solution to this is to set up
automatic rules for how Windows Mail should manage these mail messages.
Windows Mail includes a Mail Rules feature that you can configure by
clicking Message Rules on the Tools menu and then clicking Mail. Figure 15 shows an example of a new mail rule.
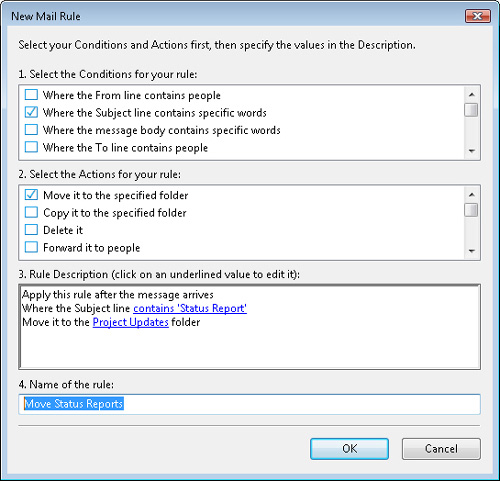
There
are many different options that allow for automatically identifying
messages based on details such as the sender, the subject, contents of
the message, and the To address. Windows Mail can then move or copy
these messages to a specific folder, or it can delete or forward them.
You can create multiple rules and specify the order in which Windows
Mail processes those rules. Overall, message rules can greatly reduce
the common problem of “information overload.”
Customizing the Window Layout
Windows Mail is
likely to become one of the most frequently used applications for many
Internet-enabled users of Windows Vista. In addition to all of the
features you have learned about already, customers can change many
different details about the configuration of the user interface. Panels
and panes can be hidden, shown, or rearranged based on preferences. Figure 16 provides an example of the options that are available when clicking Layout on the View menu.
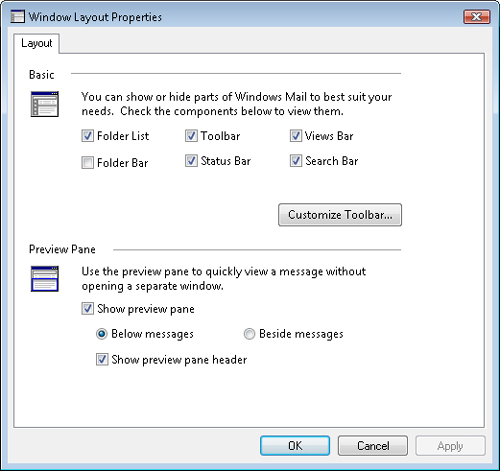
As a Consumer Support
Technician, you might be required to assist new Windows Mail users with
issues in which information might appear to have disappeared. A good
first troubleshooting step is to verify the window layout and other view
options to make sure that they have not been incorrectly modified.
