Accessing Notebook Features with the Mobile PC Control Panel
Most Windows Vista mobility enhancements are designed with a single
purpose in mind: to give you easier access to the notebook-related
features that you use most. That makes sense because when you’re using a
notebook on the go, you might have only a limited amount of battery
power, and you don’t want to waste it trying to locate some obscure
configuration option. And it’s still true that most notebook keyboards
and pointing devices are harder to use than their full-size desktop
counterparts, so the fewer keystrokes and mouse clicks required to
perform Windows tasks, the better.
Your first indication
that Vista wants to make your mobile computing life easier is the new
Mobile PC Control Panel page, shown in Figure 1
(select Start, Control Panel, Mobile PC). The idea behind the Mobile PC
page is to consolidate in a single spot all the Vista configuration
options that are directly or indirectly related to notebooks. Whether
you want to change the screen orientation on your Tablet PC, adjust
settings before a presentation, or change power options, it’s all just a
mouse click or two away.

Monitoring Your Notebook with the Windows Mobility Center
The Mobile PC Control
Panel offers links to a broad range of notebook features. A more
targeted approach is the new Vista Windows Mobility Center, which you
start by clicking the Windows Mobility Center link in the Mobile PC Control Panel. Figure 2
shows the Windows Mobility Center window that appears. (Note that you
only see the full Mobility Center in the Business, Enterprise, and
Ultimate editions of Vista.)

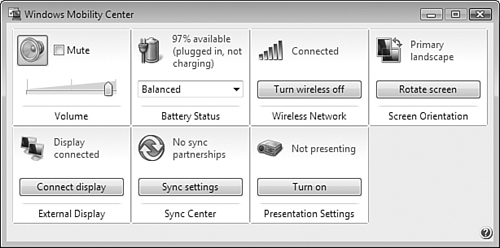
The Mobility Center offers information on eight key notebook areas, as well as controls to adjust these features:
Note
If your notebook
doesn’t support a particular feature, Vista hides the corresponding
Mobility Center module. For example, my ThinkPad X41 Tablet PC doesn’t
support brightness adjustments, so the Brightness module doesn’t show up
in Figure 2. You also don’t see the External Display module if your notebook doesn't have a VGA connector for an external monitor.
Brightness—
The current brightness setting of your notebook screen (if your machine
supports this features). Use the slider to adjust the brightness. Volume— The current notebook speaker volume. Use the slider to adjust the volume or click Mute to toggle sound off and on. Battery Status—
The current charge level of the notebook battery. Use the drop-down
list to select one of three power plans: Balanced, Power Saver, or High
Performance . Wireless Network— The wireless connection status (Connected or Disconnected), and the signal strength, if connected. Screen Orientation— The current orientation of the Tablet PC screen. Click Rotate Screen to rotate the screen by 90° counterclockwise.
External Display— The
current status of the external monitor connected to your notebook or
docking station. Click Connect Display to open the Display Settings
dialog box and work with the second monitor. Sync Center—
The current synchronization status of your offline files. Click the
Sync button to synchronize your notebook’s offline files. Presentation Settings— The current status of your presentation settings. Click Turn On to activate your presentation settings.
Note, too, that Microsoft
is giving PC manufacturers access to the Mobility Center, so we’ll
likely see the Mobility Center window customized with features that are
specific to particular notebooks. Managing Notebook Power
If you must run your
notebook without AC (on an airplane, for example), maximizing battery
life is crucial. Like most of its predecessors, Windows Vista supports
various power schemes—Vista calls them power plans—that
specify different time intervals for when the notebook is plugged in
and when it’s on batteries. However, it’s equally important to monitor
the current state of the battery to avoid a shutdown while you’re
working.
Note
One way that Windows
Vista helps preserve battery power is through its new ReadyDrive
technology, which takes advantage of a new storage medium called the hybrid hard drive.
This is a hard drive that also comes a with non-volatile flash memory
chip, typically with a capacity of 1GB. The size of the flash memory
means that ReadyDrive can write most data to and from the flash memory,
which means much less work for the hard drive and so less of a drain on
the battery. ReadyDrive also enables Vista to enter into and resume from
Sleep mode faster because it can write and restore the notebook’s
current state more quickly by using the flash memory.
Monitoring Battery Life
To help you monitor
battery life, Windows Vista displays the Power icon in the notification
area. When you’re running on AC power, the Power icon also includes a
plug, as shown in Figure 3. When you’re on batteries, the Power icon is completely green and displays without the plug, as shown in Figure 4. As your notebook uses up battery power, the amount of green decreases accordingly.


To see the exact level of battery power remaining, you have three choices:
Open the Mobility Center (as described in the previous section) and examine the Battery Status display. Hover
the mouse pointer over the Power icon. After a second or two, Windows
Vista displays a fly-out that tells you the approximate time left on
battery power and percentage of battery life remaining (see Figure 5).

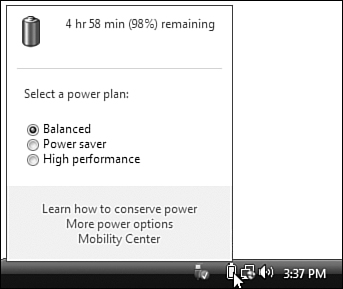
Click the Power icon. Windows Vista displays a larger fly-out, shown in Figure 6,
that not only shows you the approximate time left on battery power and
percentage of battery life remaining, but also enables you to change the
current power plan (Balanced, Power Saver, or High Performance).
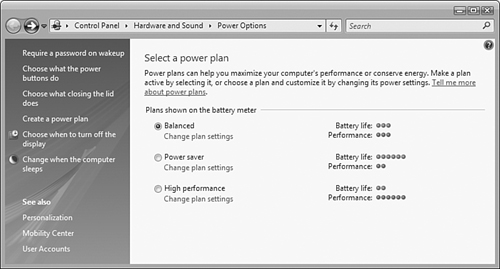
Specifying a Power Plan
Windows Vista shuts down some system components in an effort to keep
your battery running longer. This is controlled by your current power plan,
a power-management configuration that specifies which components shut
down and when Windows Vista does so. Windows Vista has three power
plans:
Power Saver—
Devices such as the screen and hard disk are powered down after a short
idle interval. For example, on battery power, Windows Vista turns off
the notebook screen after 3 minutes and the hard disk after 5 minutes. High Performance—
Devices are powered down only after a longer idle interval, which
improves performance because you’re less likely to have to wait for them
to start up again. For example, on battery power, Windows Vista turns
off the notebook screen and hard disk after 20 minutes. Balanced—
This is the middle road (more or less) between the Power Saver and High
Performance plans. For example, on battery power, Windows Vista turns
off the notebook screen after 5 minutes and the hard disk after 10
minutes.
The default power plan is Balanced, but Windows Vista gives you three methods to change it:
Using the Mobility Center— In the Battery Status section, use the drop-down list to select a power plan. Using the Power icon— Click the Power icon to see the banner shown in Figure 9.6, and then click the power plan you prefer. Using the Power Options window—
Click the Power icon and then click More Power Options (or select
Start, Control Panel, Mobile PC, Power Options) to display the Power
Options window shown in Figure 7; then click a power plan option.
Creating a Custom Power Plan
Vista’s preset power plans are probably fine for most uses, but you
might want to tweak some plan characteristics. For example, you might
want a plan that never turns off the hard disk or that waits longer
before turning off the display when the notebook is on AC power. For
these and other custom plan settings, Vista gives you two choices:
creating your own plan and customizing an existing plan.
Creating Your Own Power Plan
You can set up a new plan
that specifies the intervals when Vista turns off the display and puts
the computer to sleep both while on battery power and while plugged in.
Here are the steps to follow:
1. | In the Power Options window, click Create a Power Plan. Vista displays the Create a Power Plan window.
| 2. | Click the built-in power plan that you want to use as a starting point.
Caution
The custom plan
you create becomes one of Vista’s default plans, meaning it appears in
the fly-out when you click the Power icon and in the plan list in the
Mobility Center. However, Vista replaces
whatever built-in plan you use to get started on your custom plan. (You
can still activate the original built-in plan using the Power Options
window.) Therefore, don’t base a new custom plan off an existing plan
that you activate frequently.
| 3. | Type a Plan Name and click Next. Vista displays the Edit Plan Settings window, shown in Figure 8.
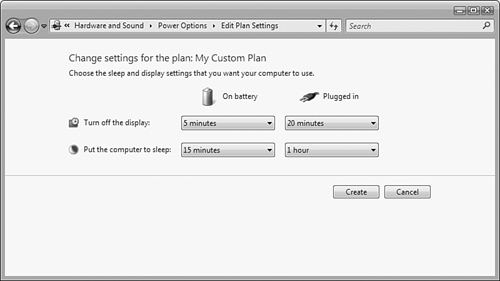
| 4. | In
both the On Battery and Plugged In columns, select an idle interval
after which Vista will turn off the display and put the computer to
sleep.
| 5. | Click Create. Vista creates your custom power plan.
|
Tip
To delete a custom
power plan, open the Power Options window and select a different plan,
if you haven’t already done so. Click the Change Plan Settings link
below your custom plan. In the Edit Plan Settings window, click Delete
This Plan. When Vista asks you to confirm, click OK.
Customizing an Existing Power Plan
Just because you saw in
the previous section that Windows Vista gave only you two measly power
settings—turning off the display and putting the computer to sleep—for
your custom plan, that doesn’t mean that’s the extent of Vista’s power
options, far from it. You can customize any plan (including a custom
plan) with a large number of settings. To work with these settings,
follow these steps:
1. | In
the Power Options window, click the Change Plan Settings link under the
plan you want to customize. You see the Edit Plan Settings window
(shown in Figure 8).
| 2. | Specify your idle intervals for Turn Off the Display and Put the Computer to Sleep.
| 3. | Click the Change Advanced Power Settings link. This displays the Advanced Settings tab, shown in Figure 9, which offers a wide range of power-management settings.
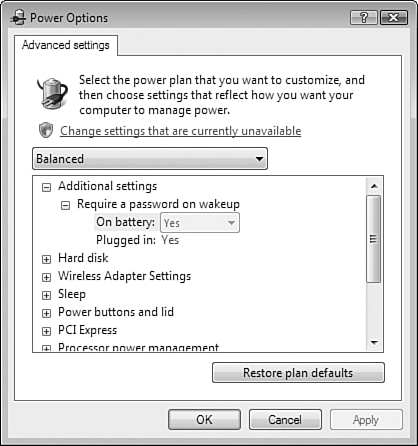
| 4. | Use the branches in the Advanced Settings tab to set your power management options.
Tip
To see all
the available settings, click the Change Settings That Are Currently
Unavailable link, and then enter your UAC credentials.
| 5. | Click OK.
| 6. | Click Save Changes. Vista updates the power plan.
|
Configuring Your Notebook’s Power Buttons
Most newer notebooks enable you to configure three “power buttons”:
closing the lid, using the on/off button, and using the sleep button.
When you activate these buttons, they put your system into sleep mode,
hibernate mode, or turn it off altogether. On some notebooks, there
isn’t a separate sleep button; you simply tap the on/off button quickly.
To configure these buttons for power management in Vista, follow these steps:
1. | In the Power Options window, click the Choose What the Power Buttons Do link to see the System Settings window, shown in Figure 10. Use the lists to configure the power button, sleep button, and lid switch for battery power and AC power.

| 2. | Use the lists to configure the power button, sleep button, and lid switch for battery power and AC power.
Tip
By default, Vista
disables the options in the Password Protection on Wakeup group. This
means that you always have to enter your user account password when
Vista wakes from Sleep or Hibernate mode. If you prefer not to enter
your password each time, you can enable these options by clicking the
Change Settings That Are Currently Unavailable link, and then entering
your UAC credentials. Once you’ve done that, you can click the Don’t
Require a Password option.
| 3. | Click Save Changes. |
|
