From the moment users log on to their computers, they
rely on the ability to accomplish tasks such as launching applications
and working with documents quickly and easily. Perhaps the easiest way
to identify whether a computer is running Windows Vista is to take a
look at the desktop and GUI features. From the look of the taskbar to
the layout of the Start menu, these components are easily identifiable
as part of the Windows Vista operating system (OS).
The Windows Vista
user interface includes many improvements over previous versions of the
Windows platform. Although it provides enhancements to usability and
functionality, there’s an aesthetic aspect that can’t be ignored. To
accommodate a variety of different preferences, the look and feel of
many different settings can be customized. In this lesson, you’ll cover
details related to configuring these options, using Control Panel and
other settings.
Working with Windows Display Settings
Windows Vista has been
designed with a look and feel that is easy to configure and customize,
using simple GUI-based tools. Most of these options are available
directly from within Control Panel, although there are other ways to
access the same settings more quickly. In this section, you’ll walk
through various display-related settings and the effects that they will
have on the look and feel of the desktop.
Accessing Display Settings
The first step in
configuring display settings is to find out how to access these various
options. There are two main ways in which you can access display-related
settings in Windows Vista, as follows:
Using Control Panel
You can access most of the Windows Vista configuration settings through
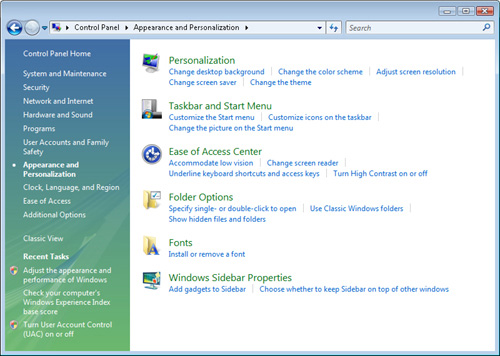
Control Panel. Users access Control Panel by clicking Start → Control
Panel. In the Control Panel Home window, clicking Appearance And
Personalization enables you to access links to additional options (see Figure 1).
Common tasks, such as changing the desktop background and modifying
desktop themes, are accessible from here. If you prefer to use the
Control Panel Classic view, you can access these options by clicking the
Classic View link. The Classic view is similar to that in previous
versions of Windows. You can also use the integrated search feature
within Control Panel to find appropriate settings.
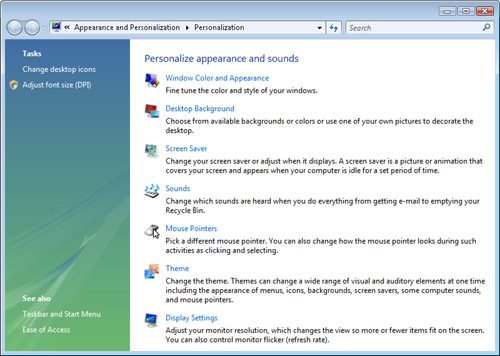
From the desktop By right-clicking the desktop and choosing Personalize, users can quickly jump to the Personalization window (see Figure 2). This is the same window that you access through Control Panel, but you can access it using fewer mouse clicks.
Regardless
of the method used to access the settings, all of the options are the
same. When supporting customers and other users, you can always instruct
them to close any open windows and return to the Personalization window
as a starting point. In the remainder of this lesson, you’ll walk
through the available settings in more detail.
Managing Windows Display Settings
The most
noticeable features of a computer’s display include several settings
that are configured for the video adapter. By default, Windows Vista
tries to choose the most appropriate settings for the computer based on
the capabilities of the installed graphics adapter and display devices.
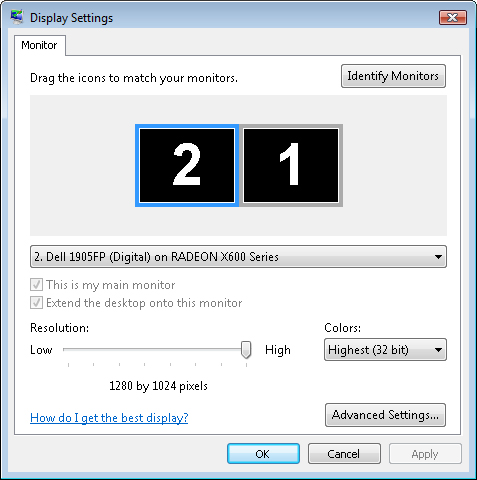
You can configure the primary properties by using the Display Settings dialog box (see Figure 3). The main configuration options include the following:
Resolution Resolution
refers to the number of pixels that are displayed on the screen. Common
resolutions include 1024 × 768 and 1280 × 1024. It is also becoming
increasingly common for desktop and notebook displays to include
widescreen configurations, such as 1680 × 1050. In general, higher
resolutions provide the ability to view more information on the screen
at one time (although the text and application windows might appear
smaller).
Colors
The number of bits used to represent colors can affect the quality of
the overall display. This setting is generally most noticeable in photos
and other images. In general, users should select the maximum number of
colors supported by their video adapter. To use Windows Aero features,
you must select the Highest (32-bit) option.
Screen refresh rate
The refresh rate indicates the number of times the screen is redrawn
per second (the rate is measured in Hertz [Hz]). For cathode ray tube
(CRT) monitors, higher refresh rates result in a more stable image with
less visible flickering. Some users might find that they experience
headaches or fatigue when running at a refresh rate that is too low. In
general, users should select the highest refresh rate that their monitor
and video adapter can support. The maximum refresh rate will vary based
on the capabilities of the video card, the capabilities of the monitor,
and the desktop resolution setting. To access these options, click
Advanced Settings, and then click the Monitor tab (see Figure 4).

For
LCD-based displays, manufacturers usually recommend an optimal refresh
rate. Windows Vista typically detects this refresh rate automatically,
but you can also find the information in the display’s menu system or
documentation.
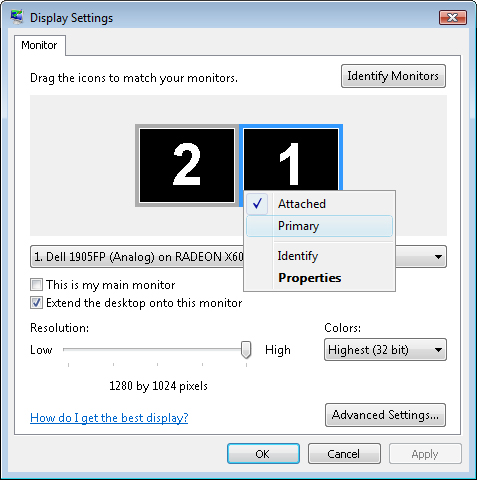
Multiple monitors
Many users have discovered the usability and productivity benefits of
having multiple monitors attached to the same computer. To support
multiple monitors, the computer must have a video card with multiple
outputs, or it might have multiple independent video cards (each
connected to one monitor). Assuming that the computer has this
capability, users can specify the physical arrangement of the monitors
in the Display Settings dialog box (see Figure 5).
Options include the ability to specify which is the main monitor (the
display on which the Start menu and other programs will appear) and to
extend the desktop onto other monitors. If you’re not sure about how the
current monitors are numbered, you can click Identify Monitors to
display the numbers on each screen briefly.
On
CRT-based displays, users often choose their resolution settings based
on personal preferences. Some types of computer displays (such as LCD
flat-panel monitors) use a fixed number of pixels to generate an image.
These displays work best at their recommended optimal resolution. When
run at either a higher or a lower resolution, text might become
difficult to read, and images will appear grainy. In most cases, Windows
Vista is able to detect the supported resolutions of the video adapter
and the optimal resolution of the connected display devices
automatically.
