Managing Windows Features
All editions of
Windows Vista include a large number of different operating system
features and services. By default, the most commonly used programs are
enabled and available for use after installation. For example, tools
such as Windows Mail and various networking options are automatically
available. In some cases, however, you might need to turn specific
features on or off. For example, you might disable a feature because you
are sure that you do not need it, and you don’t want to make it
available.
In other cases, you might
need to enable less commonly used features of the operating system.
These features are sometimes provided for compatibility reasons, such as
compatibility with earlier versions of Microsoft Internet Information
Services (IIS), or they might be seldom-used options that are required
by only some users (for example, the Telnet Server and Telnet Client
features).
To make changes to which
features are turned on or off, open Control Panel and click Programs.
Clicking Turn Windows Features On Or Off launches the Windows Features
dialog box (see Figure 1).
It is important to note that Windows Features are components of the
operating system; they are not programs that you can manage by clicking
Uninstall A Program in Control Panel.
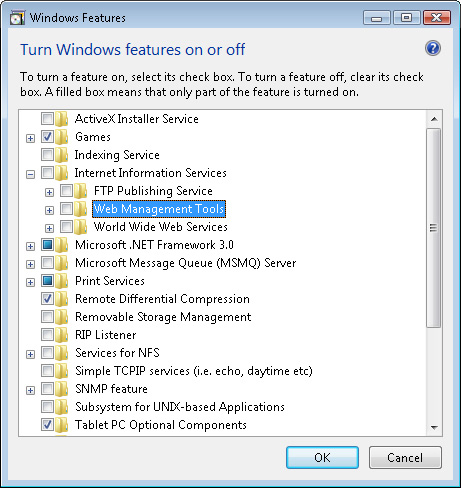
The complete list of
available Windows Features is a very long one. To help organize them,
they are grouped together into folders, which can each be expanded to
display the available subfeatures. There are three states for the check
boxes in each section:
Checked Indicates that the feature is enabled and that all associated lower-level items (if any) are also checked.
Cleared Indicates that the feature is not enabled, and all lower-level items (if any) are also cleared.
Filled Indicates that the feature is partially enabled. That is, at least one lower-level item is selected within the hierarchy.
Users should be advised
not to enable or disable features unless they are fairly certain about
their purpose. In some cases, modifications can cause system-related
problems such as applications and operating system options not working
as expected. For example, some applications on the computer are likely
to require Microsoft .NET Framework 3.0. Disabling it prevents those
applications from running.
To apply the changes,
click OK in the Windows Features dialog box. Windows Vista automatically
determines which files it should add and remove and which operating
system changes it must make. The entire process can take several minutes
and depends on how many different types of changes Windows Vista must
perform. In some cases, it might be necessary to restart the computer.
Configuring Windows Mail for E-Mail
One
of the most important capabilities for most Internet users is the
ability to send and receive e-mail. Therefore, it should come as no
surprise that Windows Vista includes a new e-mail program called Windows
Mail. Windows Mail is a replacement for Microsoft Outlook Express,
which was included in earlier versions of the Windows platform. It
includes a wide variety of new and enhanced features, including the
following:
Support for accessing multiple e-mail accounts, using a variety of different options
Integrated search functionality for quickly finding information stored in even very large mailboxes
Built-in support for browsing newsgroups
Junk e-mail and phishing filters for added security
Windows Mail is
designed to provide a core set of messaging functionality in a program
that is easy for users to configure. You can launch Windows Mail by
searching for it in the Start menu or by accessing the All Programs
group. Windows Mail is configured as the default e-mail program for new
installations and is easily accessible using Start menu shortcuts. Figure 2 shows the main user interface.
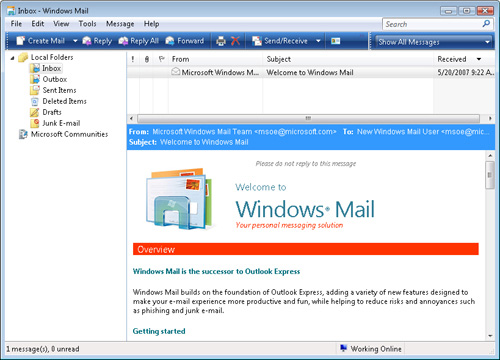
The default view
includes three main sections. The left side of the interface displays a
list of folders, including the e-mail Inbox, Outbox, and other commonly
used groupings. The right side of the interface includes two main
sections. The top section is used to show a list of the messages that
are present in the selected folder or group. The bottom section shows
the contents of the message
itself. This layout allows users to view all of the most important
information easily without having to open each message in a separate
window (although that is still an option).
Although it does not provide
all of the functionality of programs such as Office Outlook, Windows
Mail is an excellent product for home and small-business users who just
need to perform basic tasks. In this section, you’ll learn how you can
configure and use Windows Mail.
More Info: Web-based e-mail vs. Windows Mail
Customers are likely to ask
you about the advantages of using a client-based mail program (such as
Windows Mail) compared with using a Web-based messaging service. Many
Internet users have chosen to obtain free or paid e-mail accounts that
they can access through Web browsers. Examples include Windows Live
Hotmail, Google’s Gmail, and Yahoo! Mail. The primary benefit of these
services is that they are quick and easy to set up. Generally, the only
requirement is a standard Web browser. Usually, all information is
stored online. The primary drawback of Web-based e-mail is usability and
portability. Advanced users will appreciate the many different ways in
which they can access e-mail, using Windows Mail. They’ll also have the
ability to read downloaded messages and compose responses even when
they’re not connected to the Internet. Both options have benefits, and
users might choose to use both client-based and Web-based e-mail.
Preparing to Create E-Mail Accounts
Generally, the first
step you must perform when using Windows Mail is to configure e-mail
accounts. The process is fairly simple, although certain pieces of
information are required. Usually, this information is available from
the customer’s Internet service provider (ISP) or from various online
services. In general, have the following details before beginning the
process of configuring new e-mail accounts:
The user’s name (for example, “Denise Smith”).
The user’s logon information, which generally includes a logon that is the same as the e-mail address and a password.
The user’s e-mail address (for example, Denise [email protected]).
The user’s e-mail server types and addresses.
Any
additional security configuration details that might be required. For
example, server port numbers might be modified from their default
settings.
As a Consumer Support
Technician, you might need to assist users who aren’t aware of the
technical terms and details of configuring e-mail. Next, you’ll learn
how to use this information to create an e-mail account.
Creating E-Mail Accounts
As
mentioned earlier, Windows Mail provides support for multiple e-mail
and newsgroup accounts. When a user first launches Windows Mail, the New
Account Setup Wizard automatically displays. To begin the process of
creating and organizing e-mail accounts manually, click Tools, and then
select Accounts. Figure 3
shows an example of the Internet Accounts dialog box. By default, the
settings for e-mail accounts are blank because no e-mail accounts have
been configured.
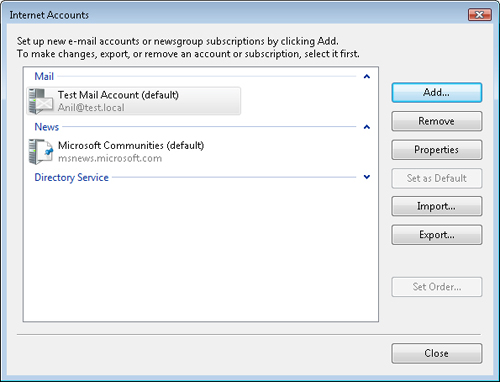
To begin the process of
setting up a new e-mail account, click Add. The first step of the
process enables you to select the type of account that you want to
create. In addition to e-mail accounts, Windows Mail also supports
newsgroup and directory service accounts. The process walks you through
the steps required to create and configure a new e-mail account.
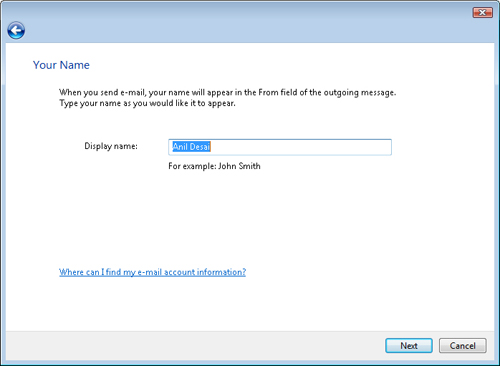
The first step of the process asks for a display name that Windows Mail should display in the From
field in e-mail messages. Users are often confused by this step because
they expect to enter their e-mail address. Although this works, the
e-mail standard is for users to provide their first and last name (and,
optionally, a middle initial). Generally, they should not use their last
name first. Figure 4 shows an example.
The
next step prompts for the full Internet e-mail address of the user
account. This is the address that is used when recipients choose to
reply to messages. This and all subsequent information should be
available from the customer’s e-mail provider.
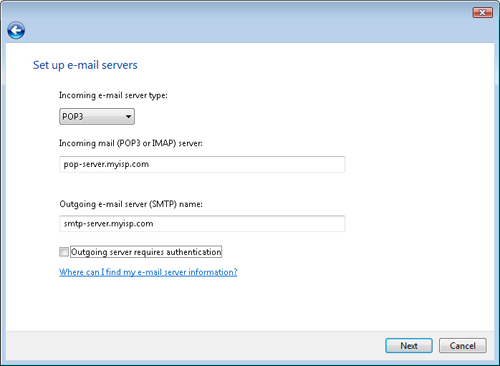
To send and receive
messages, the e-mail account must include details about server
addresses. Windows Mail supports two server types for incoming mail:
Post Office Protocol version 3 (POP3)
This is the most common method for accessing e-mail. This protocol
allows for receiving messages and for performing other basic functions
such as deleting messages from the server.
Internet Message Access Protocol (IMAP)
IMAP is a newer messaging protocol than POP3. It provides basic
functionality for sending and receiving e-mail, but it also allows users
to perform other operations. For example, they can directly access and
organize messages on the e-mail server without downloading them.
Both protocols use the
Transmission Control Protocol/Internet Protocol (TCP/IP) standard and
require the proper configuration of the Windows Vista networking options . Figure 5
shows the server setup options, along with some sample values. POP3 and
IMAP server addresses are generally valid Internet Domain Name System
(DNS) names, although small-business owners might have their own local
mail servers.
More Info: Support for HTTP-based messaging
Windows Mail does
not support direct access to Web-based e-mail using the HTTP protocol.
Depending on the features provided by their Web-based e-mail provider,
users might have the option of sending and receiving messages using the
POP3 or IMAP protocols. If those protocols are supported, users can
configure the settings just as they would for any other type of
supported server.
POP3 and IMAP are the
primary protocols for receiving e-mail. In addition to providing the
incoming server address, users must provide the address of the outgoing
e-mail server. Outgoing e-mail messages are sent using Simple Mail Transfer Protocol (SMTP).
SMTP is the standard by which messages are sent throughout the world.
It is also the primary method by which e-mail servers send messages
between each other. In some cases, the server address might be the same
for the POP3 and SMTP server. Many e-mail server providers allow users
to send SMTP messages without requiring authentication. If a customer’s
ISP requires SMTP authentication, you must select the Outgoing Server
Requires Authentication check box and then configure Windows Mail with
the appropriate user name and password for the SMTP server.
The Internet Mail Logon
step requires the user to provide the required credentials to log on to
the mail server. Often (but not always), the e-mail user name is the
same as the user’s e-mail address. The password is usually provided by
the e-mail provider or was created when the account was originally set
up. For security purposes, users can choose to be prompted for the
password each time a send and receive operation is performed. For
convenience, the password can be remembered automatically, so it is not
required each time.
After
the necessary details have been provided, users can complete the setup
process and click Finish. It is a good idea to check for messages
automatically at this time. Windows Mail attempts to perform a send and
receive operation and provides the resulting details.
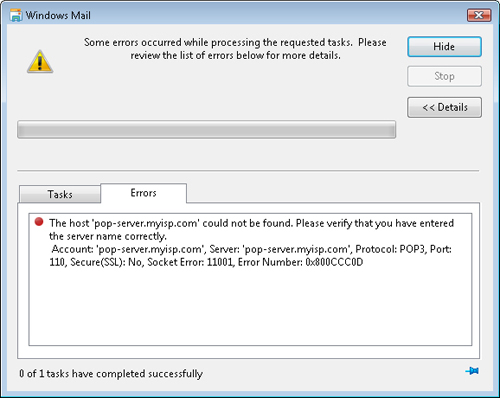
Troubleshooting E-Mail Account Issues
Most users are able to get
up and running with e-mail quickly, as long as they have the required
account setup details. When problems do occur, an error message displays
in the Send And Receive dialog box. Figure 6
provides an example. In this case, the cause of the error is that
Windows Mail could not contact the POP3 server. The most likely cause of
this is incorrect POP3 server address details.
After you
create an e-mail account, you can view, modify, and change additional
options by selecting it and clicking Properties in the Internet Accounts
Properties dialog box. Figure 7
shows an example of the General tab settings. The steps that were
performed to create a new account included only the most commonly
required configuration settings.
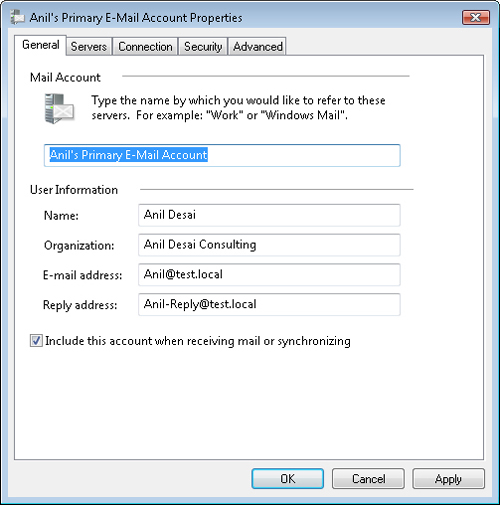
In some cases,
Windows Vista might require additional details. For example, on the
General tab, users can choose to provide a reply address that is
different from their e-mail address, a helpful feature for people who
have more than one e-mail account. Another helpful feature is the
ability to provide a name for the connection (the default is to use the
POP3 or IMAP4 server address information). The Include This Account When
Receiving Mail Or Synchronizing check box determines whether the
account is included in standard send and receive operations. Users can
temporarily disable the use of an account without losing their settings
by clearing this check box.
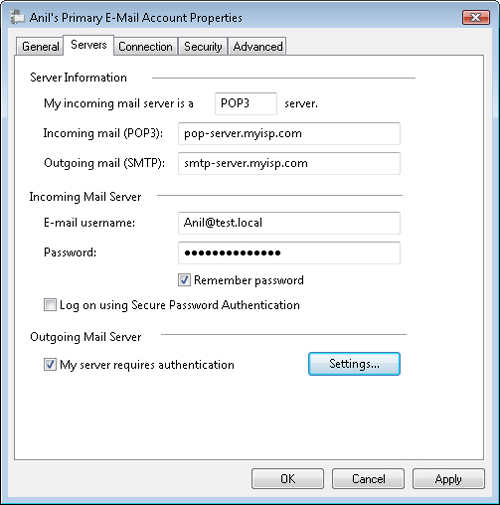
When troubleshooting issues with sending and receiving e-mail, one of the most common sources of errors is the server settings. Figure 8
shows the options that are available on the Servers tab. On this tab,
you can verify that the server addresses are correct and optionally
provide additional authentication details for a user’s SMTP server.
The Connection
tab provides settings that are useful for customers without a persistent
Internet connection. The Security tab includes options for configuring
security certificates. For most home and small-business users, this is
not necessary.
Configuring Advanced Settings
The Advanced tab contains numerous options that are helpful when troubleshooting connection and other related issues. Figure 9
shows the available options. The POP3, IMAP, and SMTP protocol
specifications include standard TCP/IP port numbers for communications.
Windows Mail automatically chooses these default values. Some e-mail
services might change the default server port numbers for security
reasons or based on network considerations. Based on the type of e-mail
server chosen for the account, users can manually change their settings.
Additionally, they can specify whether they want to enable Secure
Sockets Layer (SSL) to encrypt communications. This setting requires
that the server support SSL.
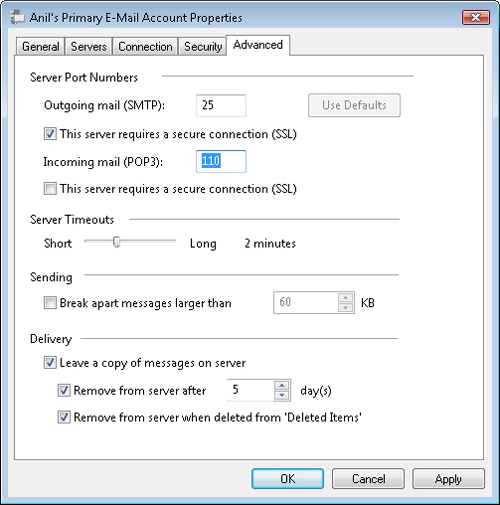
The Server Timeouts
setting is set to a default of one minute. This tells Windows Mail to
stop waiting automatically after this amount of time when sending or
receiving messages. In some cases, slow or unreliable Internet
connections might cause connections to take longer than this amount of
time. In those cases, you can increase the timeout to up to five
minutes. You can use the Sending section to break large messages into
chunks if required by the outgoing e-mail server. This option is not
required for most e-mail servers.
Finally, there is a
set of useful options related to delivery. These settings determine how
e-mail messages are managed on the server. When using POP3, the default
operation is for messages to be deleted automatically from the mail
server after they are downloaded. This helps keep the size of the
mailbox on the server small. What if the user wants to download the same
messages to multiple computers? Or what if the user wants to be able to
access messages through a Web-based interface and by using Windows
Mail? In these cases, you can choose to leave a copy of the messages on
the server. You can then choose to have Windows Mail delete the messages
after a specified number of days, permanently delete them from the
server when the user removes
them from the Deleted Items folder in Windows Mail, or both. Both
options instruct Windows Mail to delete messages during a send and
receive operation.
Importing and Exporting Accounts
In addition to
manually creating and configuring e-mail accounts, users can choose to
import and export their settings. The Internet Accounts dialog box
provides buttons for this functionality. The settings files are known as
Internet Account Files, and they use the default extension of .iaf.
These files can be copied to other computers running Windows Vista to
simplify the setup and configuration process for Windows Mail.
The Internet Accounts
dialog box also provides other useful functions. When you configure
multiple e-mail accounts, it is possible to use the Set Order button to
change the order in which Windows Mail uses e-mail accounts for send and
receive operations. Additionally, you can configure one of the e-mail
accounts using the Set Default button. This makes that account the
default selection when sending and receiving messages. Finally, it is
possible to remove e-mail accounts. When you delete an account, it is no
longer included in send and receive operations. However, all messages
that have already been downloaded for the account are saved on the local
computer until you manually delete them.
