4. Create an Interface for a Registry SettingThe
whole point of messing around in the Registry is to view and modify
settings that are otherwise inaccessible in Explorer, Control Panel, or
the hundreds of dialog boxes scattered throughout the operating system.
However, there is a way to patch into the interface and add checkboxes
and radio buttons that are linked to whatever Registry settings you
want. Why
would you want to do this? Perhaps there's a Registry setting you
change frequently, or maybe you administer a building full of PCs and
there's a feature you want to expose to your users without having them
mess around with the Registry themselves. Start by going to Control Panel → Folder Options → View menu. At first glance, the Advanced settings
list in this dialog box is presented in a somewhat awkward format,
apparently to accommodate the large number of options. However, the
less-than-ideal presentation is actually designed to allow
customization, permitting Microsoft (or you) to easily add or remove
items from the list. See Figure 3 for an example of a customized version of this window. 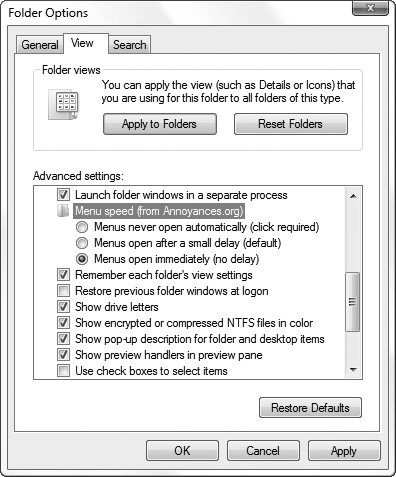
You've
probably guessed that Microsoft didn't make this list of options
customizable for you. Rather, it was designed to accommodate different
settings for different versions of Windows (the actual options present
on your PC, for instance, depend on your edition of Vista). But that
doesn't mean you can't change it around to suit your needs. The
idea is that you link up a checkbox or radio button to a value—any
value you choose—in your Registry. This would, for example, allow you to
make certain Registry changes accessible to yourself or others (such as
users of other PCs you administer), reducing the need for them to mess
around in the Registry. Or, if you're a software developer, you can add
your own program's options to this window. Or, maybe you just want
easier access to a hidden Microsoft setting you find yourself changing
often. The format
is actually quite remarkable, because you don't have to be a programmer
to utilize this feature. You can add new options to a certain portion of
the Registry and then tie those options to values you choose anywhere
else in the Registry. The downside is that it's a little cumbersome to
type it all out, and the options are rather limited. Here's how you do
it: Open the Registry Editor. Expand the branches to HKEY_LOCAL_MACHINE\Software\Microsoft\Windows\CurrentVersion\Explorer\Advanced\Folder. Take a look at the keys inside of the Folder
key. The structure of the hierarchy in the Folder Options window is
reproduced here in the Registry, although the list items will appear in a
different order than their corresponding Registry entries. This is
because the captions in the Folder Options list aren't necessarily the
same as the names of the corresponding Registry keys here, yet both
collections are sorted alphabetically. For example, the Remember each folder's view settings option is represented by the ClassicViewState key in the Registry. Take this opportunity to back up the entire branch by highlighting the Advanced key and selecting Export from the File menu. This way, you'll be able to easily restore the defaults without having to reinstall Windows. At this point, you can remove any unwanted entries by deleting the corresponding keys from this branch; the Text value in each key should be enough to explain what each key is for. To add a new item, start by simply creating a new subkey in the Advanced
key. Name the key anything you want, as long as it doesn't conflict
with a existing key name. Bonus points for a nice, descriptive key name. Some settings are divided into groups, such as Hidden files and folders, which contains two radio buttons. You can create a new group using the existing Hidden key as a template. Then, add new entries to your group by placing subkeys inside your new group key. |
|
The
values inside each key determine the properties of the corresponding
setting. Feel free to fish around the existing keys for examples. Start by adding a new string value to your key named Text, and then double-click it to enter the caption of the new entry. When you're done, add another string value named Type, and type either group, checkbox, or radio
as the value's contents. These two values, plus the others that
determine how your new setting looks in the Folder Options window, are
explained in Table 2. Table 2. Visual properties of Folder Options items|
Value name
|
Datatype
|
Description of value contents
|
|---|
|
Type
|
String
|
This can be set to either group, checkbox, or radio,
representing a folder, checkbox, or radio button, respectively.
Checkboxes are square options and can be either on or off. Radio buttons
are round options that are linked to other radio buttons in the same
folder, in that only one at a time can be selected (you can have
multiple groups of radio buttons). And folders, of course, are used to
organize the various other options. This parameter is required by all
items.
| |
Text
|
String
|
This is the actual caption of the option as it will appear in
the dialog box. This can be as long as you want (better too descriptive
than too vague), but the paradigm dictates that only the first word be
capitalized and that there be no period. This parameter is required by
all items.
| |
Bitmap
|
String
|
This specifies the icon, used for folder items only. If omitted, it's a rather ugly bent arrow. The syntax is filename, index, where filename is the full path and filename of the file containing the icon, and index is the icon number (starting with zero), if the file contains more than one icon. To specify the familiar yellow folder, type %SystemRoot%\system32\Shell32.dll,4 here. This parameter is optional for all folders, and has no effect on checkboxes and radio buttons.
| |
HelpID
|
String
|
This is the filename and optionally the help context ID,
pointing to the documentation for this item. If the user selects the
item and presses the F1 key, this specifies the help note that will
appear. The syntax is filename#id, where filename is the name of a .hlp or .chm file, and id is the numeric help context id (commonly used by programmers) of the topic you want to display. Omit id to simply show the index page of the specified help file. This parameter is optional.
| |
Next, add values—explained in Table 3—to
specify what happens when a specific item is turned on or off in the
Folder Options window. For radio and checkbox items, you'll need the
following values: HKey-Root, RegPath, ValueName, and CheckedValue. (This step isn't necessary if your item is a group.) Table 3. Registry-related properties of Folder Options items|
Value name
|
Datatype
|
Description of value contents
|
|---|
|
HKeyRoot
|
DWORD
|
This is an eight-digit number representing the root of the
Registry path containing the target Registry setting. Use the hexadecimal number 80000000 for HKEY_CLASSES_ROOT, 80000001 for HKEY_CURRENT_USER, 80000002 for HKEY_LOCAL_MACHINE, 80000003 for HKEY_USERS, or 80000005 for HKEY_CURRENT_CONFIG. For some reason, it must be separated from the rest of the Registry path, specified in RegPath, discussed next. This parameter is required for all checkbox and radio items.
| |
RegPath
|
String
|
This is the path specifying the location of the target Registry setting, not including the root (see HKeyRoot, earlier). For example, for HKEY_CURRENT_USER\Software\Microsoft\Windows\CurrentVersion, you would only enter Software\Microsoft\Windows\CurrentVersion here. This parameter is required for all checkbox and radio items.
| |
ValueName
|
String
|
This is the name of the target Registry value. This value is
where the setting data is stored when the option is turned on or off in
the Folder Options window. The key containing said value is specified by
the RegPathHKeyRoot parameters, listed earlier. This parameter is required by all checkbox and radio items.
and | |
Checked- Value
|
Should match target value datatype
|
This holds the data to be stored in the target Registry value (specified by the RegPath and ValueNameon. If you're configuring an option to be used on both Windows 9x/Me and Windows Vista/2000 systems, use both the CheckedValueW95 and CheckedValueNT parameters instead of this value. This parameter is otherwise required by all checkbox and radio items.
parameters earlier), when said option is turned | |
CheckedValueW95
|
Should match target value datatype
|
Use this instead of CheckedValue,
above, if you're configuring an option to be used on both Windows 9x/Me
and Windows Vista/2000 systems. This value contains the data that will
be applied if the system is running Windows 9x/Me. Used in conjunction
with CheckedValueNT, discussed next.
| |
CheckedValueNT
|
Should match target value datatype
|
Use this instead of CheckedValue,
discussed earlier, if you're configuring an option to be used on both
Windows 9x/Me and Windows Vista/2000 systems. This value contains the
data that will be applied if the system is running Windows Vista, 2000,
or NT. Used in conjunction with CheckedValueW95, later.
| |
UnCheckedValue
|
Should match target value datatype
|
This holds the data to be stored in the target Registry value, when said option is turned off. This value is optional; if omitted, it is assumed to be 0.
| |
Default- Value
|
Should match target value datatype
|
This is the default value, used only if the target Registry
value does not already exist. As soon as the option in the Folder
Options window is turned on or off at least once, this parameter is
ignored, and Windows instead reads the state of the target value,
comparing it to CheckedValue and UnCheckedValue to determine if the option should appear checked or unchecked. This value is optional; if omitted, it is assumed to be 0.
|
The value type (String, Binary, DWORD) of the CheckedValue, UnCheckedValue, and DefaultValue parameters all depends on what the target value requires. For example, if the target value you're changing is a DWORD value, then all three of these parameters must also be DWORD values. |
|
After you've created keys and entered the appropriate property values, your Registry should look something like Figure 4, and the resulting Folder Options dialog box should look like Figure 3, shown earlier. If Folder Options is open, you'll have to close it and reopen it for the changes to take effect. 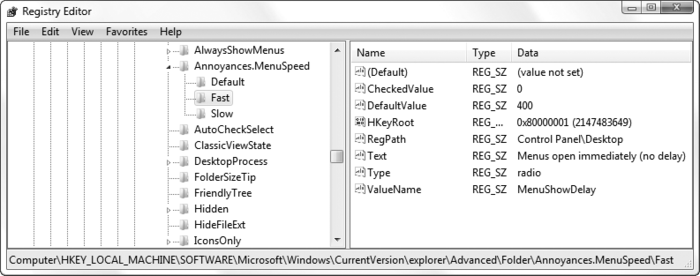
If
you add a setting and it doesn't show up in the Folder Options window
(after closing and reopening it), most likely one or more required
values are missing. |
|
Close the Registry Editor when you're finished.
When
the Folder Options dialog box is first displayed, the current data
stored in each target value is compared with the corresponding CheckedValue and UnCheckedValue, and the option in the Advanced settings list is set accordingly. In other words, if you did everything right, each option in Advanced settings should reflect its own current state. Change a setting and click OK, and the corresponding options are written to the Registry.
|
