1. Letting Your Computer Do the Talking
Windows
Vista provides a program called Narrator that actually speaks to you!
Narrator can describe aloud the items that are currently displayed on
your screen, and it can even read long blocks of text. Narrator has some
limitations, but it can be very useful in the right circumstances. Of
course, for Narrator to work, your computer must have a sound system.
Listen to Narrator
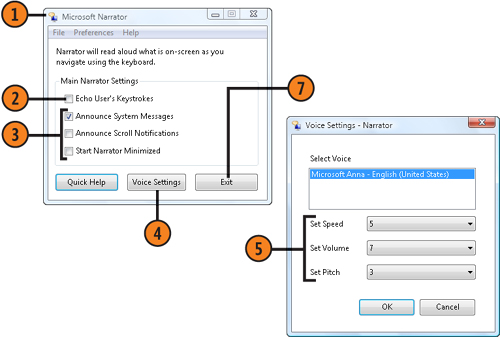
- 1. Start Narrator from the Start menu to display the Narrator dialog box.
- 2. Select this check box if you want Narrator to speak aloud each
keystroke you make so that you can verify that you’re pressing the keys
you want.
- 3. Select or clear any of the check boxes to make Narrator work the way you want.
- 4. Choose Voice Settings to open the Voice Settings dialog box.
- 5. Adjust the reading speed, volume, and pitch of Narrator’s voice. Click OK when you’ve finished.
- 6. Press Alt+Spacebar, and choose Minimize from the Control menu to
minimize Narrator when you’ve adjusted all the settings to your
satisfaction.
- 7. To close Narrator, keep pressing Alt+Tab until Narrator becomes
selected, and then click the Exit button in the Narrator dialog box.
Tip
Narrator
works very well with the speech-recognition program, but it’s designed
primarily to work with the keyboard, so use the Tab key to move around
in a dialog box, or use keyboard shortcuts to activate commands. To
temporarily stop Narrator while it’s reading or describing something,
press the Ctrl key. To have Narrator describe the contents of a window
at any time, press Ctrl+Shift+Spacebar. To hear a description of the
layout, press Ctrl+Alt+Spacebar. |
2. Creating a Sound File
You
can record your own Windows Media Audio (.wma) file from a variety of
sources, depending on the equipment you have on your computer. These
sources can include live or recorded music, narrations, or notes. Once
you’ve recorded it, a .wma file can be played back using Windows Media
Player or Windows Media Center.
Record Sounds
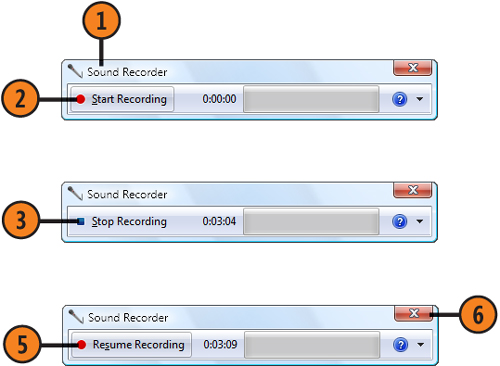
- 1. Start Sound Recorder from the Start menu.
- 2. Click the Start Recording button, and record the sounds you want.
- 3. Click Stop Recording when you’ve finished. If you’ve completed the
recording, use the Save As dialog box to save the sound file with the
name you want in the location you want.
- 4. If you want to continue recording to the same sound file, click Cancel in the Save As dialog box.
- 5. Click Resume Recording, record what you want, and then click Stop
Recording when you’ve finished. Use the Save As dialog box to save the
file with the name and in the location you want.
- 6. Close Sound Recorder when you’ve finished.
Tip
To adjust the recording volume of your microphone, click the Start button, type sound
in the Search box, and click Sound to display the Sound dialog box. On
the Recording tab, double-click your microphone, and adjust the settings
on the Levels tab. |
