Working with Mobile Devices
There are many
different types of mobile devices available today. They range from
relatively simple single-function devices such as music players to fully
capable PDAs that enable users to run complex applications. In the
past, managing these types of devices has been complicated. Hardware
vendors were often required to create their own tools and utilities to
enable synchronizing between different applications. Users often needed
to install and configure multiple applications, each of which had
different user interfaces. In this section, you’ll learn about features in Windows Vista that are designed to simplify the process of working with mobile devices.
More Info: Evaluating mobile devices
When recommending mobile
devices to your customers, you are likely to consider the primary
features of the device. For example, more memory, a faster processor,
and better built-in functions are all useful benefits. However, you
should also keep in mind the convenience and quality of the included
software. Users who plan to synchronize their information with their
computers running Windows Vista should look for the logos that indicate
Windows Vista compatibility. Better yet, devices that are based on the
Microsoft Windows Mobile operating system have been designed to provide a
consistent experience with the Windows platform.
Installing Mobile Devices
The first step in
allowing a mobile device to work with Windows Vista involves connecting
it to a computer. The connection allows the computer to send and receive
data to and from the device. There are several common methods by which
mobile devices can connect to computers running Windows Vista, as
follows:
USB
These wired connections are available on most computers and can be a
convenient way to plug devices into a computer. Some mobile devices have
built-in USB connectors. Others require connection through a cradle or
other device.
Infrared
These connections work over small distances, using the same method used
by a traditional television remote control. Infrared connections are
relatively slow but do enable wireless transfer of information with a
compatible computer.
Bluetooth
The Bluetooth wireless standard provides connectivity with nearby
computers and other devices. To connect to a Bluetooth-compatible mobile
device, a computer must have a Bluetooth receiver. Some notebook
computers come with this functionality included. For other computers,
external Bluetooth receivers (which usually connect to a USB port) are
required. To associate a Bluetooth device with the computer, you must
configure the passkey for the device. This process enables users to
determine which devices should be able to communicate when multiple
Bluetooth-enabled receivers are present.
Serial cables
Serial connections are an old but reliable standard. They are typically
much slower than other connection methods and are most often found on
legacy devices.
Wireless network connections
Some mobile devices provide compatibility with the 802.11 wireless
network standard. These devices can be configured to connect to a
wireless network and communicate with other computers.
Because
mobile devices vary greatly in their connection methods, you need to
refer to the documentation for the device to determine the specific
connection steps. Some mobile devices require users to enable features
such as wireless connections or Bluetooth.
Installing Windows Mobile Device Center
Windows Mobile is
the Microsoft operating system standard for mobile devices. Several
versions of the platform are available. When you connect a Windows
Mobile–based device to a computer running Windows Vista, users are
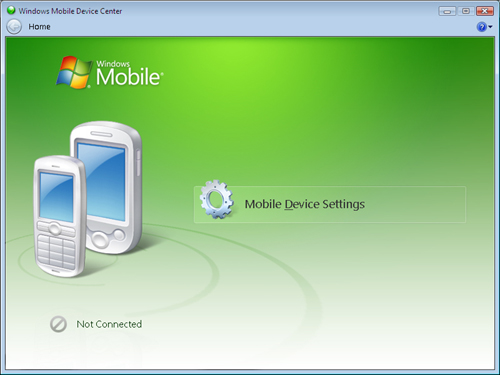
prompted to download and install Windows Mobile Device Center (see Figure 1). This program is the primary method by which users can access various functions of their mobile devices from their computers.
In addition to connecting to a
mobile device, Windows Mobile Device Center includes drivers that
enable other features. For example, you can use Windows Sync Center
(covered later in this lesson) to coordinate data modifications between
devices. The specific available capabilities vary based on the specific
type of device that is being connected.
More Info: Working with Windows Mobile Device Center
The mobile device
industry changes much more rapidly than even the desktop and notebook
markets. For up-to-date information on mobility features and compatible
devices for Windows Vista, see the Windows Mobile Web site at http://www.microsoft.com/windowsmobile/.
Using Windows Mobility Center
Portable
devices such as notebook computers provide many useful features for
customers who travel often or who work at multiple locations. In the
past, the major challenge related to working with these computers was
learning the various hardware-related features and utilities that
enabled access to all of the functionality. Usually, each manufacturer
of portable computers would include its own utilities for managing
screen settings, battery usage, wireless network settings, and other
details. End users often had to install and learn these different
components for each computer they used.
Tip
Although the names are
very similar, be careful not to confuse Windows Mobility Center with the
Windows Mobile Device Center. Windows Mobility Center is designed to
provide functionality for notebook computers and other similar devices
that run the full Windows Vista operating system. The Windows Mobile
Device Center is used to communicate with devices that run the Windows
Mobile operating system.
Windows Vista includes
numerous mobility-related features as part of the base operating system.
This provides consistency and the ability to access the most common
functions easily when using a notebook computer. In addition, it
provides a way for notebook manufacturers to include their own branding
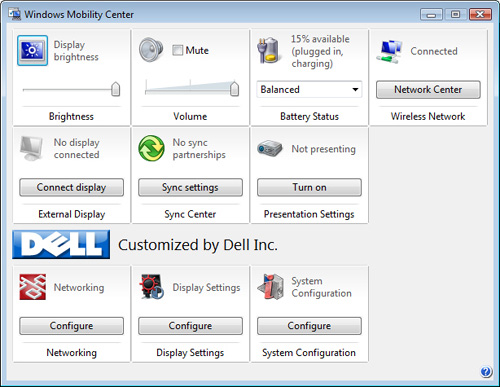
and additional utilities that might be unique to those systems. Figure 2
shows an example of the Windows Mobility Center interface. Note that
the top section includes built-in components that are standard to the
application, whereas the bottom portion includes manufacturer-specific
utilities and features.
Windows
Mobility Center has been designed to be accessible quickly on notebook
computers. The easiest way to access it is by right-clicking the battery
meter icon and selecting Windows Mobility Center. You can also open the
application by searching for it in the Start menu.
More Info: Shortcut keys
Many computer
manufacturers provide an even easier method of accessing commonly used
notebook computer features. Settings such as speaker volume and screen
brightness can often be accessed using dedicated keys or by using a
keyboard combination. For more information, consult the computer’s
documentation.
The default sections of Windows Mobility Center include the following:
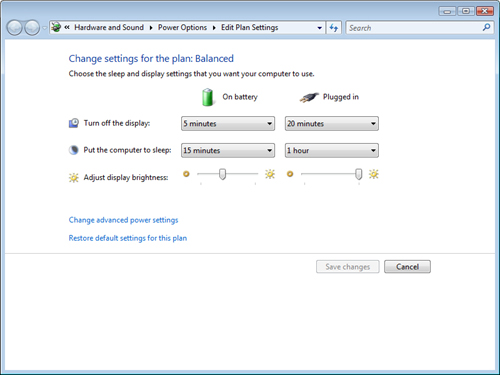
Display Brightness
This option provides a slider bar to change the brightness of the
display quickly. Users often modify this setting based on the external
lighting, available battery charge, and personal preferences. You can
change the default options for brightness by clicking the icon (see Figure 3).
Volume
These settings enable you to mute the computer’s speakers and to change
the master volume. Clicking the icon launches the Sound Control Panel
page.
Battery Status
This section shows the current amount of available battery charge. It
also enables changing quickly between the various power profiles that
are listed in the dropdown list. Clicking the icon loads the Power
Options Control Panel page.
Wireless Network This
section displays the status of the current wireless network connection
(connected or disconnected). Clicking the Network Center button launches
the Network and Sharing Center, which can be used to connect to
wireless networks.
External Display
If an external display device is connected to the computer, this icon
enables you to configure the screen resolution options. Notebook users
who commonly connect to external monitors or to projector devices can
use this option to find associated configuration settings.
Sync Center
This button shows the status of any synchronization partnerships that
have been defined on the computer (if applicable). More information
about using Windows Sync Center is covered later in this lesson.
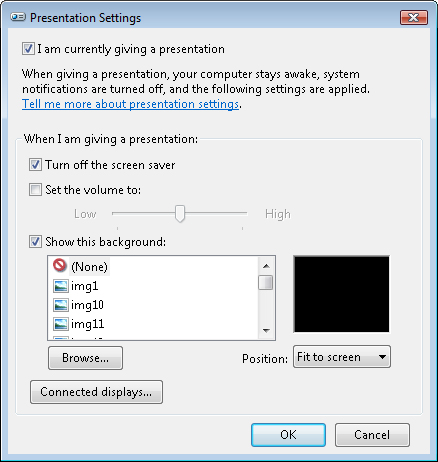
Presentation Settings
When giving a presentation, users often want to make temporary changes
to their computer settings. For example, they might want to choose an
alternate desktop background, change the speaker volume, disable the
screen saver, and suppress various notifications such as new e-mails. Figure 4
shows the options that are available by clicking the Presentation
Settings icon in the system tray when presentation settings are enabled.
Providing these
commonly accessed settings in one place means users do not need to
search through the Control Panel to find mobile device settings.
