Some Group Policy “Problems”
If the administrator of your
network has instituted group policies and hasn’t done a good job of
explaining them, Windows XP might seem to act strangely when it’s really
only honoring these policies. For example, Windows XP might complain
that a password is too short or doesn’t contain a number. These are
almost certainly policy “problems” and not Windows woes at all. A
perusal of the various computer-related and user-related network
settings available in the Group Policy editor will show you the kinds of
things that can be affected. Here’s a summary:
You can’t
specify any exceptions for Windows Firewall—The Computer Configuration,
Administrative Templates, Network, Network Connections, Windows
Firewall, Standard Profile, Windows Firewall: Do Not Allow Exceptions
policy is enabled.
You
can’t activate the Offline Files feature—The Computer Configuration,
Administrative Templates, Network, Offline Files, Allow or Disallow Use
of the Offline File Feature policy is disabled.
The
network logon is slow—The Computer Configuration, Administrative
Templates, System, Logon, Always Wait for the Network at Computer
Startup and Logon policy is enabled.
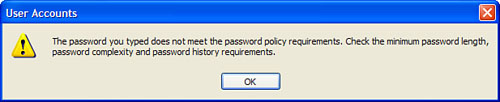
Windows XP displays the dialog box shown in Figure 1—The Windows XP Network, Password, Require Alphanumeric Windows password policy has been activated.
You
can’t access a network connection’s property sheet—The User
Configuration, Administrative Templates, Network, Network Connections,
Prohibit Access to Properties of a LAN Connection policy is enabled.
You
can’t run the New Connection Wizard—The User Configuration,
Administrative Templates, Network, Network Connections, Prohibit Access
to New Connection Wizard policy is enabled.
You’re
not an Administrator and you can’t rename a network connection—The User
Configuration, Administrative Templates, Network, Network Connections,
Ability to Rename LAN Connections policy is disabled.
You’re
an Administrator and you can’t rename a network connection—The User
Configuration, Administrative Templates, Network, Network Connections,
Ability to Rename LAN Connections or Remote Access Connections Available
to All Users policy is disabled.
You
can’t view the status of an active connection—The User Configuration,
Administrative Templates, Network, Network Connections, Prohibit Viewing
of Status for an Active Connection policy is enabled.
Troubleshooting General Network Nuisances
This section takes you
through a few of the most common complaints that crop up with Windows
XP networking and offers some solutions.
You receive a message telling you that A duplicate name exists on the network.
The name you’ve given
to your computer is the same as that of another computer on the
network. Windows XP normally prevents you from changing your computer’s
name to a name that already exists on the network. However, if the other
computer is turned off or disconnected from the network, Windows XP
allows the name change. To change your computer name, follow these
steps:
1. | Open Control Panel’s System icon (or click Start, right-click My Computer, and then click Properties).
|
2. | Display the Computer Name tab.
|
3. | Click Change.
|
4. | Use the Computer Name text box to change the name.
|
5. | Click OK. Windows XP tells you that you have to restart your computer to put the new name into effect.
|
6. | Click OK to return to the System Properties dialog box.
|
7. | Click OK. Windows XP asks whether you want to restart your computer.
|
8. | Click Yes.
|
No other computers appear in your workgroup.
When you’re in the My
Network Places folder, you can click the task pane’s View Workgroup
Computers link to see the other computers in your workgroup.
(Alternatively, use the Folders list to select My Network Places, Entire
Network, Microsoft Windows Network, and then select your workgroup.)
However, you might not see any other computers even though you know
other computers exist in your workgroup.
First, make sure
that you’re using the same workgroup name as the other computers. To
change the workgroup name, follow these steps:
1. | Open Control Panel’s System icon (or click Start, right-click My Computer, and then click Properties).
|
2. | Display the Computer Name tab.
|
3. | Click Change.
|
4. | Use the Workgroup text box to change the workgroup name.
|
5. | Click OK. Windows XP displays a Welcome to the Name Workgroup message (where Name is the new workgroup name).
|
6. | Click OK. Windows XP tells you that you have to restart your computer to put the new name into effect.
|
7. | Click OK to return to the System Properties dialog box.
|
8. | Click OK. Windows XP asks whether you want to restart your computer.
|
9. | Click Yes.
|
If the workgroup name is
correct, see whether you can view the other workgroup computers via the
command line. Open a Command Prompt window and enter the following
command
This displays a list of the other computers in your workgroup. Here’s an example:
Server Name            Remark
-------------------------------------------------------------------------
\\APOLLO               Office Computer
\\HERA                 Karen's Computer
\\HERMES               Notebook Computer
\\ZEUS                 Paul's Computer
The command completed successfully.
If you see the other
workgroup computers now, it might mean that you simply need to
wait—particularly if you’ve recently changed workgroups. Windows XP is
sometimes a bit slow to broadcast changes, so the other workgroup
machines might not show up right away. Reboot and check the workgroup
folder later. In the meantime, you can work with the other computers via
Command Prompt.
Other network users can’t work with your shared folders or printers (or you can’t work with resources shared by other users).
As
long as the other users can see your shared resources, the most likely
culprit here is either that file and printer sharing has been turned off
or is being blocked by the Windows Firewall. To check this out, follow
these steps:
1. | Open the property sheet for your network connection.
|
2. | Display the General tab.
|
3. | Activate the File and Printer Sharing for Microsoft Networks check box.
|
4. | Display the Advanced tab.
|
5. | In the Windows Firewall group, click Settings to display the Windows Firewall dialog box.
|
6. | Display the Exceptions tab.
|
7. | Activate the File and Printer Sharing check box.
Tip
It’s also possible that
the scope of the File and Printer Sharing exception is too limited.
Select the File and Printer Sharing exception, click Edit, and then
click Change Scope. Activate the My Network (Subnet) Only option, and
click OK.
|
8. | Click OK to return to the connection’s property sheet.
|
9. | Click OK.
|
Here are some other things to look for:
Make sure that
you’ve set up an account on your system for each user, and that you’ve
given each user the correct password for the account.
Check
the type of permission you’ve granted each user. For example, a user
given only Read access might complain because he can’t modify a file or
create new files.
Make sure that your shares aren’t hidden. You can hide a shared resource by tacking a dollar sign ($) to the end of its name.
The
user might be attempting to access a shared folder that you’ve deleted,
moved, or stopped sharing. You need to tell the user to either delete
the share from My Network Places or set up a new Network Place.
