Connecting to a Remote System
After
you have your connection set up to your liking, you’re ready to dial
in. HyperTerminal gives you a couple of methods of establishing a
connection with the remote system:
When you save
your first connection, HyperTerminal adds a new HyperTerminal subfolder
to the Start menu’s Communications folder. Select Start, All Programs,
Accessories, Communications, HyperTerminal (the folder, not the program
icon). In the submenu that appears, select the icon of the connection
you want to launch.
In the HyperTerminal program, select File, Open and use the dialog box that appears to open the connection.
In either case, you then
click the Dial button in the Connect dialog box that appears.
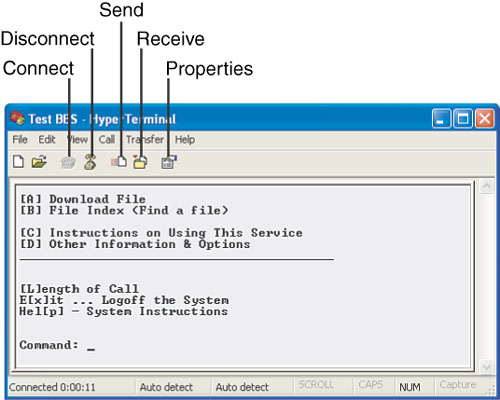
HyperTerminal dials the modem and connects with the remote system. Text
from the remote computer appears in the HyperTerminal window, as shown
in Figure 1. The status bar tells you the length of time you’ve been connected, and also indicates various connection settings.

Performing File Transfers
If the remote system has a
file you want to download, HyperTerminal makes it easy. After you’ve
told the online service the name of the file you want to receive or send
and the protocol to use, the service says something like Ready to send/receive file. Please initiate file transfer. At this point, you tell HyperTerminal that a file transfer is about to take place by using one of the following techniques:
For a download, either select Transfer, Receive File or click the Receive button in the toolbar (refer to Figure 1).
For an upload, either select Transfer, Send File or click the Send button in the toolbar (refer to Figure 1).
For a text file upload, select Transfer, Send Text File.
Note that in some cases, HyperTerminal selects the appropriate command for you automatically.
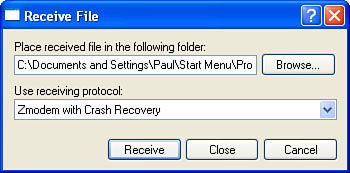
If you’re downloading, the Receive File dialog box, shown in Figure 2,
appears. In the Place Received File in the Following Folder text box,
type the name of the folder in which you want to store the file. If
you’re not sure of the folder’s name, click the Browse button, choose a
folder in the Select a Folder dialog box that appears, and click OK to
return to the Receive File dialog box. To select a protocol, drop down
the Use Receiving Protocol list and choose the same protocol you
selected in the remote system. Click the Receive button when you’re
ready to proceed with the transfer.

If
you’re uploading, either the Send File dialog box or the Send Text File
dialog box appears. Select the file to send, use the Protocol drop-down
list to choose the same protocol you selected in the remote system, and
click Send to make it so.
Whether you’re sending
or receiving, HyperTerminal displays the progress of the transfer in a
dialog box. If for any reason you need to abort the transfer before it’s
complete, you can click the Cancel button. You can also click Skip File
to bypass the current file in a multifile transfer.
When the transfer is
complete, HyperTerminal returns control to the service, and you can
continue with other service options or log off.
Disconnecting from the Remote System
When you’ve finished
working with the remote system, disconnecting is as easy as selecting
Call, Disconnect or clicking the toolbar’s Disconnect button (refer to Figure 1).
Connecting to Another Computer
In addition to the
usual online services and BBS computers, you can also use HyperTerminal
to connect to another PC and then chat with the remote user or send
files back and forth. All that’s required is that both computers be
running HyperTerminal or some other terminal program and that one of the
modems be set up to answer incoming calls.
To set up HyperTerminal for a PC-to-PC connection, follow these steps:
1. | Create a new HyperTerminal connection, following these instructions:
If your computer is doing the dialing, enter the phone number of the remote PC. If
your computer is doing the answering, the phone number doesn’t matter,
but because HyperTerminal requires one anyway, you can just enter a
bogus number. Make sure that both computers are set up with the same connection settings (speed, data bits, emulation, and so on). When HyperTerminal prompts you to dial, click Cancel.
|
2. | Select File, Properties to display the property sheet for the connection, and select the Settings tab.
|
3. | Click the ASCII Setup button to display the ASCII Setup dialog box.
|
4. | Activate the following check boxes:
Send Line Ends with Line Feeds Echo Typed Characters Locally Append Line Feeds to Incoming Line Ends Wrap Lines That Exceed Terminal Width
|
5. | Click OK to return to the property sheet.
|
6. | Click OK.
|
To make the
connection, one computer dials and the other waits for the incoming
call. When you see the ring indicator on the modem or hear the phone
ring, type your modem’s answer command and press Enter. You need to
check your modem manual for the correct command, but on most modems you
use either ATA or just A. (You can avoid this step if your modem supports automatic answering. If it does, check your manual to see how to set it up.)
After the connection has
been established, you can send messages back and forth by typing
onscreen and pressing Enter after each line. File transfers work just as
I described earlier.
Entering AT Commands in HyperTerminal
If you’re familiar with the AT
command set, you might need to send a command or two to your modem. If
so, here are the steps to follow to send commands via HyperTerminal:
1. | Start HyperTerminal.
|
2. | Enter a name for the connection (for example, AT Commands), select an icon, and click OK.
|
3. | In the Phone Number dialog box, use the Connect using drop-down list to choose Comx, where x is the port number to which your modem is attached, and then click OK.
|
4. | When the port property sheet appears, click OK. The HyperTerminal window appears.
|
5. | Select File, Properties, activate the Settings tab, and click ASCII Setup.
|
6. | In
the ASCII Setup dialog box, activate the Send Line Ends with Line Feeds
check box and make sure that the Echo Typed Characters Locally Check
Box is deactivated. Click OK.
|
7. | Click OK to return to HyperTerminal.
|
You can now enter AT commands in the terminal window. Don’t forget to save your connection so that you can reuse it at any time.