Logo
programming4us
programming4us
programming4us
programming4us
Home
programming4us
XP
programming4us
Windows Vista
programming4us
Windows 7
programming4us
Windows Azure
programming4us
Windows Server
programming4us
Windows Phone
 
programming4us
Windows 7

Advanced Windows 7 Programming : Working in the Background - DEVELOPING TRIGGER-START SERVICES (part 6)

- Free product key for windows 10
- Free Product Key for Microsoft office 365
- Malwarebytes Premium 3.7.1 Serial Keys (LifeTime) 2019
3/8/2014 8:29:25 PM
5.2. Installing the Service

After you build the service, you need to install it before you can use it. Because this is a trigger-start service, you also need to verify that the service installed correctly. You want to be sure that the service installed as you intended it to install, rather than as a standard service. The following steps help you install the service:

  1. Choose Start => All Programs => Microsoft Visual Studio 2010 => Visual Studio Tools. Right-click the Visual Studio Command Prompt (2010) entry and choose Run As Administrator from the Context menu. You'll see a command prompt window open.

  2. Change directories to the directory that contains the service.

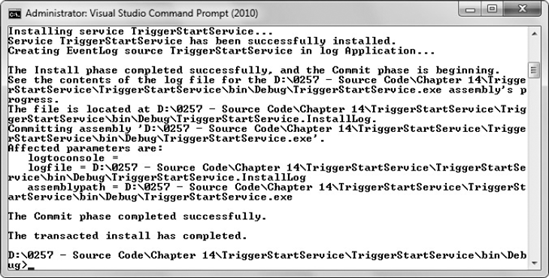
  3. Type InstallUtil TriggerStartService.EXE and press Enter. You'll see a number of messages appear as InstallUtil installs the service. Your command prompt will look similar to the one shown in Figure 8. The important message appears at the end: "The Commit phase completed successfully."
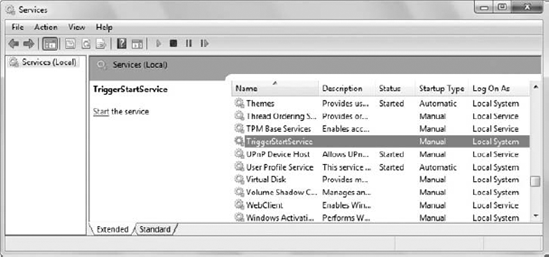
  4. Open the Services console found in the Administrative Tools folder of the Control Panel. Locate the TriggerStartService entry, as shown in Figure 9. Notice that the TriggerStartService is set to start manually, not automatically. In addition, the service should log in using the LocalSystem account, as shown in the figure. If you see these entries, then you'll know that the TriggerStartService has at least installed successfully. However, you still don't know whether it has installed as a trigger-start service.

    Figure 8. Install the TriggerStartService.EXE file as a service.
    Figure 9. You need to verify that the TriggerStartService installed successfully.
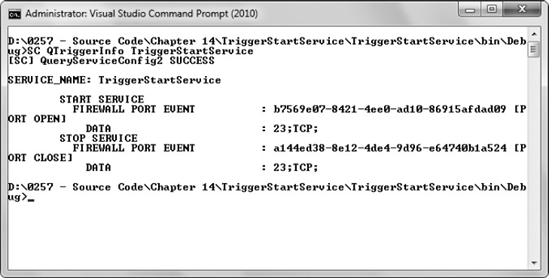
  5. At the command prompt, type SC QTriggerInfo TriggerStartService and press Enter. The SC utility will tell you the trigger-start service status of a service when you use the QTriggerInfo command. Figure 10 shows the results you should see. If you see this output, then you know that the service has installed as a trigger-start service. Notice that the output tells you that this service is waiting for a firewall port event, and that it's looking at Port 23 — precisely what you had programmed into the service.

    Figure 10. You need to verify that the TriggerStartService installed as a trigger-start service.
Other -----------------
- Advanced Windows 7 Programming : Working in the Background - ADVANTAGES OF WORKING IN THE BACKGROUND
- Microsoft Visio 2010 : Importing Graphics (part 6) - Importing AutoCAD Drawings - Manipulating an Imported AutoCAD Drawing and Adding Furniture
- Microsoft Visio 2010 : Importing Graphics (part 5) - Importing AutoCAD Drawings - Inserting an AutoCAD File
- Microsoft Visio 2010 : Importing Graphics (part 4) - Adding Excel Charts to Your Diagrams, Importing Vector Graphics
- Microsoft Visio 2010 : Importing Graphics (part 3) - Adding Clip Art to Your Diagrams
- Microsoft Visio 2010 : Importing Graphics (part 2) - Using Images as Shapes in Visio - Handling Bitmaps and Jaggies
- Microsoft Visio 2010 : Importing Graphics (part 1) - Using Images as Shapes in Visio - Working with Images
- Microsoft Visio 2010 : Using Special Shape Features (part 2) - Control Handles , Hyperlinks, Action Tags
- Microsoft Visio 2010 : Using Special Shape Features (part 1) - Right-Click Actions,Shape Data Fields
- Microsoft Visio 2010 : Working with Text (part 3) - Text Resizing Behavior
 
 
Top 10
- Microsoft Visio 2013 : Adding Structure to Your Diagrams - Finding containers and lists in Visio (part 2) - Wireframes,Legends
- Microsoft Visio 2013 : Adding Structure to Your Diagrams - Finding containers and lists in Visio (part 1) - Swimlanes
- Microsoft Visio 2013 : Adding Structure to Your Diagrams - Formatting and sizing lists
- Microsoft Visio 2013 : Adding Structure to Your Diagrams - Adding shapes to lists
- Microsoft Visio 2013 : Adding Structure to Your Diagrams - Sizing containers
- Microsoft Access 2010 : Control Properties and Why to Use Them (part 3) - The Other Properties of a Control
- Microsoft Access 2010 : Control Properties and Why to Use Them (part 2) - The Data Properties of a Control
- Microsoft Access 2010 : Control Properties and Why to Use Them (part 1) - The Format Properties of a Control
- Microsoft Access 2010 : Form Properties and Why Should You Use Them - Working with the Properties Window
- Microsoft Visio 2013 : Using the Organization Chart Wizard with new data
 
programming4us
Windows Vista
programming4us
Windows 7
programming4us
Windows Azure
programming4us
Windows Server