When you get right down to it, a computer is useless
without software. The hardware allows it to host an operating system.
The operating system allows it to run software or applications. The
applications are needed to make the box productive.
Although some
applications are installed by default on Windows 7, such as Internet
Explorer and Windows Media Player, most users need more. These
applications need to be installed.
Applications are distributed in one of the following formats:
Msi
This is a Windows installer (.msi)
package file. It uses the Windows Installer engine to complete the
installation. Windows Installer was previously known as Microsoft
Installer. Microsoft recommends the use of installer packages for
third-party applications.
Msu
This is a Microsoft update (.msu) package. It is installed using the Windows Update Stand-alone Installer.
Exe
This is an executable
file. It is sometimes used by developers to check the environment
before calling the installer package. For example, an application may
require a specific version of the .NET Framework. The .exe
file can be used to check to see if the framework exists, and if not,
it can then install it. After the prerequisites are checked and
installed, the .msi file is called to install the application.
Installing applications on
a local system is straightforward. You browse to the file, double-click
it, and the installation begins. If Autorun is enabled on your system,
you may just need to put in the CD and click the prompt to start the
installation.
However, there are some other items to consider when installing and configuring software:
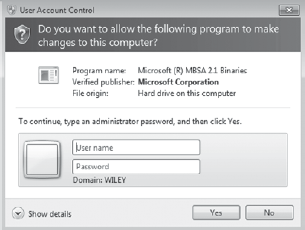
1. Installation Permissions
Administrative permissions are required to install software. If a user is logged on as a regular user, the prompt shown in Figure 1
will appear at some point during the installation. As long as the user
can provide credentials for an account with local administrative
permissions, the installation will continue.
NOTE
Administrative permissions are also required to uninstall an application.
UAC uses two access
tokens when a user is logged on with administrative permissions. One
token is as a regular user and the other token is as an administrator. A
regular user access token is used for most activities. When advanced
privileges are needed, UAC prompts the user before using the access
token with administrative permissions.
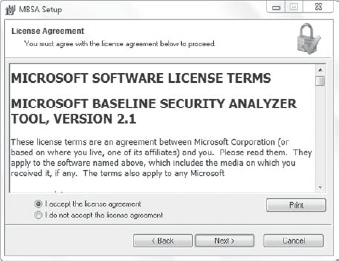
2. Licensing Restrictions
Almost any software you
purchase or install has a software license associated with it. This is
also called an end-user license agreement (EULA).
Figure 2
shows the EULA for the Microsoft Baseline Security Analyzer tool.
Almost all software requires you to indicate that you accept the license
agreement before the installation will continue. This is often done by
changing the selection to indicate you accept it, as shown in the
figure.
It's common for a EULA
legally to restrict the installation of the software to a single system.
Some EULAs grant you the right to install it on multiple systems. A
EULA typically applies to the application and any subsequent updates to
the application.
3. Digital Signing
Software applications can be sophisticated. The magic that is possible very often approaches the "wow" factor.
However, many attackers can
also write some sophisticated applications. The damage that they inflict
on a system or your personal finances can also approach the "wow"
factor, though not in a good way. If you've ever been infected with
malware, you may have substituted "wow" with another word or two.
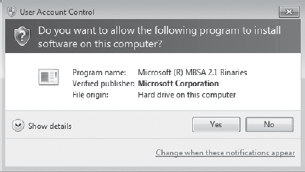
One of the ways that you can
protect yourself and systems on your network is to ensure that software
is digitally signed before installing it. Digitally signed software provides verification that the software has been published by a specific company.
As an example, Figure 3 shows the UAC prompt for software that was released by Microsoft. Microsoft Corporation is listed as the Verified Publisher.
|
If the software is digitally signed but the publisher can't be verified, the Verified Publisher will be listed as Unknown.
|
|
If this software does
something wrong or malicious to your system, you know who wrote it. You
can go back to the company for a resolution. Digitally signed software
provides authentication and integrity.
Authentication
This allows anyone who uses the software to verify the origin. The
digital signature proves who created the original file. This step
requires that the certificate be obtained from a trusted certificate
authority.
Integrity
This ensures that the software hasn't been modified after it was
signed. For example, if a virus infected the installation file, the
digital signature would no longer match. As long as the signature is
valid, you know the file has not been modified.
Digital signatures require the support of a Public Key Infrastructure (PKI).
A PKI issues certificates, including certificates used for digital
signatures. In addition, PKIs use public and private key pairs for the
certificates.
Private key
Anything encrypted with a private key can be decrypted only with the
corresponding public key. The private key always stays private.
Public key
Anything encrypted with a public key can be decrypted only with the
corresponding private key. The public key is freely shared and included
in a certificate.
Public/private key pair
These are pairs. Anything encrypted using a key from one public/private
key pair can't be decrypted with a key from another public/private key
pair.
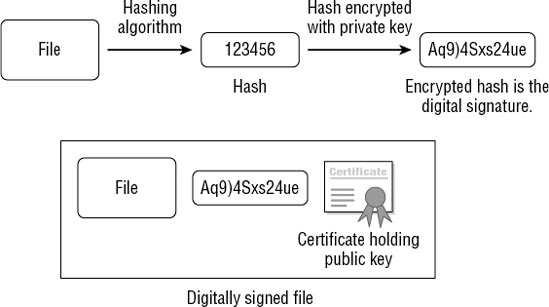
Figure 4
shows how a digital signature is created for a file. The first step is
to create a hash of the file. A hash is simply a number. It's created by
performing a calculation (a hashing algorithm) on a string of data such
as a message or a file. The hash is then encrypted with a private key.
The original file is then packaged with the encrypted hash and the
certificate holding the public key.
NOTE
A hash will always be the
same when it is calculated on an unchanged file. As long as the data is
not changed, the hash will always be the same. This verifies integrity
of the data.
Remember, this public key
is matched to the private key that encrypted the hash. In other words,
because the hash was encrypted with the private key, only the matching
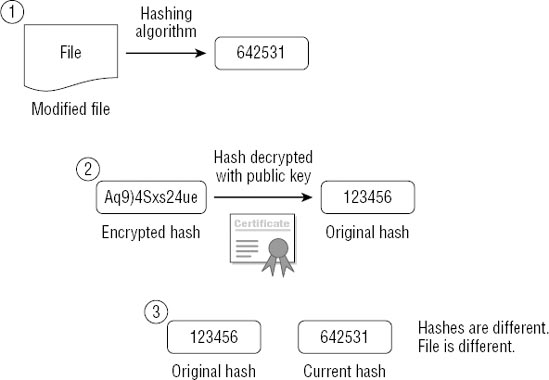
public key can decrypt it. Figure 5 shows how this digitally signed file is later used with the installation file in a three-step process.
In
the first step, the hash is calculated on the installation file. For
this example, imagine that the file has been infected with malware. It
has been modified. Since the file is different, the calculated hash is
also different (642531 instead of 123456).
In the second step, the encrypted hash is decrypted using the public key. This gives the original hash of 123456.
The
last step compares the two. If the hashes are the same, the file has
maintained integrity. However, if the hashes are different, the file is
no longer the same. The installation reports a problem and installation
is not recommended.
|
Digital signatures can also be used for driver files, macros, and scripts.
|
|
What if the malware writer
wants to get creative? There are two possibilities. The first one won't
work, but the second one has a chance of success.
Providing a different hash
Instead of only modifying the file, what if the malware also creates a
new hash and encrypts it? This will fail. The encrypted hash must be
encrypted with the private key in order to be decrypted with the public
key that is included in the digital signature. However, the private key
is kept private and isn't available. If the encrypted hash is replaced
with other data, the public key won't be able to decrypt it and the
installation will report a problem. At that point the installation is
not recommended.
Providing a different digital signature
What if the malware writer creates and provides a certificate for the
infected file? In this situation, the writer does not purchase a
certificate but, instead, creates one. Needless to say, this certificate
doesn't identify the actual creator of the malware. A new hash is
created and encrypted with the private key. The new digital signature
includes the infected file, the new hash, and the new certificate. The
certificate includes the matching public key. When the installation
starts, a problem won't be discovered unless the certificate is
verified.
You may be saying,
"Wait a minute. I thought the certificate provides authentication." It
does, but only if the certificate can be verified.
To overcome this
vulnerability, you need to ensure that the publisher can be verified.
The certificate used to sign software should come from a trusted certificate authority (CA).
A commercial CA will verify the identity of anyone who purchases a
certificate. If you trust the CA, you automatically trust any
certificates issued from the CA.
This is similar to a driver's
license issued from a department of motor vehicles (DMV). Since a
merchant trusts the DMV when you present your driver's license to make a
purchase, they will also trust the validity of the driver's license.
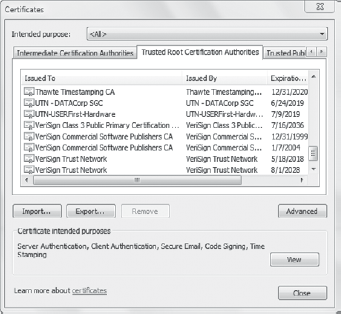
Figure 6
shows a partial list of the Trusted Root Certification Authorities
store. If a software company purchases a certificate from the VeriSign
Commercial Software Publishers CA, that software certificate will be
trusted because the CA is trusted.
On the other hand, if the
attacker created a certificate authority to issue certificates, it would
not be listed in the Trusted Root Certification Authorities store. The
attacker's certificates could not be verified.
You can view the Trusted
Root Certification Authorities store from Internet Explorer. Launch
Internet Explorer and then select Tools => Internet Options. Select the Content tab => Certificates => Trusted Root Certification Authorities.
|
It's possible to add
additional certificates to the Trusted Root Certification Authorities
store. For example, you can add certificates to employee computers for
internal certification authorities.
|
|
4. Enabling and Disabling Features
When you first install
Windows 7, not all of the features are added by default. In addition,
some of the features that are installed can be removed. You can use the Windows Features tool to add or remove features.
Figure 7 shows the Windows Features screen expanded to show all of the available features. You can access this from the Control Panel => Programs => Programs And Features => Turn Windows Features On And Off link.

Click Start => Control Panel. Type Features in the Control Panel Search box located in the upper-right corner. Click
Programs And Features. Note that this is populated with all of the
installed applications. You can use this page to uninstall applications
by selecting an application and clicking Uninstall. Click Turn Windows Features On Or Off. On
the Windows Features screen, deselect the check box for Games if it is
selected. If it's already deselected, you can select it to add Games.
Click OK. After a moment, Windows Features will complete and the window will close.
|
You can access Local Group
Policy by adding the Group Policy Object Editor snap-in for the local
computer to an MMC. An easier way is to click Start, type Group in the
Start Search text box, and select Edit Group Policy.
|
The settings available in
Group Policy can be applied at the site, domain, or OU level, and those
available in Local Group Policy apply to a single computer. The path for
a domain Group Policy starts with User Configuration => Policies => Administrative Templates. The path for Local Group Policy starts with User Configuration => Administrative Templates.
|
|
Hide Windows Features
This setting removes
access to Windows Features. This prevents users from adding or removing
any features. This setting is located in the Administrative Templates => Control Panel => Programs node.
Hide Programs And Features Page
With this setting
enabled, users won't be able to access the Programs And Features page at
all. This also prevents them from uninstalling programs, viewing
installed updates, and uninstalling updates. This setting is located in
the Administrative Templates => Control Panel => Programs node.
Hide The Programs Control Panel
This option removes
the Programs link in Control Panel and all programs within the Programs
link. It includes Programs, Default Programs, and Desktop Gadgets. This
setting is located in the Administrative Templates => Control Panel => Programs node.
