Windows Server Update Services is a free download you
can install on a Windows server. It's used as a central location to
download, approve, and deploy updates.
Figure 1
shows a typical configuration using WSUS in an enterprise. In the
figure, the WSUS server retrieves updates from the Microsoft update site
and all clients receive their updates from the WSUS server.
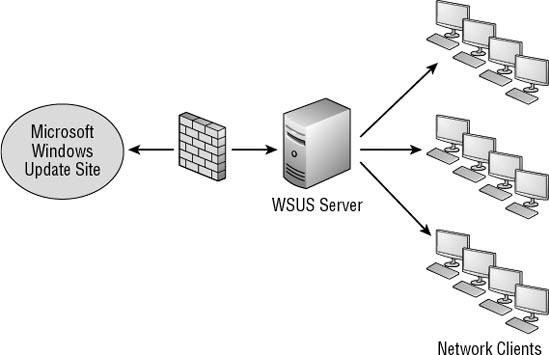
An administrator chooses
which updates to download to WSUS. Once the updates have been
downloaded, they can be tested, approved, and deployed to clients. WSUS
allows you to organize computers in groups, so it's possible to approve
an update for one group of computers but not another group.
Although Figure 1
shows only 12 network clients, your network could have many more. In a
large network, you may even choose to use multiple WSUS servers.
Figure 2
shows a typical configuration when multiple WSUS servers are used. A
single WSUS server is used to download updates from the Microsoft update
site and is referred to as the upstream server. WSUS servers that receive updates from the upstream server are referred to as downstream servers.
Downstream WSUS servers retrieve the updates from this server, and
administrators of each downstream server can then choose to approve and
deploy updates to their clients based on their needs.
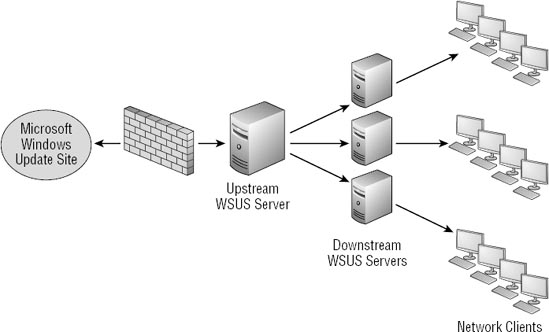
This is
useful in a large but decentralized environment where administrators in
different locations need to make decisions on the management of the
systems that are different from what may be needed in another location
of the enterprise. In other words, an administrator of one downstream
server can deploy an update to clients in her network, while an
administrator for another downstream server can wait until further
testing is completed before deploying updates to his network.
1. WSUS Updates
WSUS can receive and deploy a
wide range of updates. This includes updates for operating systems,
applications, and enterprise applications.
Operating systems All Microsoft operating systems, from Windows 2000 through Windows 7 and Windows Server 2008 R2, are supported.
Applications
A full range of Microsoft applications, including Microsoft Office,
Microsoft Works, Microsoft Live, Silverlight, Expression, Report Viewer,
Visual Studio, and much more, are supported.
Application server products
Microsoft server products, such as Microsoft Exchange, Microsoft SQL
Server, Internet Security and Acceleration Server, Host Integration
Server, System Center Configuration Management Server, Windows Small
Business Server, and more, are supported.
2. WSUS Requirements
WSUS is installed on a server
such as Windows Server 2003 R2, Windows Server 2008, or Windows Server
2008 R2. To support Windows 7 clients, you'll need at least WSUS 3.0
with SP2 or later.
Other requirements are as follows:
Server roles
WSUS requires both the
Application Server and the Web Server (IIS) roles installed. Internet
Information Services (IIS) is Microsoft's web server product, and it is
installed when the Web Server (IIS) role is installed. These roles
should be added prior to adding WSUS. IIS 6.0 or later is required.
Disk space
You should have at
least 8 GB of available disk space. WSUS will need at least 6 GB to
store updates downloaded from the Microsoft Update site. If you're short
of disk space, it is possible to store the updates on the Microsoft
Update site, but the overall performance will be slower. An additional 2
GB of disk space is need to house the Windows Internal Database that
will be used to store the WSUS data, but it's also possible to use an
existing SQL Server and store the database on that server.
Downloaded files
You'll need to
download the following two files: WSUS 3.0 and the Microsoft Report
Viewer Redistribu table 2008. Both are available as free downloads from
Microsoft's download site (www.microsoft.com/downloads). Search for "WSUS 3" and "Report Viewer Redistributable 2008" to locate each item.
Both x86 and x64 versions
are available for WSUS, so download the version you need based on where
you'll install it. For example, if you're installing it on a 64-bit
server, download the x64 version. The Report Viewer has only a single
edition that works on both x86 and x64 servers.
3. Installing, Configuring, and Using WSUS
Once you've reviewed the
requirements and prerequisites, you can begin the installation of WSUS,
configure clients to use WSUS, approve updates for deployment, and
verify that updates have been deployed by viewing WSUS reports. The
following sections will lead you through the entire process.
3.1. Adding the Application Server and Web Server (IIS) Roles
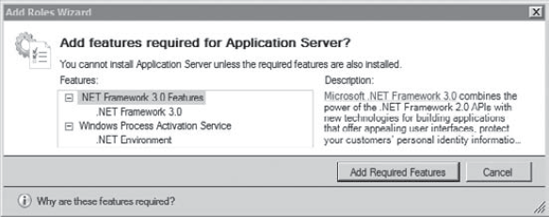
Launch Server Manager in Windows Server 2008 by clicking Start => Administrative Tools => Server Manager. Click Roles in Server Manager, and select Add Roles. When the Before You Begin page appears, click Next. Select
the check box next to Application Server. When you do, a dialog box
appears, as shown in the following graphic. Click the Add Required
Features button.
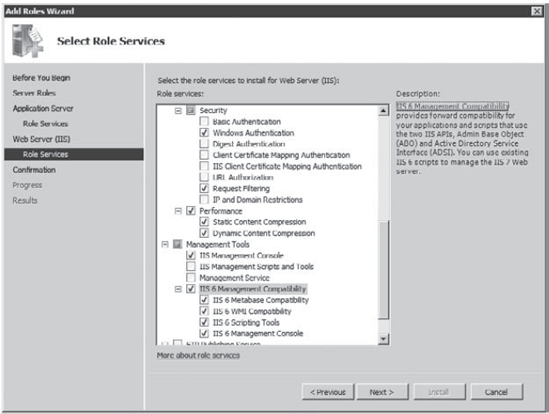
Select the check box next to Web Server (IIS) and click Next. Review the information on the Introduction To Application Server page, and click Next. The Application Server Foundation Role Service is selected by default. Click Next. Review the information on the Introduction To Web Server (IIS) page, and click Next. Several role services are selected by default. You'll need to add the following additional role services: In
the Application Development section, select ASP .NET. This will cause a
dialog box to appear, prompting you to add additional services. Click
the Add Required Role Services button. In the Security section, select Windows Authentication. In the Performance section, select Dynamic Content Compression. In
the Management Tools section, select IIS 6 Management Compatibility,
which automatically selects the other four IIS 6 compatibility settings. Your display will look similar to the following graphic. Click Next.
Review the information on the Confirmation page and click Install. This will take a few minutes to complete. When it is done, review the results and click Close.
|
3.2. Installing the Report Viewer
Browse to the location where you stored the Report Viewer install application. Double-click it to launch it. When the Welcome page appears, click Next. Review the License Terms page, select I Have Read and Accept the License Terms, and click Install. When the setup completes, click Finish.
|
3.3. Installing WSUS
With the prerequisites out of the way, you can now install WSUS.
Locate the WSUS application you've downloaded, and double-click it to begin the installation. When the wizard's Welcome page appears, click Next. Make sure that Full Server Installation Including Administration Console is selected, and click Next. Review the License Agreement. Select I Accept the Terms of the License Agreement, and click Next. Accept the defaults on the Select Update Source page. This will set the C:\WSUS folder to be used to store the updates. Alternatively, you can browse to a different location to store the updates. Click Next. Review the options on the Database Options page. Accept the default Install Windows Internal Database On This Computer in the C:\WSUS folder. Click Next. On
the Web Site Selection page, accept the default Use the Existing IIS
Default Web Site (Recommended) option, as shown in the following
graphic.
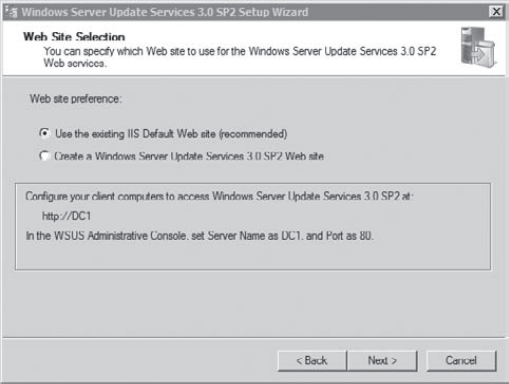
This
graphic has some important information under the selections. It
identifies how you should configure the client computers to access
Windows Server Update Services using http://servername. I have installed it on a server named DC1, so the address is http://DC1. Port 80 is the default port used for HTTP. Review the information on the Ready to Install page. Notice that it also identifies the path for the Client Self Update Site as http://serverName/selfupdate. Click Next to begin the installation. After several minutes, the installation will complete. Click Finish. The Windows Server Update Services Configuration Wizard will launch automatically. Review the information on the Before You Begin page and click Next. Review the information on the Microsoft Update Improvement Program page and click Next. On
the Choose Upstream Server page, accept the default Synchronize From
Microsoft Update, as shown in the following graphic, and click Next.
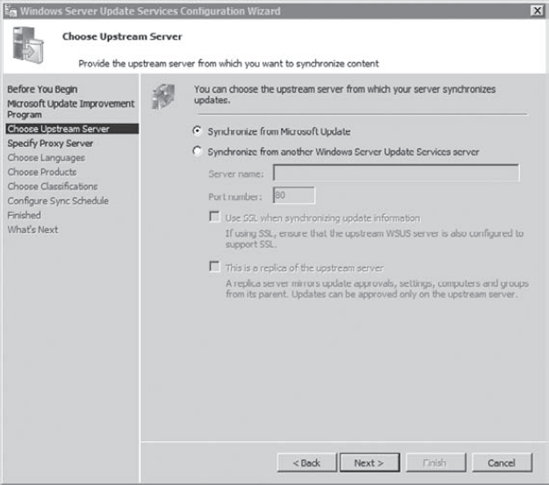
If you were using
both upstream and downstream servers, you'd configure the downstream
servers to obtain their updates from the upstream server, and the
upstream servers would obtain their updates from the Microsoft Update
site. If your network uses a proxy server, specify the details in the Specify Proxy Server page. Click Next. The
Connect to Upstream Server page will appear. Since this is the only
WSUS server, the Windows Update server is considered the upstream
server. Make sure that your server has Internet connectivity, and click
Start Connecting. This process will take several minutes to complete.
When it completes (the progress bar will reach the far right-hand side),
click Next. On the Choose Languages page, select your language and click Next. Review
the information on the Choose Products page. By default, Office updates
and Windows updates are included. You can select or deselect any
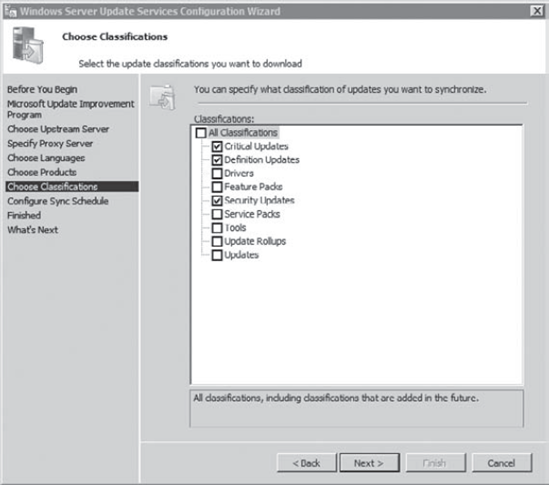
updates desired. Click Next. Review
the information on the Choose Classifications page. The following
graphic shows the default selections, but you can choose other
classifications to download. Click Next.
On the Set Synch Schedule page, accept the default Synchronize Manually. Click Next. Review
the information on the Finished page. The Launch The Windows Server
Update Services Administration Console and Begin Initial Synchronization
Server selections are both checked by default. Click Next. Review
the information on the What's Next page and click Finish. Note that
when WSUS connects with the Microsoft Update site at this point, it does
not download the updates but instead downloads an XML file that
describes the updates. Once the updates are approved, they are
downloaded to the WSUS server and are available to deploy to clients. WSUS
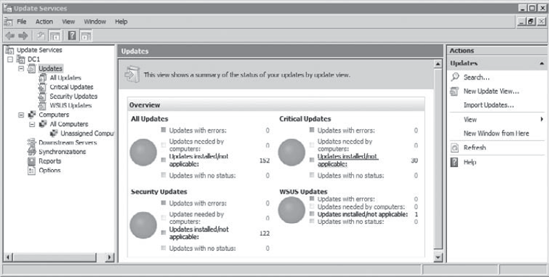
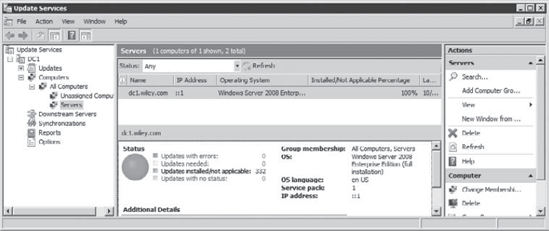
will launch. Expand by the server by clicking the plus (+) sign. Select
Updates in the Update Services console, and you'll see a display
similar to the following graphic.
At
this point, WSUS is successfully installed, and other network
components can be configured to ensure your clients get their updates
from this WSUS server.
|
3.4. Configuring Group Policy Settings for WSUS
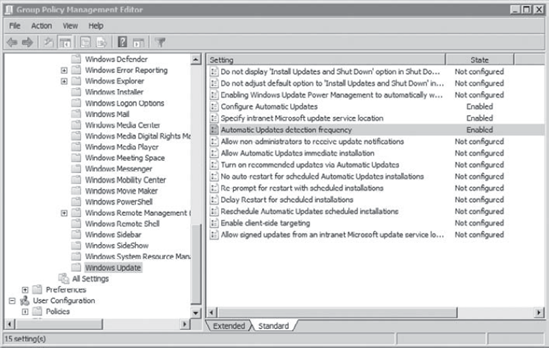
The Group Policy node that is configured is Computer Configuration => Policies => Administrative Templates => Windows Components => Windows Update. Figure 3
shows the GPO setting that can be manipulated to configure clients for
Automatic Updates. Once the setting is set to Enabled, you can select
one of four settings from the Configure Automatic Updating drop-down
box.
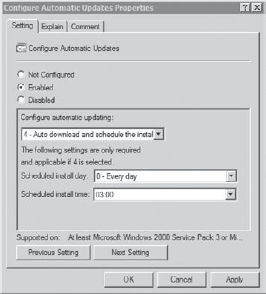
The choices available from the
Configure Automatic Updating drop-down box are numbered 2 through 5. If
Configure Automatic Updates is set to Disabled, updates must be
downloaded and installed manually, and this value is 1 (which isn't
selectable from the drop-down box). The four choices numbered 2 through 5
are as follows:
2 – Notify for Download and Notify for Install
When updates become
available for download, an icon appears in the status area of the
taskbar to inform the user that updates are available, but the update is
not automatically downloaded. This can be used for clients located in
remote sites who need to connect to the WSUS server over a slow wide
area network connection. However, it has an inherent risk because it
depends on the user to download and install the updates.
3 – Auto Download and Notify for Install
This is the default
setting when this Group Policy setting is enabled, but it is not the
best setting. The update is downloaded based on the schedule but not
installed. An icon appears in the status area that the user can click to
initiate the installation. Just as with the previous option, it has an
inherent risk because it depends on the user to take action to install
the updates.
4 – Auto Download and Schedule the Install
When using WSUS, this is
the commonly used setting. The update is automatically downloaded to
the client, and the installation of the update is scheduled. By default,
the scheduled install occurs every day at 3:00 AM, though you can
change the day and time setting.
5 – Allow Local Admin To
Choose Setting This option allows a local administrator to select one
these options. However, the local administrator cannot disable Automatic
Updates. In other words, Automatic Updates will be scheduled, but the
local administrator can choose whether the update is automatically
downloaded and/or automatically installed via the Windows Update
console.
Figure 4
shows the Specify Intranet Microsoft Update Service Location Properties
setting. You'd use this to configure the clients to use the WSUS server
for updates instead of getting updates from the Windows Update site. In
my network, I have configured a server named DC1 as the only WSUS
server, so the address is http://dc1, and I have set this address for the update server and the statistics server.
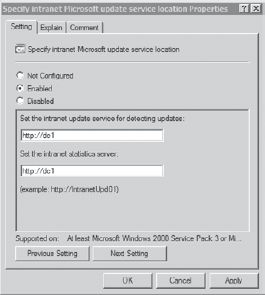
The WSUS statistics server is a single WSUS server that collects information from all WSUS-managed clients in the enterprise.
NOTE
If your environment has
multiple WSUS servers, you can direct some clients to use one WSUS
server with one GPO and direct other clients to use other WSUS servers
with other GPOs. However, a central WSUS server would still be used for
overall statistics in the enterprise, so the intranet statistics server
setting would be the same for all clients in the enterprise.
You can also configure how often clients check to see if updates are available. Figure 5
shows the Automatic Updates Detection Frequency with an interval of 20
hours selected. This time isn't specific but is instead randomized
around the number entered.
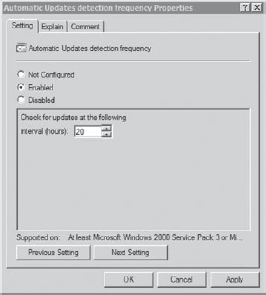
The actual time when a
client is checked is a random number between 80 percent of the given
number and 120 percent of the number. With the number at 20, the client
would check at some point between 16 hours (20 × 0.80) and 24 hours (20 ×
1.2) after the last check. The default setting is 22, causing clients
to check for updates at random intervals of between about 17.6 and 26.4
hours. Other Group Policy settings exist that can be manipulated, but
these are the common ones.
3.4.1. Creating a GPO to Configure Clients to Use WSUS
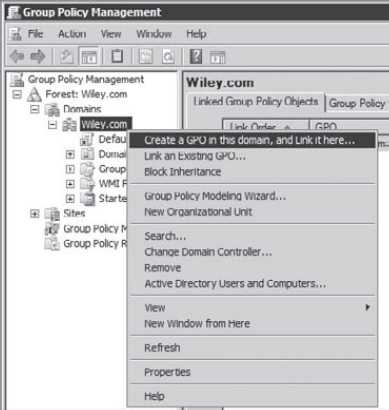
Launch the Group Policy Management Console by clicking Start => Administrative Tools => Group Policy Management. Browse
to your domain. Right-click the domain, and select Create A GPO In This
Domain, and Link It Here, as shown in the following graphic:
Type WSUS as the name of the new GPO and click OK. Right-click the WSUS GPO and select Edit. Select Computer Configuration, and browse to the following GPO setting: Policies => Administrative Templates => Windows Components => Windows Update. Select
the Configure Automatic Updates selection. Select Enabled. Select the
4—Auto Download and Schedule the Install From the Configure Automatic
Updating selection. Click Next Setting. On the Specify Intranet Microsoft Update Service Location setting page, select Enabled and type http://ServerName (where ServerName is the name of the server where you installed WSUS). Click Next Setting. On
the Automatic Updates Detection Frequency setting page, select Enabled,
and change Interval Hours to 20. Click OK. At this point, your display
will look similar to the following graphic.
Close the Group Policy Management Editor and the Group Policy Management Console.
|
3.4.2. Verifying That Clients Are Using GPO Settings for WSUS
Group Policy will be applied
to clients every 90 to 120 minutes by default. You can wait two hours
and check to see if it has been applied, or you can use the gpupdate /force
command from the command prompt to force an immediate refresh of Group
Policy. I suggest using the command if you're trying to verify the
update.
After the GPO has been applied, you can verify that the clients are using the WSUS server. Exercise 4.7 shows how to run the gpupdate /force command and then verify that clients are configured to their updates from the WSUS server.
Log on to a Windows 7 client in the domain that is affected by this Group Policy. Force Group Policy to be updated with the following steps: Type the following command and press Enter. gpupdate /force
After
a moment, you'll receive two messages indicating that both the User
Policy and Computer Policy have been updated. Close the command-prompt
window. Click Start => All Programs => Windows Update. Your display will look similar to the following graphic.
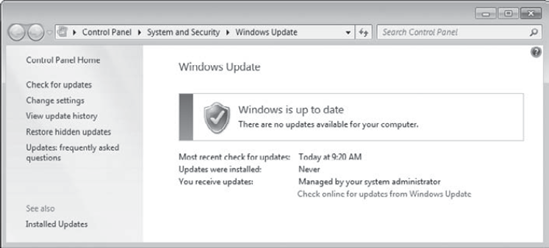
Notice that
the You Receive Updates setting is now set to Managed by Your System
Administrator. If WSUS wasn't being used, this setting would instead
display
|
If you want the client to
connect to the WSUS server immediately and check for updates, you can
enter the following command at the command prompt:
wuauclt /detectnow
However, if no updates have been approved by the WSUS server, nothing will be downloaded.
3.4.3. Verifying That Clients Are Using GPO Settings with GPResult
You can also verify that
clients are using the WSUS server from the command prompt. Launch a
command prompt, and execute the following two commands:
Gpresult /v > gpr.txt
Notepad gpr.txt
Gpresult /v shows the result of applied Group Policies. The /v switch provides the results in verbose mode (lots of words), and > gpr.txt redirects the output to a text file named gpr.txt. You can then open the file in Notepad with Notepad gpr.txt, which can then be easily browsed and searched.
If you created a new policy and
named it WSUS, it will be displayed in the Computer Settings section
under the Applied Group Policy Objects heading as follows:
Applied Group Policy Objects
-----------------------------
    Default Domain Policy
    WSUS
    Local Group Policy
In addition, the
Administrative Templates section will have several settings related to
updates but aren't in simple English. The easiest thing to decipher here
is the UseWUServer Registry key. It has a value of 1, indicating that a WSUS server is designated.
GPO: WSUS
KeyName:    Software\Policies\Microsoft\Windows\WindowsUpdate\AU\UseWUServer
Value:      1, 0, 0, 0
State:      Enabled
Not so easy to decipher is that the server is designated as http://DC1 using ASCII characters. Each character is separated with a 0 or an ASCII null character.
GPO: WSUS
KeyName:       Software\Policies\Microsoft\Windows\WindowsUpdate\WUServer
Value:         104, 0, 116, 0, 116, 0, 112, 0, 58, 0, 47, 0, 47, 0,
                  100, 0, 99, 0, 49, 0, 0, 0
State:         Enabled
ASCII 104 is h, ASCII 116 is t, ASCII 112 is p, and so on.
3.5. Creating Computer Groups on WSUS
A significant improvement of
WSUS over earlier versions is the ability to approve updates for
specific groups of computers. In other words, you can choose to approve
updates for one group of computers but not others.
In order to support this with WSUS, you create computer groups and then move the computers into the appropriate group.
If WSUS is not launched, start WSUS on the server by clicking Start => Administrative Tools => Windows Server Update Services. Click
the plus (+) symbol next to Computers to open it. Select All Computers.
Change the Status drop-down box to Any and click Refresh. This will
show a list of all computers known by the WSUS server. At the very
least, the name of the WSUS server should be here. Right-click All Computers, and select Add Computer Group. Type in Servers as the Name and click Add. Select Unassigned Computers. Right-click the server name and select Change Membership. Select the Servers group and click OK. Select the Servers group. Select Any from the Status drop-down box, and click Refresh.
You will see the
single server you've added in the Servers group. In the graphic, you may
notice that there are two computers, though only one is shown in the
Servers group. In my small network, I have a Windows 7 computer that is
still in the Unassigned Computers group.
|
3.6. Approving Updates in WSUS
At this point, WSUS is
configured to receive and deploy updates. In addition, clients in the
domain are configured through Group Policy to receive updates from the
WSUS server. However, updates will not be deployed to the clients
automatically, and they aren't even downloaded to the WSUS server
automatically.
Instead, an administrator must take several steps to deploy updates. These steps are as follows:
Locate the update in the WSUS console.
Right-click the update and select Approve.
Select either the All Computers group or individual computer groups where the update should be deployed.
Right-click the computer group(s), select Approved for Install, and click OK.
NOTE
If desired, you can
configure auto-approval rules for WSUS. This allows you to identify
updates that should be automatically approved based on a classification,
a product, or a deadline (in days) when the update should be
automatically approved.
Once an update is approved,
it will be scheduled for download from Microsoft's website to the WSUS
server. When the client checks in with the WSUS server, it will see that
the server has the new update, and the client will download and install
it (unless the GPO settings were configured to handle the update
differently).
Updates are downloaded to the
WSUS server when the server synchronizes with the Microsoft website.
Synchronization can be done manually, or a synchronization schedule can
be created using the WSUS Options page.
3.7. Viewing WSUS Reports
WSUS includes a rich set of
reporting capabilities. You can create summary and detailed reports
based on updates or based on computers and also view reports of
synchronization results.
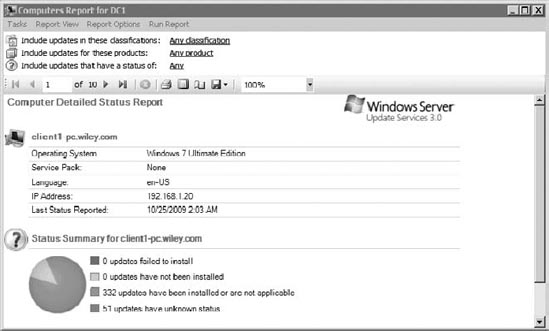
Figure 6
shows the report for a Windows 7 PC managed by WSUS. The report was
created by right-clicking the computer and selecting Status Report. The
first page provides summary data, and the following pages list all of
the updates, their approval status, and their installation status.
If you select the Reports
node, it allows you to create reports on all of the updates and all of
the computers. It also includes the ability to create the reports in a
tabular format, which can easily be displayed in a Microsoft Excel
worksheet. All of the reports can also be saved in a PDF format if
desired.
WSUS is feature
rich, especially considering that it's a free product. It provides
administrators with any easy-to-learn and easy-to-use tool that gives
them better administrative control over updates in the enterprise.
While this section covered
some of the basics of WSUS, the goal was to help you realize the
benefits of using it. The goal wasn't to teach you everything you need
to know about WSUS but instead to help you get started. If it's the
right product for you and your enterprise, you can start with what
you've learned here. But you need to realize that there's more to WSUS
than what we've covered here.
