7. Using PowerShell Commands
Instead of giving you a laundry
list of all the commands, my goal instead is to use the limited space in
this article to give you some examples of commands you may find useful.
I also hope to give you some information that will easily translate to
other commands to allow you to expand your knowledge. You'll see some
other PowerShell commands in other areas of this book.
When you're ready to learn
more, you can pick up one of the complete books on PowerShell or visit
the TechNet Script Center Gallery (http://gallery.technet.microsoft.com/ScriptCenter) for more commands and scripts.
NOTE
Microsoft hosts a site
titled "Hey, Scripting Guy!" where you can find a wealth of information,
tutorials, and examples of different types of scripts, including
PowerShell scripts. There are actually two scripting guys (Ed Wilson and
Craig Liebendorfer). You can find their column and archives here: http://www.microsoft.com/technet/scriptcenter/resources/qanda/all.mspx.
If you want to create your
own list of all the commands and document them in text files you can
review periodically, try these commands:
Get-Command -CommandType cmdlet | Out-File cmdlets.txt
Get-Command -CommandType alias | Out-File alias.txt
Get-Command -CommandType function | Out-File function.txt
Get-Command | Out-File Commands.txt
As a reminder, you don't
need to type in everything when entering PowerShell commands. PowerShell
will give you some help. As an example, the first command in the
previous list could be typed in like this:
First, type in only Get-Co and then press the Tab key twice to see the command:
Get-Command
Press the spacebar, enter the dash (-) symbol, type in C, and press the Tab key to see it become
Get-Command -CommandType
Press the spacebar, type in cmdlet, the pipe symbol (|), Out-F, and press the Tab key once to get
Get-Command -CommandType cmdlet | Out-File
Last, type in the name of the file as cmdlets.txt.
7.1. Getting Help on PowerShell
You'll find a rich set of help
available to you within PowerShell. What I've found is that many people
are uneasy about using the help provided from the command prompt or
PowerShell. However, this help has become much richer in recent years.
If you overlook it, you'll be missing a lot. Here are some of the commands you can use to retrieve the available help:
Help or Get-Help
This will display generic help information on how to execute help commands and their results. Both Help and Get-Help will work.
Get-Help commandName
You can request help on any PowerShell command by simply typing in Help and the command name. The command can be a cmdlet, a function, or an alias.
When you request help for an alias, it provides help on the associated cmdlets. As an example, if you type in Get-Help dir, it will return help on the Get-Children cmdlet since dir is an alias for Get-Children.
Get-Help commandName -examples
Examples are only a few keystrokes away just by adding the -examples switch to your Get-Help request. For example, you can use the following command to see examples with descriptions of the Get-Service command. There are several pages, so adding the More command will allow you to view a page at a time. Press the spacebar to scroll to the next page.
Get-Help Get-Service -Examples | More
Get-Help commandName -detailed
The -detailed switch can be used to provide more detailed help than the basic help command. It will include examples.
Get-Help commandName -full
The -full switch
provides all of the available help on the topic. This will often provide
more information on parameters used within the command.
|
Many help files are
available from PowerShell that provide more information about specific
topics and are referred to as "about" topics. For example, if you want
information on the pipelines command, you can enter Help about_pipelines. To see a full listing of all of these "about" topics, enter help about.
|
|
7.2. Using WMI_Cmdlets
Windows Management
Instrumentation is used on many administrator applications to automate
the process of retrieving information on computers or taking action on
computers.
As a simple example, different
applications are used to deploy updates to clients, but they often first
checked to see if the update has already been deployed. WMI is used to
query the computer to determine if the update is deployed. Applications
such as Windows Server Update Services (WSUS), Microsoft Systems
Management Server (SMS), and System Center Configuration Manager (SCCM)
all use WMI regularly.
PowerShell includes a full set
of WMI cmdlets that can be used to retrieve information on systems just
as they do on applications. One of the challenges with these is that
there is so much that can be done that it's easy to get overwhelmed by
the complexity. However, if you understand how a few of them work,
you'll easily be able to use the concepts you've learned and branch off
in different directions.
First, when querying WMI
objects, you need to include an extra parameter that includes the class
and the name of the object that you want to query. As an example, the Win32_Share class includes the name of the class (Win32) and the name of the object type (Share).
Classes and objects sometimes
confuse people. You can think of a class as a blueprint, similar to a
blueprint for a house. You can't live in a blueprint. Similarly, a class
isn't an actual object but the definition for an object. When a folder
is shared, it's viewed by WMI as a share object, and the Win32_Share class can be used to query information on this share object.
Win32 classes are the
primary classes used to query and work with Windows-based operating
systems. There are hundreds of objects in this class, but here's a small
sampling: Win32_Account, Win32_BIOS, Win32_ComputerSystem, Win32_SystemEvent, Win32_CurrentTime, Win32_DiskQuota, Win32_Group, Win32_LogicalDisk, Win32_NetworkAdapter, Win32_NTEventLogFile, Win32_OperatingSystem, Win32_Printer, Win32_Process, Win32_Service, and Win32_Session.
A logical question is, "What do each of these do?" The simplest answer is, "Ask PowerShell with a query."
7.2.1. Getting Details on an Object
You can query information from any of these classes with the Get-wmiObject cmdlet. This command will provide basic information on the queried object and looks like this for the Win32_ComputerSystem class.
Get-wmiObject Win32_ComputerSystem
The output on one of my systems is
Domain              : WORKGROUP
Manufacturer        : Dell Inc.
Model               : Dell DM051
Name                : DARRIL-PC
PrimaryOwnerName    : Darril
TotalPhysicalMemory : 3756154880
|
The Get-wmiObject cmdlet has its own alias of gwmi. Instead of typing in the entire command, you can substitute it with gwmi whenever desired. For example, the following two commands are interpreted the same:
Get-wmiObject Win32_ComputerSystem
gwmi Win32_ComputerSystem
|
|
You can use the same command for any Win32 class to see what type of information is provided.
You can also modify what information is provided. For example, by adding the Format-List
cmdlet, you'll see significantly more detail on the queried object.
Instead of just a few commonly used properties, it will list all of the
properties:
Get-wmiObject Win32_ComputerSystem | Format-List *
If you execute these commands, you may notice that some of the properties start with two underscores (such as __Genus, __Class,
and so on). These are used by the system and are referred to as system
classes. If you want to eliminate them, you can use the following
command to list properties that start with a letter:
Get-wmiObject Win32_ComputerSystem | Format-List [a-z]*
7.2.2. Querying Information on Specific Objects
If you tried to retrieve
information on some of the other Win32 classes, you may have been a
little overwhelmed by the results, especially if you included the | Format-List cmdlet. For example, if you queried the Win32_Service class (using Get-wmiObject Win32_Service), it would have scrolled through several screens. This is because it's querying every instance of the object on your system.
If you query the Win32_Computersystem class, it retrieves only information on your system. However, the Win32_Service class will query information on every single instance of a service on your system.
Many times, instead of
retrieving all of the information about all the objects, you may want
only information on a specific object. As an example, here's how you can
use the -query switch to retrieve information about a specific service.
Imagine that you only want to see if the Windows Defender (WinDefend) service is running. You can use this query:
Get-WmiObject -query "Select * From Win32_service Where name ='WinDefend'"
The Select statement in the query starts by saying that you want to retrieve all columns (using the * as a wildcard). Next, it identifies the class Win32_Service as the source in the From clause. Last, it uses a Where clause to identify the name of the service. You should be aware of a couple of rules here:
The entire Select statement must be enclosed in double quotes.
String data used in comparisons must be enclosed in single quotes (as in 'WinDefend').
The Select statement uses symbols (such as = for equals) for comparison operators instead of the comparison switches used in PowerShell commands (such as -eq for equals).
You may be wondering how I knew that the Windows Defender service is named WinDefend.
Well I didn't, but I knew a couple of ways to determine the name. If I
knew the common name was Windows Defender, I could have used the
PowerShell command Get-Service "Windows Defender" to display the status, name, and DisplayName to see this result:
Status  Name              DisplayName
------  ----              -----------
Running WinDefend         Windows Defender
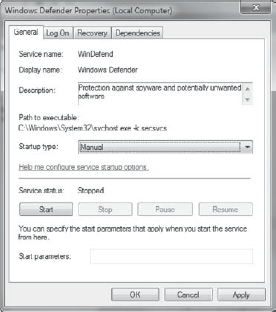
Or, I could have looked in the Services applet and identified the service name on the General tab, as shown in Figure 2.
Similarly, you may be
interested in knowing if the Windows Defender service is running on a
remote computer named WS23. You could use this command:
Get-WmiObject -query
 "select * from Win32_service where name ='WinDefend'" -computername WS23
|
Even though the previous code is shown on two lines, it would be entered on a single line.
|
|
The only extra that is added is the -computername
switch and the name of the remote computer. If you don't have another
computer to query right now, you can query your own system. Type hostname and press Enter to determine the name of your system, and substitute WS23 with your system's name.
|
While you can query
your local computer without invoking administrator rights, you must have
local administrator rights on remote computers that you want to query
using WMI. If you don't have local admin rights, access will be denied.
|
|
7.2.3. Killing Applications with Win32_process
You may come across an application that occasionally causes a problem and needs to be terminated. You can do so with the Remove_WmiObject cmdlet. However, before you terminate the application, you'll need to identify it in a variable.
Launch an instance of PowerShell. Type calc and press Enter to launch an instance of the calculator. Return the focus to PowerShell and enter the following line: $calc = get-wmiobject -query "select * from win32_process where name = 'calc.exe'"
This line identifies the process running the calculator application and stores this information in the variable $calc. Enter the following command to retrieve the handle to the application, and then terminate the application with the Remove-Wmi-Object cmdlet: $calc | Remove-WmiObject
|
7.3. Formatting Output with the -f Format Operator
The -f format operator is a neat tool you can use to control how output is displayed in a script. Using the -f operator, you first identify the column format and then identify what will be in the column. The basic format is
"{0,jp} {1,jp}" -f $Item.itemx, $Item.y
The format of all of the
columns is enclosed in the quotes, with each individual column enclosed
in braces. The first column is 0, the second column is 1, and so on.
Within the column definition, you specify whether it should be right or
left justified and the number of characters the column should have. For
right justification, the number is positive (such as 30); for left justification, the number is negative (such as −30).
As an example, if you want the
first column to be left justified with 30 characters and the second
column to be right justified with 15 characters, you'd use this to
define the columns:
"{0,−30} {1,15}"
$colLog = get-EventLog -list
ForEach ($Item in $ColLog) {
Write-Output $Item.Log, $Item.MaximumKilobytes
}
However, the output wasn't pretty. You can use the -f format operator to identify how the columns should be formatted. The full script would then look like this:
$colLog = get-EventLog -list
ForEach ($Item in $ColLog) {
"{0,−30} {1,15}" -f $Item.Log, $Item.MaximumKilobytes
}
Notice that with the -f operator, you don't need to include the Write-Output clause. Listing 1 shows the output on my system.
Example 1. Output using the -f operator
Application                                20480
DFS Replication                            15168
HardwareEvents                             20480
Internet Explorer                          512
Key Management Service                     20480
Media Center                               8192
ODiag                                      16384
OSession                                   16384
Security                                   512
System                                     20480
Windows PowerShell                         15360
|
You can use the -f format operator to format as many columns as desired.
7.4. Filtering the Output with the Where-Object Command
There are times when you don't
want to see all the data, but instead you wish to see only a subset of
the data that meets a certain condition. You could use the Where-Object command (which has an alias of Where) to filter the result.
In the following code, the Where clause is used to retrieve a list of only the logs that have a Max(K) value greater than 15168. Notice the use of $_. The first command, Get-EventLog, creates a collection of event logs that is then piped to the Where clause. The $_ refers to this collection, and a period can then be added to reference any of the properties of the objects in the collection.
Get-EventLog -list | Where {$_.MaximumKilobytes -gt 15168}
Notice that the entire condition is enclosed in braces ({ }).
Similarly, here's a method you can use to list only services that start with the letter S using the -like operator. Notice that the asterisk (*) is used as the wildcard, and the string you're searching for must be in double quotes:
Get-Service | Select name, service, status | where {$_.name -like "S*"}
7.4.1. Using the IF statement
Occasionally, you'll want to check for a specific condition and, if the condition is met, execute some code. You can use the IF statement. The basic syntax of the IF statement is
If (condition 1)
  { execute code }
Elseif (condition 2)
  { execute code }
Else
  { execute code }
The Where-Object filter could be rewritten using a ForEach loop with an IF clause, like this:
$colLog = get-EventLog -list
ForEach ($Item in $ColLog) {
If ($Item.MaximumKilobytes -gt 15168) {
"{0,-30} {1,15}" -f $Item.Log, $Item.MaximumKilobytes }
}
The collection of logs is stored in the $colLog variable. The ForEach loop loops through each log in the collection and includes an IF statement. Notice that the IF{ }).
statement has a condition (enclosed in parentheses), and the statement
(or statements) to execute when the condition is true is enclosed in a
set of curly braces (
When using the IF
statement, you can include as many statements as desired within the
curly braces. When the condition is met, all the statements in the curly
braces will be executed.
The following code checks to see the status of the eventlog service and includes the Elseif and Else clauses. If the service is running, it outputs "Running". If the service is not running, it checks to see if it is stopped and, if so, outputs "Stopped".
If it's not running or stopped, it'll output a line indicating the
service is not running or stopped (indicating it is paused).
$service = Get-Service |
 Select name, service, status | where {$_.name -like "eventlog"}
If ($service.status = "Running")
{Write-Host "Running"}
Elseif ($service.status = "Stopped" )
{Write-Host "Stopped"}
Else
{Write-Host "Service not stopped or running"}
7.4.2. Using the Switch Statement
While the IF
statement is useful when choosing between one or two options, when you
start choosing between many options, it becomes very cumbersome with all
of the IF ELSEIF ELSE clauses. A solution is the Switch statement, which is very valuable when you want to take one of many possible choices.
NOTE
If you've done programming with other scripting or compiled languages, you may have run across the Case statement. If you know the Case statement, you know the Switch statement—just by another name. The Switch statement in PowerShell works just like the Case statement in other languages.
The Switch statement uses the value of a variable to determine which action to take. The basic syntax is
$switchVar
Switch ($switchVar) {
Value1 {"action for this value"}
Value2 {"action for this value"}
Value3 {"action for this value"}
}
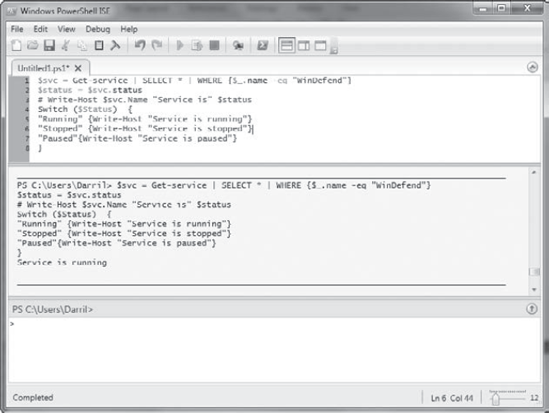
Launch an instance of the PowerShell ISE. Enter
the following command in the top pane, and press F5 to execute it. Note
that you can use the Tab key to save some typing, just as you can in
PowerShell. $Name = "WinDefend"
Get-service | Select * | Where {$_.name -eq $Name }
This will return the details on the Windows Defender service. Now modify the command to populate the $svc variable with the results as a collection by adding $svc = to the beginning of the command. It will look like this: $svc = Get-service | Select * | Where {$_.name -eq $Name }
Next, create a variable named $status and populate it with the status of Windows Defender (which is stored in the $svc collection as $svc.status) with this line. If desired, you can use the Write-host command to show you the status and execute the entire script. $status = $svc.status
Write-Host $svc.Name "Service is" $status
Next, create the Switch statement using the $Status variable. Switch ($Status) {
"Running" {Write-Host "Service is running"}
"Stopped" {Write-Host "Service is stopped"}
"Paused"{Write-Host "Service is paused"}
}
Execute the script. You may not want the first Write-Host line to execute, so you can "comment it out" by placing the #
symbol at the beginning of the line. Why would you comment it out and
not delete it? You may want to easily add it in later for debugging
purposes, and it is easier to delete the # character than it is to type in the whole line again. Your display will look similar to the following graphic.
Instead
of just displaying the status, you may want to take an action. For
example, if it's stopped, you can start it by adding this line in the "Stopped" section: Start-Service $Name
You
can also run only part of your script in the ISE. Use your mouse to
highlight only the following part of the first line in the top of the
ISE: Get-service | Select * | Where {$_.name -eq $Name
You can click the Run Selection icon (next to the Run Script icon) or press the F8 key to run only the highlighted text. At this point you should save the script. Click the Save icon. Browse to C:\Scripts and save it as CheckService.ps1. Execute the script file using the bottom pane of the ISE by typing the following and pressing Enter: c:\scripts\CheckService.ps1
|
7.5. Script Reusability
You may be wondering why I used the variable $Name in the script used in the previous exercise. After all, instead of these two lines:
$Name = "WinDefend"
Get-service | Select * | Where {$_.name -eq $Name }
I could have used just this line:
Get-service | Select * | Where {$_.name -eq "WinDefend }
The reason is for
script reusability. Although this code was written for the Windows
Defender service, it can easily be used for any service. The only thing
that needs to change is the name of the service.
For example, if I wanted to use
this for a different service, such as the Print Spooler service, I'd
just need to identify the name of the Print Spooler service (Spooler) and put it in place of "WinDefend" in the $Name = "WinDefend" line as $Name = "Spooler".
It's even possible to use the Param command to allow the script to accept a parameter. In other words, I can name my script CheckService and program it to accept the name of a service as Param($svc). I could check the Windows Defender service with the command CheckService WinDefend or the Print Spooler service with the command CheckService Spooler.
To put it all together, I
added a couple of extra touches to this script. This script checks to
see if the service is running, and if so, it restarts it (which can
sometimes be useful for services that hang, like the Print Spooler
service). If the service is stopped, it will be started. If it is
paused, it'll be resumed.
Listing 2 shows it in full.
Example 2. Check status of service
#Script written Sep 2009 by Darril Gibson
#Purpose. Checks status of service.
# Restarts if running, starts if stopped,
# and resumes if paused.
#Expects Display Name of service
# as a parameter ($Name)
Param($Name)
$svc = Get-service | Select * | Where {$_.name -eq $Name}
$status = $svc.status
# Write-Host $svc.Name "service is" $status
Switch ($Status) {
"Running" {Restart-Service $Name }
"Stopped" { Start-Service $Name }
"Paused" {
#Windows Defender can't be paused or resumed
Resume-Service $Name }
}
|
Notice the use of the Param command. Instead of hard-coding the name of the service, it accepts a parameter (such as WinDefend or Spooler). The Param command must be the very first executable line (comments can precede it). You would execute the script from PowerShell as
c:\scripts\CheckService.ps1 WinDefend
The script can also be called
from other programs including Task Scheduler.
However, you'll find that this
script won't work completely unless you run it with elevated
permissions. For example, if the Windows Defender service is running,
the script will try to restart it but can't because it doesn't have
permissions. Instead, launch the script from a PowerShell window with
elevated permissions by selecting Run As Administrator or execute it
with the System account when executed from a program such as Task
Scheduler.
Well, that's a taste of
Windows PowerShell. Don't expect to walk away with a full understanding
of everything that can be done with PowerShell. However, if you come
across any PowerShell commands or scripts, they should make a little
more sense to you.
