4. Capturing Images with WDS
Once WDS is configured
and a capture image has been added, you can use WDS to capture images in
addition to deploying images. You can use this process to capture an
image immediately after creating your reference computer and running
Sysprep to prepare it.
One of the earlier
exercises led you through the process of adding a capture image onto the
WDS server. This is a Windows PE that is used to capture an image from a
reference computer.
As a reminder, the
reference computer is a computer configured specifically to be captured
as an image. You would first install the operating system, add
applications, and then configure any other desired settings. Once you're
satisfied it is configured as desired, you would run Sysprep on it to
remove the computer-specific information from the computer.
When the system is rebooted, you can use the PXE boot process to connect to the WDS server and capture the image. Figure 5
shows the overall process of capturing an image from a reference
computer. It is similar to the process of deploying an image up to step
4. Refer to this figure as you're reading the steps in the following
explanation.

The user starts the process by pressing the F12 key on the PXE client computer.
This
causes the client to broadcast DHCP discover messages looking for a
DHCP server. A DHCP server responds with TCP/IP configuration
information such as an IP address, subnet mask, default gateway, and
address of a DNS server.
The
user is prompted to press F12 again for a network service boot. If F12
is not pressed again, the system will boot normally. However, if F12 is
pressed again, the client will contact the WDS server.
If
the WDS server has both a boot image and a capture image, you will be
prompted to choose which one to download. You would choose the capture
image.
The
capture image is sent to the client. This image is a Windows
Preinstallation Environment image with additional elements that allow it
to capture an image. This will launch the Windows Deployment Services
Image Capture Wizard. Follow these steps for the wizard.
Click Next on the Welcome page, and the Image Capture Source page will appear, as shown in Figure 6.
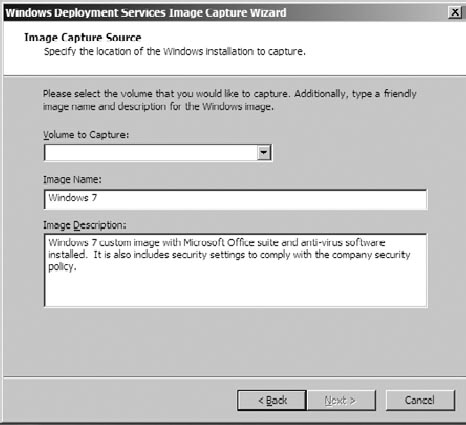
Select the Volume To Capture; this is normally C:. Enter an Image Name and an Image Description and click Next.
|
If a drive letter doesn't
appear under the Volume To Capture selection, it usually indicates that
the system wasn't Sysprepped. Less often, it could mean that the system
has not been activated and has been Sysprepped and/or rearmed three
times.
|
|
On the Image Capture Description page, click Browse. Create a folder and give it a name such as Images. Double-click the folder. Give the capture image file a name such as Win7 and select Save.
It's
possible to click Finish here. The image will be captured and saved on
the local drive. You can then copy the image as desired. The following
steps will be used to upload the image to the WDS server.
Select the check box Upload Images To WDS Server. Enter the name of the server and click Connect.
You
will be prompted to log on with credentials for an account in the
domain. The username must be entered as domain\username or as
username@domain (also known as a universal principal name format).
A
Domain Name Service server is queried to locate a domain controller.
Remember, the DNS server is required for WDS, and this is one of the key
roles it plays. The client has the address of the DNS server from the
DHCP lease it obtained earlier.
The
supplied credentials are checked against Active Directory. These
credentials are used to provide access to specific image groups.
You
can now select one of the image groups on the server based on the
permissions of the logged-in user. Select an image group from here and
click Finish.
The image is captured and stored on the C: drive. After the capture completes, the image will be uploaded to the WDS server.
NOTE
Note that this process is
imaging the C: drive and is storing the image on the C: drive. This is
not a typo. It really works. The imaging process takes an inventory of
the files and folders before the process starts and adds all of them to
the image. Since the created image isn't created before the process
starts, it is not included in this list.
Once the process completes, you can reboot your computer and access the C:\Images folder. You'll see the captured image as a .wim
file located here. If you selected the check box to store the image on
the WDS server, it will also have been uploaded and available there.
