Images are used to deploy Windows 7 to computers. All of the images are derived from the basic Windows Imaging (.wim) file type in Windows 7. This is the same .wim file type used in Windows Vista, Windows Server 2008, and Windows Server 2008 R2.
These images share many similarities no matter how they are deployed. You can deploy images using the following methods:
Two primary image types are used:
Boot images
A boot image
installs the Windows Preinstallation Environment (Windows PE, or
WinPE). WinPE is used to provide a basic environment where a full
installation can start. In installations before Windows Vista,
installations began with a command-prompt mode, but now WinPE is used
instead. The Windows 7 installation DVD includes a boot image (named boot.wim in the \Sources folder).
Install images
An install image includes a full operating system. The Windows 7 installation DVD includes the Windows 7 install images in the install.wim
file. You can also create custom install images. A custom install image
would include the operating system, applications, settings, and
configuration.
Windows imaging files can
contain more than one image. The Windows 7 installation DVD I have has
four images contained within the install.wim
file: the Home Basic edition, the Home Premium edition, the
Professional edition, and the Ultimate edition. You can use ImageX with
the /Info switch (as shown later in this section) to identify the images contained in a Windows image file.
|
It's important to realize the distinction between a .wim file and an image. An image is a full image of a bootable operating system, but it must be contained within a .wim file. Any .wim file can contain one or more images.
|
|
Images are stored in image
files using compression and single-file technologies. Compression is
easy enough to understand: The files are zipped or shrunk and can be
uncompressed when needed.
Single-file technologies may be
new to you, though. Files that are in more than one image are stored
only once in the image file. For example, the Windows folder holds the regedit.exe file. If your .wim file includes four Windows 7 images, the regedit.exe
file is stored only once as a resource that is available to each of the
images. Space is saved by storing it once instead of four times.
1. Understanding Imaging
Imaging Windows 7 is the
process of capturing an image on a single computer. This image can then
be deployed to one or more other computers in the environment. This can
be done with the Windows Automated Installation Kit (AIK) as shown in
this section, with more automated tools such as Windows Deployment
Services, or with the more advanced
enterprise application System Center Configuration Manager (SCCM).
Figure 1 shows the different computers involved in the imaging process when capturing and deploying images with the Windows AIK.

The technician's
computer is the computer you use to do the preparation. You install the
Windows AIK here and can use it to create bootable USBs, create bootable
CDs, and do maintenance on images. You may also choose to store the
images you've captured on this computer.
You capture an image from a
reference computer. A reference computer has the operating system
installed, applications installed, and any specific security or
configuration settings desired.
2. Designing Images
When designing images for an
enterprise, there are many different considerations. What you choose to
do depends largely on your needs and on the capabilities of your
organization.
A significant decision point
is whether you have deployed System Center Configuration Manager. SCCM
is an enterprise application that can be purchased, and it is the
replacement for System Management Server (SMS). SCCM can be used to
enhance significantly the administration and maintenance of an
organization. From an imaging perspective, it can be used to deploy
images, applications, updates, and other packages such as driver
packages. Sounds great, right?
The challenge is that even
though it is a solid product, not all organizations have it because it
is not a free product. Furthermore, not all organizations have IT
administrators who understand how to use it. A typical class to learn
SCCM takes a full week.
On the other hand, there are
several free tools that can be used. These include the Windows Automated
Installation Kit, Windows Server Update Services (WSUS) to deploy
updates, and Group Policy to deploy applications and settings.
If you have SCCM, use it. But if you don't and your company can't afford it, there are alternatives.
2.1. Understanding the Different Image Types
You create standard and
custom images on reference computers. An organization can have a single
standard image used as a baseline for all users; it can also have
multiple custom images used for specific needs for different groups of
users.
As an example, I work in a large
organization with tens of thousands of users. A single standard image
has been created and is used to deploy images to computers throughout
the organization. While it has a significant amount of customization
including additional applications, security, and other settings, it
starts as only a baseline. Group Policy and SCCM are then used to deploy
different applications and settings to users within the organization.
Standard image
A standard image is a
single image used as a baseline for all computers. It includes
customization such as additional applications, security, and other
settings affecting features and components of the operating system. The
enterprise then uses Group Policy, SCCM, and/or WSUS to deploy different
settings, applications, and updates to users within the organization.
Custom image
Instead of a single
image for everyone, it's possible for an organization to use different
custom images for different target groups. For example, one custom image
could be used for users in the Sales department, and another custom
image could be used for users in the Accounting department. Even with
custom images, it's common to use Group Policy to enforce settings and
to use other tools to deploy updates.
Role-based image
A role-based image is
just another type of custom image. Instead of creating images targeted
to specific departments, they are created for users performing specific
tasks. For example, an image could be created for graphic artists that
includes all of the tools they need. It doesn't matter which department
they work in; if that's their job or role, that's the image they
receive.
Geographic and localization-based images
Very large organizations
can span different countries supporting different languages and locales.
Separate images can be created to support these different users. On a
smaller scale, if needs are different for separate regions within the
same company, it's possible to create different images for each of the
regions.
2.2. Online vs. Offline Image Servicing
Images can be serviced
either online or offline. An online image is booted into the operating
system, and changes are made while it is running. This can be done
before Sysprep is run, or it can be done in the Sysprep Audit Mode,
which is presented in the next section.
An offline image is not running but instead is an image that is stored in a .wim file. The image can be extracted from the image file in a process referred to as mounting the image.
Once it is extracted, files within the image can be modified and
packages can be added. Common tools used to mount and modify images are ImageX.exeDISM.exe, commonly referred to as ImageX and DISM. and
After an offline image is modified, the changes can be saved back as an image contained within the original .wim file or stored in another .wim file. The image can then be deployed just as any other image.
3. Creating Images on Reference Computers
With any imaging process, the
reference computers must be properly prepared. The overall steps
involved in creating a reference computer for imaging are as follows:
Install the operating system
You can install the
operating system using the installation DVD.
Install desired applications
You can
install any applications desired at this point. Installed applications
will be available to users after the image is deployed. These include
full-blown applications such as the Microsoft Office suite, simple
applications such as Adobe Reader, Internet Explorer add-ons, and
security applications such as antivirus software and host-based
intrusion-detection systems.
Configure security settings
Although Windows 7
starts in a much more secure state than older Microsoft operating
systems, you may want to tweak it for your own use. As a few examples,
you can rename the administrator account, configure the firewall, and
disable specific services.
Configure other desired settings
You can
configure additional settings such as enabling or disabling features and
components, modifying the desktop wallpaper, adding links to network
shares and network printers, configuring logon or logoff scripts, and
much more.
Test, test, test
Once the system has been
configured, it should be well tested to ensure it meets the needs of the
organization. While some modification of the image can be done after
it's created, it's much easier to ensure that it has everything needed
before capturing the image.
Run Sysprep
Sysprep
will prepare the system for duplication. You can use it to remove
computer-specific information such as the computer name and the computer
security identifier (SID).
After these steps are completed, you can capture the image using ImageX or Windows Deployment Services.
4. Running Sysprep
The System Preparation (Sysprep)
tool is a very important element of the imaging process. If an image is
deployed to multiple computers with the same image without running
Sysprep, these computers will have problems. A lot of information on a
computer should be unique.
As a simple example, the SID
will be the same on these computers if Sysprep isn't run. When more than
one computer has the same SID in an environment, you end up
troubleshooting a wide assortment of errors, none of which simply states
"Duplicate SIDs identified." It's best to avoid these problems
completely by running Sysprep.
The Sysprep.exe program is located in the Windows\System32\Sysprep folder. You can launch it from the command line or by double-clicking it to launch the graphical user interface (GUI).
NOTE
Sysprep cannot be run on
an upgraded version of Windows. In other words, if you were running
Windows Vista and then upgraded to Windows 7, Sysprep would not run on
this system. Instead, an information dialog box would appear saying,
"You can only run Sysprep on a custom (clean) install version of
Windows."
Figure 2 shows the GUI part of the Sysprep tool. It can also be launched from the command line.
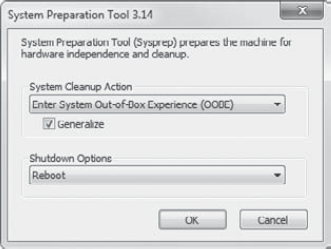
It includes two System
Cleanup Actions and three Shutdown Options. The Generalize option is the
most important check box for this GUI. When checked, it will remove
system-specific information from the computer, which allows you to reuse
the image on different computers.
The two System Cleanup
Actions are Enter System Out-Of-Box Experience (OOBE) and Enter System
Audit Mode. The three Shutdown Options are Reboot, Shutdown, and Quit.
Enter System Out-Of-Box Experience (OOBE)
When the system is turned on after using this option, it will mimic the
first boot screens from an initial installation. The Windows Welcome
program will run when it is booted to reinitialize settings on the
computer. It's possible to automate this process with the use of an
answer file.
Enter System Audit Mode
The system audit mode can be used by original equipment manufacturers,
computer resellers, or enterprises for similar hardware. It allows a
custom image to be saved and then booted into audit mode, where
additional programs or updates can be added.
Using audit mode is also referred
to as servicing an online image. It will run many of the initial setup
tasks for a normal boot, but it bypasses the Windows Welcome phase,
which speeds up the process considerably.
After a computer boots to
audit mode, it will continue to boot to audit mode until you configure
the computer to boot to the Windows Welcome phase by running Sysprep and
selecting the Out-Of-Box Experience (OOBE) selection.
Quit This will exit Sysprep after running without shutting down the system.
Reboot
As you'd guess, this reboots the system. Use it if you plan on either
modifying settings in audit mode or immediately capturing the image.
Shutdown This will power down the system after Sysprep is run.
When running Sysprep from the command prompt, you would generally use the following command:
C:\windows\system32\sysprep\sysprep /oobe /generalize /shutdown
The /oobe switch specifies the Out-Of-Box Experience, the /generalize switch causes unique information to be removed, and the /shutdown
switch causes the system to shut down. The next time the system is
turned on, the image should be captured using one of the available tools
(such as ImageX or Windows Deployment Services). If the system boots
normally without capturing the image, Sysprep will need to be run again
before capturing the image.
You may want to use two additional switches when running Sysprep from the command prompt:
/quiet
This runs Sysprep without displaying any onscreen messages. It would be used if Sysprep was automated through a script.
/unattend:answerfile
This is used to specify
the full path and name of an answer file to use when the system is
rebooted. Windows 7 will use this answer file for an unattended
installation. You can use the Windows System Image Manager (part of the
Windows AIK) to create an answer file to use with Sysprep.
