4. Connecting to and Managing Wireless Connections
Windows 7 greatly simplifies the process of connecting to
wireless networks by autonegotiating the required settings, making it
really easy to connect your computer to any available wireless network.
To connect to a wireless network, click the Network icon in the system
tray, click an available wireless network and then click Connect. If you
are connecting to a secured network, type the security key when prompted
and then click OK.
You will only need to enter the key once. The next time you
connect, Windows will remember the key and supply it for you. If you
entered the security key incorrectly, simply reenter the key when
prompted and then click OK again.
If you aren’t within range of a wireless connection, you can
pre-create the connection to use when you are within range. For some
types of secured networks, you may need to pre-create the connection by
walking through the steps below but not actually connecting as this ensures the right
security settings are used. You also can create connections to establish
an ad hoc wireless network between your computer and other computers. In an ad hoc wireless network,
the connections are created directly between the participating computers
and no other networking equipment is needed.
You can view available wireless network connections and create new
wireless network connections by following these steps:
Click Start→Control Panel→Network and Internet→Network and
Sharing Center.
In the Network and Sharing Center, click “Manage wireless
networks” in the left pane.
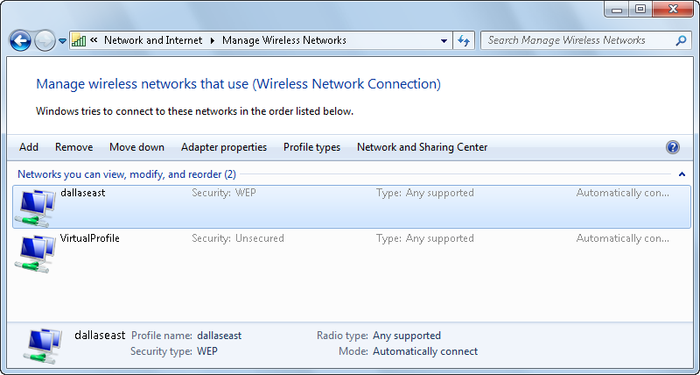
In the “Manage wireless networks” window, shown in Figure 1, you’ll see a list of any
currently defined wireless network connections.
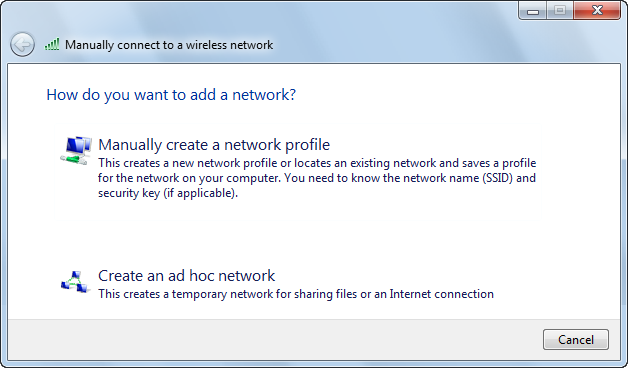
Click Add. This starts the “Manually connect to a wireless
network” Wizard, as shown in Figure 2.
Select one of the following options:
Manually create a network profile
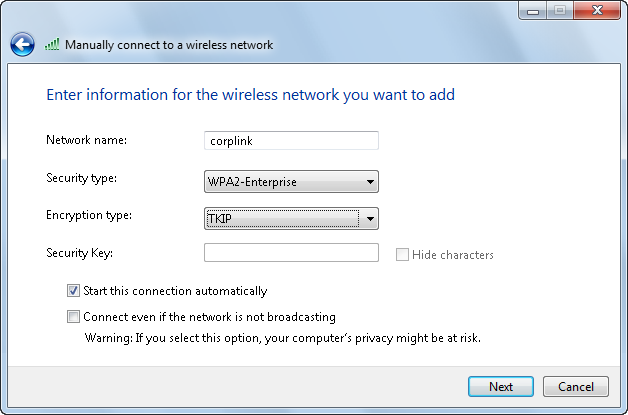
Making this selection creates a new wireless network
profile and saves the profile to your computer. As shown in
Figure 3,
you are prompted for the Network name, Security type,
Encryption type, and Security Key/Passphrase for access to the
wireless network. Select the “Start this connection
automatically” checkbox if you want to connect to this network
without prompting. Click “Connect even if the network is not
broadcasting” if you have a wireless network that has been
configured not to broadcast its SSID (this is sometimes called
stealth mode, though it
does not adequately protect you from snoopers). When you click
Next, the wizard adds the network to your list and prompts you
to open the connection properties dialog box to review the
settings.
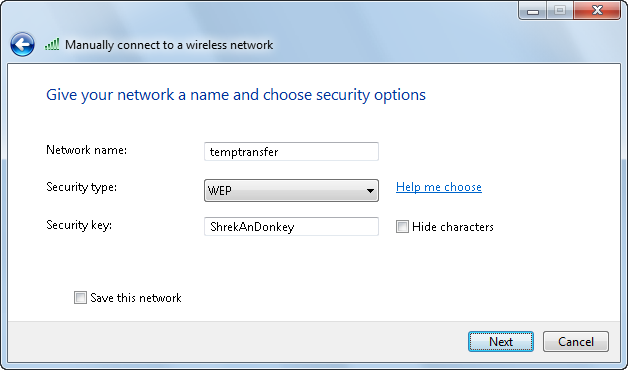
Create an ad hoc network
Making this selection allows you to create a
computer-to-computer network with other computers using only
the wireless network adapters installed in your computer. You
can use these types of connections to share files or share
Internet connections with other computers. Generally, devices
in ad hoc networks must be within 100 feet of one another
indoors and 300 feet of each other outdoors. When making the
connection to the ad hoc network, you will lose connectivity
to any active Wi-Fi connection that uses the same adapter as
the one you use for the ad hoc connection (wired Ethernet
connections should be unaffected). Click Next. As shown in
Figure 4, enter the
name of the network, select a security type, and then enter
the security key or pass phrase to use. You have the option to
save this network for future use, allowing you to keep your
settings without prompting during future use. When you click
Next, the wizard tells you the network is ready to use.
5. Configuring Available and Preferred Wireless Networks
You can connect to and configure wireless networks using
the Network and Sharing Center. You have the option of setting the
preferences of wireless networks defined to your computer and the order
in which you connect to the available networks. You can even set your
network connections to start automatically.
You can manage wireless network connections by following these
steps:
Click Start→Control Panel→Network and Internet→Network and
Sharing Center.
In the Network and Sharing Center, click “Manage wireless
networks” in the left pane. This opens the “Manage wireless
networks” window.
In the “Manage wireless networks” window, you will see the
wireless networks defined for your computer. You also have a toolbar
with different options for managing your wireless networks. Table 1 lists the options
available for your use.
Table 1. Properties for managing wireless networks
| Option | This feature allows
you to |
|---|
| Add | Add wireless network
connections to your computer. |
| Remove | Remove a selected
wireless network connection from your computer. |
| Move Down | Change the connection
preference of a wireless network to a lower state. This will
allow other wireless connections to connect before this
one. |
| Move Up | Change the connection
preference of a wireless network to a higher state. This will
allow the selected connection to connect before other
connections you’ve created. |
| Adapter Properties | Open the properties
window of your wireless network adapter. The properties window
allows you to change the network protocol definitions and
services available. |
| Profile
Types | Change the way profiles
are handled on the computer. You can use all-user profiles, or
all-user and per-user profiles. All-user profiles allow all
users of the computer to use the connection. Per-user profiles
apply only to the logged-on user, and may cause an interruption
in connectivity when you log off or switch users. |
| Network and Sharing
Center | Open the Network and
Sharing Center, allowing you to manage more of your network
settings. |
6. Setting Up a Wireless Router or Access Point
Most wireless routers and account points you purchase
after November 2009 will be compatible with Windows 7 and support
Windows Connect Now (WCN). You can set up a wireless router or
wireless access point that supports WCN by completing these
steps:
Set up the router and plug it into a power source.
Click the Network icon in the system tray, click the default
network of the router, which is identified by the manufacturer name,
and then follow the prompts to set up the router.
During the set up process, you may need to connect one end of
an Ethernet cable to the Internet port on your router and the other
end into modem or other device supplied by your Internet provider.
This will allow the device to connect to the Internet. If you don’t
connect the router to the Internet during setup, you’ll need to do
so afterward.
Your computer will be connected to the router’s network
automatically. To connect other computers, the Network icon in the
system tray, click the network of the router. If the router supports
WCN or WPS and has an activate/connect button, you can push the
button on the router and then wait for the router to automatically
set up the connection to the new computer. If the router doesn’t
have an activate/connect button, you are prompted for a security
key; enter it and then click OK.
If the wireless router or access point doesn’t support WCN, you
can set it up by completing these steps:
Set up and plug in the wireless router or access point.
Connect one end of a network cable to your computer’s wired
network adapter and then connect the other end of the cable to the
wireless router. On the router, use a port that isn’t labeled
“Internet,” “WAN,” or “WLAN.”
Open your web browser and type the address of the router’s
configuration page, which is usually http://192.168.0.1 or http://192.168.1.1. Consult your router’s
documentation to be sure.
When prompted, enter the default username and password for the
router. Typically, the username is admin and
the password is either blank or one of the following words:
admin or password. If
these don’t work, refer to the documentation for the router.
In your browser, you should have an option to run the router’s
setup utility. If there isn’t a setup utility, specify a name for
the router’s network, select the encryption level and choose a
security key for accessing the router. Be sure to change the
administrator password so that other people on your network can’t
modify the router’s configuration.
Once you’ve set up the router, you can connect to it by
clicking the Network icon in the system tray, then clicking the
network of the router. Enter the security key when prompted and then
click OK.
