2. Creating Broadband Connections
Most people have a broadband connection to the Internet
these days. Broadband connections are defined by their bandwidth and
fall into five categories: cable, ADSL, SDSL, fiber to the premises, and
broadband wireless. Any of these types of connections provides
high-speed access to the Internet. Each connection requires service from
an ISP. If the ISP allows you to connect without having to provide a
username and password, such as with cable modem service, you typically
don’t need to establish a separate broadband connection. Instead, you
simply need to connect your computer to the cable modem provided by the
cable provider . On the other hand, if your broadband provider requires you to
use a username and password it has assigned, you’ll need to create a
broadband connection that sets the username and password for you.
In the Network and Sharing Center, you can set up a broadband
connection by following these steps:
Click “Set up a new connection or network.” This opens the Set
Up a Connection or Network Wizard.
In the wizard, click Connect to the Internet, and click the
Next button.
If your computer has existing connections that could be used
to connect to the Internet, you’ll see a list of the existing
connections. Select “No, create a new connection” and then click
Next.
The wizard gives you three selections from which to choose.
The choices are Wireless, Broadband (PPPoE), and Dial-up. Click
Broadband (PPPoE).
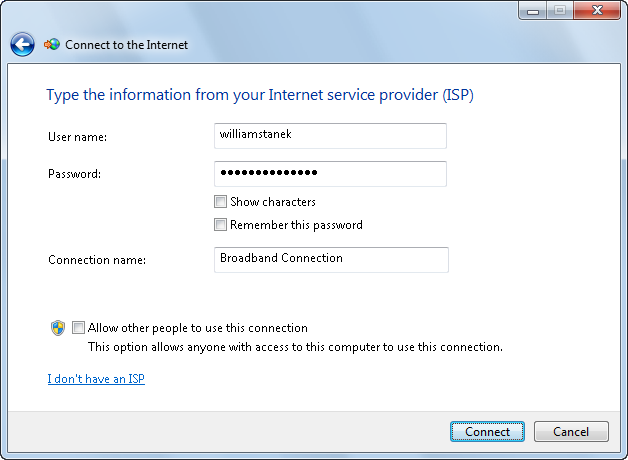
On the “Type the information . . .” page, shown in Figure 14, type the username
and password provided by your ISP in the text boxes provided. As
necessary, select the “Show characters” checkbox to see your
password and verify the correct syntax.
Select the “Remember this password” checkbox to save your
password for future use.
Windows 7 also enables you to share your connection with
anyone with access to your computer. If you want other users to have
access to this connection, check “Allow other people to use this
connection.”
Click Connect to create the connection and establish a
connection to the ISP.
3. Creating VPN Connections
Many organizations use VPN connections to gain access to
their networks. These connections use encryption to secure the
transmitted data between the user and the network. They also provide
remote connectivity to a network so that you can access network resources, such as file shares,
email servers, and terminal service connections.
Most organizations use Internet connections to allow VPN client
connections to their network. If you do not have the correct information
to connect to the VPN service, contact your network administrator for
specific information on how to connect to the network. Some
organizations use specific VPN client applications, which require the
installation of a separate VPN client application. To determine whether
the default VPN client included in Windows 7 will work with your VPN
connection, contact your network administrator. If your organization is
running Microsoft’s Routing and Remote Access Service (RRAS), the VPN
client in Windows 7 will work by default.
In the Network and Sharing Center, you can set up a VPN connection
by following these steps:
Click “Set up a new connection or network.” This opens the Set
Up a Connection or Network Wizard.
In the wizard, click “Connect to a workplace,” and click the
Next button.
If your computer has existing dial-up connections that could
be used to connect to your workplace, you’ll see a list of the
existing connections. Unless your system administrator has
specifically directed you to use one of these connections, select
“No, create a new connection” and then click Next.
On the “How do you want to connect?” page, you have two
choices:
Use my Internet connection
This feature connects you to a workplace using a VPN
connection through the Internet. It requires a username and
password for connecting to your VPN server.
Dial directly
This feature connects you to a workplace using a VPN
connection with a modem by directly dialing a phone number to
your workplace without going through the Internet.
To use an existing Internet connection for a VPN connection,
follow these steps:
Click “Use my Internet connection (VPN)” to use an Internet
connection for a VPN connection.
If you aren’t currently connected to the Internet, you’ll see
the “Before you connect” page. On this page, choose the connection
that you want to use to connect to the Internet, and then click
Next.
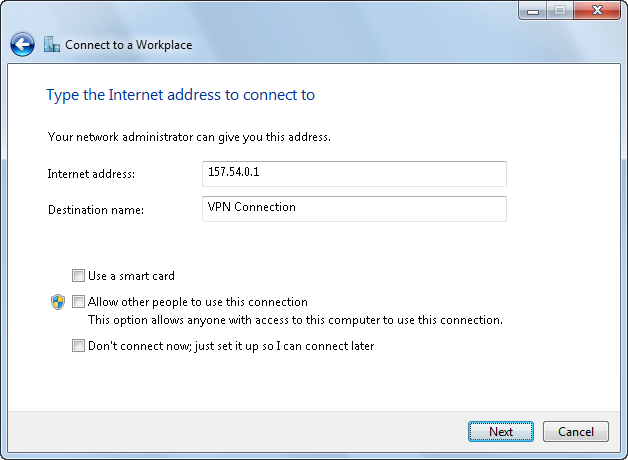
On the “Type the Internet address to connect to” page, shown
in Figure 15, type
the IP address provided by your network administrator. This is the
IP address of your organization’s remote access server.
In the “Destination name” text box, type a name for the
connection. The default name is VPN Connection.
Check “Use a smart card” if you have a smart card for use in
authenticating you to your VPN connection.
Check “Allow other people to use this connection” if you want
anyone with access to your computer to be able to use this VPN
connection.
Check “Don’t connect now; just set it up so I can connect
later” if you want to create the VPN connection, but not actually
connect to it.
Click Next. On the “Type your user name and password” page,
the wizard prompts you to enter your username and password. In the
“User name” text box, enter the domain username for your workplace.
In the Password text box, enter the password for your domain user
account. As necessary, click “Show characters” to view your
password. This helps you identify the correct syntax and find
typos.
Click “Remember this password” to save your password for
future use.
As necessary, enter the name of the domain at your workplace
into the Domain text box. This setting is optional, but it remembers
your domain so that you do not have to type it in each time you use
the connection.
After entering the correct data into the fields provided by
the wizard, click the Connect button to create the connection and
connect. If you chose “Don’t connect now; just set it up so I can
connect later” in the earlier step, click Create to create the
connection without actually connecting and then click Close.
To use a dial-up connection for a VPN connection, follow these
steps:
Click “Dial directly” to use your modem to make the VPN
connection.
On the “Type the telephone number” page, enter the phone
number provided by your network administrator.
Complete steps 4–10 of the previous procedure. After providing
the necessary information, click Create to create the dial-up VPN
connection. If you chose “Don’t connect now; just set it up so I can
connect later” in the earlier step, click Create to create the
connection without actually connecting and then click Close.
4. Configuring Proxy Settings
Many organizations today use proxies to protect their
users from intrusion and to use smaller amounts of publicly routed IP
addresses. A proxy is a server that sits between
you and the Internet. It receives all client requests to the Internet,
fulfills the request itself, and then sends the information to the
client. When creating network connections, you may need to configure a
proxy in order to gain access to the Internet or other external
servers.
Windows 7 offers support for adding proxies inside Internet
Explorer’s settings. You can configure the proxy server and port to
support the different protocols you use for accessing services that
require a proxy within your organization.
NOTE
If you use a different web browser, such as Mozilla Firefox,
that browser may have its own proxy settings that you must
configure using its settings or options dialog. Some browsers, such as
Google Chrome, use the system-wide proxy settings that you learn to
configure in this section.
You can enable or disable proxy settings on a per-connection basis
as well as for the LAN. You should enable proxy settings only when using
a proxy is required. If you enable proxy settings and a proxy is not
required, you won’t be able to use the related connection to access the
Internet or resources on your network. This happens because your
computer will look for a proxy that isn’t there. Malware programs
sometimes target your proxy settings, and you may have to enable or
disable these settings as a result.
You can configure a proxy for a LAN connection by completing these steps:
Click Start, and then click Control Panel.
Click Network and Internet, and then click Internet
Options.
In the Internet Options dialog box, click the Connections
tab.
Click the LAN Settings button.
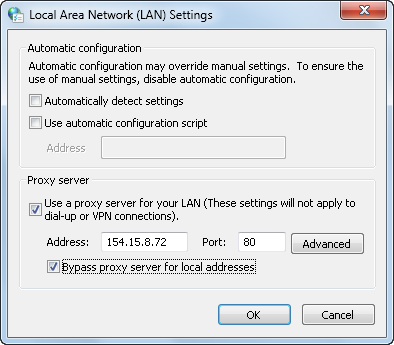
To enable the use of a proxy server, check the box for “Use a
proxy server for your LAN (These settings will not apply to dial-up
or VPN connections),” as shown in Figure 16.
Enter the IP address of the proxy in the Address text
box.
Enter the port number of the proxy in the Port text
box.
If you want to bypass the proxy server for local IP addresses,
select the “Bypass proxy server for local addresses”
checkbox.
Click OK to complete the proxy configuration process.
You can configure a proxy for a dial-up or VPN connection by
completing these steps:
Click Start→Control Panel. Click Network and Internet→Internet
Options→ Connections
tab.
Under Dial-up and Virtual Private Network Settings, click the
connection you want to work with and then click Settings.
In the Connection Settings dialog box, enable the use of a
proxy server by checking the box for “Use a proxy server for this
connection (These settings will not apply to other
connections).”
Enter the IP address of the proxy in the Address text
box.
Enter the port number of the proxy in the Port text
box.
Click OK to complete the proxy configuration process.
Whenever you change network connection settings, you should verify
that you can establish a connection and access resources. If you are
having difficulty connecting to the Internet after changing your
connection settings, check your proxy settings in Internet Options to enable or disable your
proxy configuration as appropriate for each connection.
