One of my favorite accessories is the Snipping Tool, which
is included with all editions of Windows 7 except Starter. The Snipping Tool captures any screen elements that
you select, including text and images. A captured element is referred to
as a snip, and you can insert snips easily into documents and email
messages.1. Creating Snips
You can open the Snipping Tool by clicking Start→All
Programs→Accessories→selecting Snipping Tool. The Snipping Tool starts
in New Snip mode, which is the mode for capturing snips. The Snipping
Tool has four capture modes:
Free-form Snip
In this mode, you outline the area that you want to snip by
drawing freehand around it. You capture a snip in this mode by
clicking and then dragging to outline the area you want to
capture.
Rectangular Snip
In this mode, you outline the area that you want to snip by
drawing a rectangle around it. You capture a snip in this mode by
clicking and then dragging around the area that you want to
capture.
Window Snip
In this mode, you capture an entire window as a snip. You
capture a snip in this mode by moving the mouse pointer over the
window that you want to capture, and then clicking.
Full-screen Snip
In this mode, you capture the full screen as a snip. When
you select this mode, the full screen is captured
automatically.
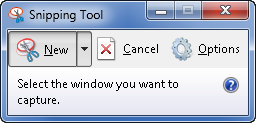
Figure 1 shows
the Snipping Tool in New Snip mode. From left to right, the buttons on
the toolbar are used as follows:
New
Starts a new capture using the default mode or the last
capture mode you used.
Capture Options
A downward-pointing triangle to the right of the New button
that sets the capture mode.
Cancel
Cancels the current capture.
Options
Sets capture options.
You can capture a snip by following these steps:
Click Start, click All Programs→Accessories→Snipping Tool. The
Snipping Tool is displayed in the foreground, and the rest of the
screen is lightened automatically to make it easier to distinguish
the Snipping Tool interface elements from the background elements
you are capturing.
Click the Capture Options button and select the capture mode
you want to use.
Capture your snip. As Figure 2 shows, you
capture a rectangular snip by clicking and then dragging around the
area that you want to capture.
When you release the mouse button, the Snipping Tool captures
the snip and shows the editing view. You can then use the editing
view to edit the snip, as discussed in the next section.

