Documents you print can be either spooled or sent directly
to the printer. When you use spooling with printing rather than
direct-to-printer printing, documents that are waiting to print or are in
the process of printing are stored on the print server as a print job. If
you encounter problems while printing, you may want to check the status of
print jobs and pause or cancel a print job as necessary. Because fax
machines and scanners typically can be used to both send and receive
documents, they typically have incoming jobs and outgoing jobs that you
can manage.1. Working with Print Jobs
You manage the print jobs associated with a printer using the
print management window. If the printer is configured on your computer,
you can access the print management window by completing the following
steps:
Click Start→Devices and Printers.
In Devices and Printers, right-click the printer you want to
work with and then select “See what’s printing.”
If the printer isn’t configured on your computer, you can manage
the printer remotely by completing these steps:
Click Start and then click Network.
Double-click the computer sharing the printer.
Double-click the printer.
You can now manage print jobs for the selected printer using the
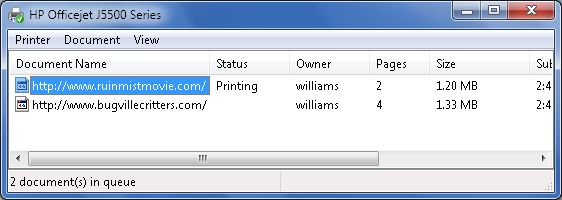
print management window shown in Figure 1. The print management
window provides details about documents being printed or waiting to
print on the selected printer. These details include:
Document Name
Shows the name of the application that printed the document,
and the document name.
Status
The status of the print job. Document status entries you’ll
see include Printing and Error–Printing.
Owner
The person who printed the document.
Pages
The number of pages in the document.
Size
The document size in kilobytes or megabytes.
Submitted
The time and date the print job was submitted.
Port
The port used for printing.
You can set the status of individual documents using the Document
menu in the print management window. To cancel printing or change the
status of a document, follow these steps:
Select the document in the print management window.
On the Document menu, use one of the following options to
change the status of the print job:
Cancel
Cancels printing of the document and removes the print
job.
Pause
Puts the document on hold and lets other documents
print.
Resume
Resumes printing of a paused document. Printing resumes
from where it left off.
Restart
Starts printing the document again from the
beginning.
NOTE
Sometimes when you cancel a print job that’s currently
printing, the printer might continue to print part of the document or
all of it. This can occur because most printers cache documents in an
internal buffer and may print the contents of this cache before
checking for updates.
2. Working with Printers
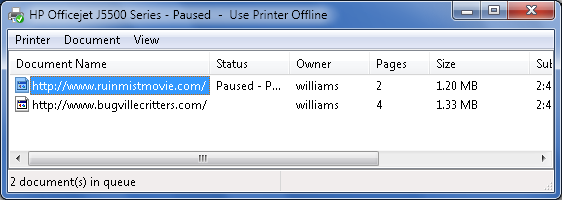
The title bar in the print management window provides details on
the status of the printer itself. If printing is paused or the printer
is offline, you’ll see related status details on the title bar, as shown
in Figure 2.
Before you try to repair or resolve a problem with a printer
shared with multiple people, you may want to pause printing. Using the
print management window, you do this by selecting the Pause Printing option from the Printer menu. A checkmark
indicates that the option is selected. When you pause printing, the
printer completes the current job and then puts all other print jobs on
hold. When printing is paused, the printer accepts but does not print
new print jobs. To resume printing, select the Pause Printing option a
second time. This should remove the checkmark next to the option.
When you have problems with a printer, you may find that many of
the print jobs currently waiting to print are simply reprints of the
same document or of documents that are no longer needed. In this case,
you can use the print management window to empty the print queue and delete all its contents. To do this,
select the “Cancel all documents” option from the Printer menu.
In addition to pausing a printer, you can also designate a printer
as being offline. Using the print management window, you specify that a
printer is offline by selecting the “Use printer offline” option from
the Printer menu. A check mark indicates that the option is selected.
When the printer is offline, the printer does not accept new print jobs
but will print existing jobs waiting to print as long as printing is not
paused. To designate that a printer is back online, select the “Use
printer offline” option a second time. This should remove the checkmark
next to the option.
NOTE
If a printer is designated as being both offline and
paused, you must clear both to restore normal printing
operations.
