4. Burning Data CDs
and DVDs
Windows Live
Photo Gallery has built-in CD and DVD burning
features. You can use these features to create archive copies and
to
share pictures and videos with others. Before you burn data CDs
and
DVDs, you should familiarize yourself with the disc types and disc
filesystem options that are available.
NOTE
You don’t necessarily have to use Windows Live Photo
Gallery to
burn data CDs and DVDs. Anytime you insert a blank CD or DVD,
Windows
7 shows a Burn button on the Windows Explorer toolbar. Clicking
this
button starts the Burn a Disc Wizard, and you can burn discs in much
the
same way as discussed in this section.
4.1. Navigating the
available types of data discs
With
data CDs and DVDs, you can burn any files in your gallery
to create a data disc.If you create a
data DVD with pictures in JPEG format, any DVD player that
supports
this format can read and play the disc as a slideshow. An
alternative
to this is to make a movie as a DVD-Video using your pictures.
You
will then be able to play the DVD in just about any DVD player,
providing that you use a standard type of DVD disc. Because data
DVDs
can hold an enormous number of JPEG images, you can create
photo-album
slideshows that run for hours.
When you are working with data CDs and DVDs, you
need to keep in
mind that computer and home or car CD and DVD players are
different.
Your computer DVD player typically is designed to read
commercially
produced CD-ROMs and DVD-ROMs as well as computer-burned CDs and
DVDs
in specific formats. To make matters worse, different Windows
programs
may have varying support for different disc types. Case in
point:
Windows Live Photo Gallery supports a similar but different set
of
disc types than Windows Media Player.
Although Windows Live Photo Gallery won’t burn
audio CDs, it
does give you more burning options for data discs than Windows
Media
Player does. Windows Live Photo Gallery supports burning data
CDs to
CD-R, CD+R, and CD-RW. Windows Live Photo Gallery supports
burning
data DVDs to DVD-R, DVD-RW, DVD+R, DVD+RW, and DVD-RAM. DVDs can
be
either single-sided and single-layered or single-sided and
dual-layered. DVD-Audio and DVD-Video aren’t supported for data
disc
burns, but you can make a movie as a DVD-Video.
Many CD/DVD burners support multiple disc types.
Of the
many types of writable discs, not all discs can be formatted
with a
filesystem and used in the same way. To help you choose the
right disc
for the task, Table 1
provides some tips and advice.
Table 1. Navigating CD and DVD options
| Disc
type | How
used | Compatible
with |
|---|
| CD-R, CD+R, DVD-R,
DVD+R | These disc types are
recordable. Data cannot be deleted once
recorded. | Compatible with many
computers and some CD/DVD players. |
| CD-RW, DVD-RW,
DVD+RW | These disc types are
re-recordable. Data can be deleted after it is recorded,
and
you can write data to the disc many times. | Compatible with many
computers and some CD/DVD players. |
| DVD-RAM | These
disc types are
re-recordable. Data can be deleted after it is recorded,
and
you can write data to the disc many times. | Compatible with fewer
computers and CD/DVD players. |
4.2. Navigating data
disc filesystem options
Most Windows programs create data discs using a
mastered
approach and discs are written in the appropriate filesystem
format
automatically. With a mastered approach, you select a collection
of
files that you want to copy to a disc and then burn all the
files at
once. When you are burning large collections of files, this is a
convenient approach with the added bonus of compatibility with
any
computer or device that supports the type of data disc you are
using.
When you
burn files to data discs using mastering, you burn
files in a session. In many CD/DVD burning programs, you have
the
option of leaving a session open to allow you to add files
later, and
then you close the session when you are done adding files. By
closing
the session, you finalize the disc and allow it to be read on
other
computers and devices. Otherwise, while a session is open, the
disc
can be read only on your computer. Windows Live Photo Gallery
uses the
built-in CD/DVD burn feature of Windows 7. Instead of opening a
session, Windows 7 creates a burn list and copies files you want
to
burn to a temporary folder. Once you’ve collected all the files
you
want to burn, you can open a burn session, write the files, and
then
close the burn session. Once the burn session is closed, you can
no
longer add to the disc.
With
Windows Live Photo Gallery, you can create data discs with
what Windows 7 calls a “live filesystem.” A data disc with a
live
filesystem works like any other type of removable storage, such
as a
USB flash key or a removable disc drive. You can copy files to
the
disc immediately without having to burn them, simply by copying
and
pasting files or by dragging and dropping files. If the disc is
re-recordable, you can remove files simply by selecting them and
deleting them. If you eject the disc, you can insert it into
your
CD/DVD drive later and continue to use it like removable
storage. The
major drawback, however, is that home and car CD/DVD players
cannot
read data discs with a live filesystem—only computers can.
Technically, data discs with a live filesystem are
formatted
using the Universal Disc Format (UDF) rather than the standard
CD
File System (CDFS). Although UDF has been around for
a long time, you might not have heard of it before, because
although
Windows has supported UDF since Windows 98, you needed to
purchase a
separate CD/DVD burner program to actually create and use UDF.
That is
no longer the case with Windows 7.
At the time I wrote this book, UDF versions included
the
following:
UDF 1.5
This format is compatible with Windows 2000 and
later
versions of Windows. It might not be compatible with
Windows 98
or Apple computers.
UDF 2.0
This format is compatible with Windows XP and
later
versions of Windows. It might not be compatible with
Windows 98,
Windows 2000, or Apple computers.
UDF 2.01
This is the default format, and it includes a
major bug
fix that you’ll want to take advantage of in most cases.
This
format is compatible with Windows XP and later versions of
Windows. It might not be compatible with Windows 98,
Windows
2000, or Apple computers.
UDF 2.5
This format is optimized for Windows Vista and
later
versions of Windows. It might not be compatible with
earlier
versions of Windows or Apple computers.
As Windows 7 uses UDF 2.01 by
default, this means data CDs you
burn with a live filesystem will be compatible with Windows XP,
Windows Vista, and later versions of Windows.
4.3. Burning data disc masters
You can burn a mastered disc
by completing the following
steps:
In Windows Live Photo Gallery, select one or more of
the
pictures and videos you want to burn to disc.
Click
Make and then click Burn a Data CD. Windows Live Photo
Gallery will then open the tray on your default CD/DVD
burner.
Insert a blank disc into your
CD/DVD burner and then close
the tray. You can insert a CD or DVD.
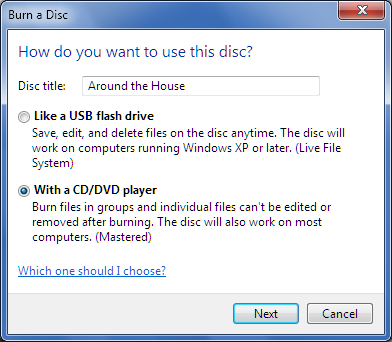
In the Burn a Disc
Wizard, type a disc title, select
With a CD/DVD Player, as shown in Figure 3.
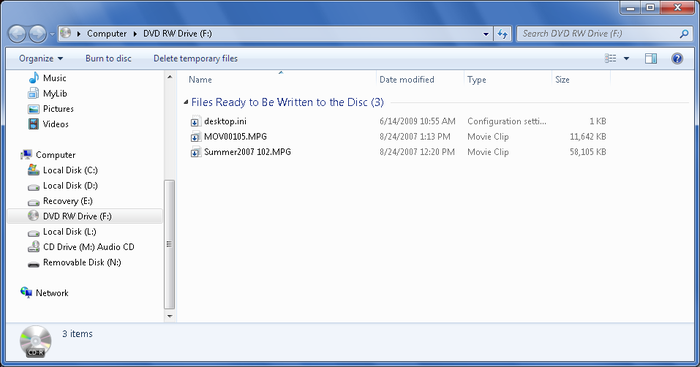
When you click Next,
the data disc is opened in Windows
Explorer, as shown in Figure 4. The “Files Ready to Be
Written to the Disc” pane shows the pictures and videos
you’ve
selected. This is your burn list. Don’t close this window.
NOTE
Files on the burn list are copied from their original
location
and written as temporary files to a temporary folder. This
temporary
folder is created in your personal profile. Copies of these
files
are created to be sure that all the files are in one place and
that
you have appropriate permissions to access the files before
trying
to burn the disc.
To add more
pictures and videos, select them in Windows Live
Photo Gallery, click Make, and then select Burn a Data CD.
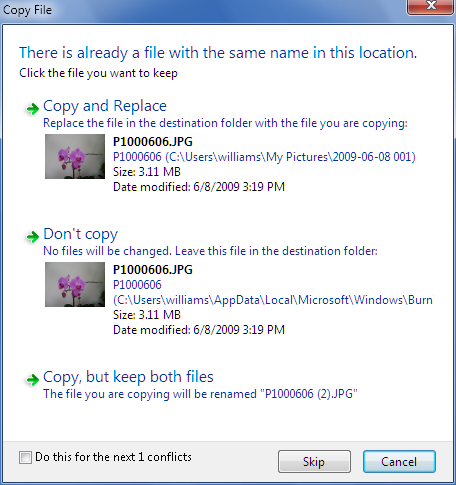
If you
try to add any pictures or videos that are already added to
the
burn list, you’ll see the Copy File dialog box shown in Figure 5. Before you
click “Copy and Replace,” “Don’t Copy,” or “Copy, but keep
both
files” as appropriate, you might want to select the “Do this
for
the next . . . conflicts” checkbox to perform the same
action for
all duplicate copies.
To
add files that are on your computer but are not in your
gallery, drag the files to the burn list in Windows
Explorer. You
can add any type of file using this technique; not just
pictures
or videos.
If you want to remove a
picture or video from the burn list,
click it and then click “Delete temporary files.” When
prompted to
confirm the action, click Yes. The related temporary file is
then
moved from the burn list to the Recycle Bin. The original
version
of the picture or video will still exist in its original
location.
Once you’ve added
all the files you want to burn, access the
burn list in Windows Explorer. Click an open area within the
burn
list and then press Ctrl-A and then on the status bar click
the
Show More Details link. Note the total size of all selected
files,
and remove files as necessary so that all the files fit on
one
disc. Unlike Windows Media Player, the Burn to Disc Wizard
will
not burn files to multiple discs.
NOTE
If you are unsure of the total capacity of a disc, simply look
at another disc of the same type. The capacity is written on
the
disc. Most data CDs can hold up to 700 MB of data. Most
single-sided
single-layered DVDs can hold up to 4.7 GB of data.
When you are ready to continue, click Burn to
Disc. In the
Burn to Disc Wizard, the disc title is set using the title
you
provided previously, and the recording speed is set to the
maximum
speed supported by the CD/DVD drive.
When you click Next, Windows 7 will add the
files you
selected to a disc image and then write the files to your
data
disc. When finished burning the disc, Windows 7 will
automatically
eject the disc. By default, the temporary files are deleted
and
you can click Finish to exit the Burn to Disc dialog box. If
you
want to burn the same files to another disc, select the
“Yes, burn
these files to another disc” checkbox before clicking
Finish.
Keep the following in mind when working with the
Burn to Disc
Wizard:
If
an error occurs while burning, you’ll see a burn error
message. As shown in Figure 6, you’ll have
the option of trying again with a different disc, deleting
the
temporary files that have not burned, or saving all the
temporary
files and trying to burn them later. If you try again, make
sure
you select a slower burn speed. Although your CD/DVD drive
may be
able to burn at a high speed, the disc itself may not be
rated for
burning at the speed you’ve selected.

NOTE
Generally, if you see a burn error, only a portion of your
files will be written to the disc. If the burn session is
still
open, you can try to burn to the disc again. However, in some
cases,
you may find that you have to use a new blank disc.
If you miscalculated the
capacity of your data disc, you’ll
see a free space error and will have to click Cancel or
Finish.
Both actions exit the Burn to Disc Wizard. Don’t worry; you
don’t
have to start over. When you click Cancel or Finish, you’ll
see
the Windows Explorer window with the files you are trying to
burn.
Remove files to reduce the total size of the data and then
click
Burn to Disc.
NOTE
Rather than deleting items, you can change the type of disc
you’re working with. If you inserted a CD but want to use a
DVD
instead, simply eject the CD and insert a DVD. You’ll then see
the
Burn to Disc Wizard.
4.4. Burning a data
disc with a live filesystem
You can burn a
data disc with a live filesystem by
completing the following steps:
In Windows Live
Photo Gallery, select one or more of the
pictures and videos you want to burn to disc.
Click
Make and then click Burn a Data CD. Windows Live Photo
Gallery will then open the tray on your default CD/DVD
burner.
Insert a blank disc into your
CD/DVD burner and then close
the tray. You can insert a CD or DVD.
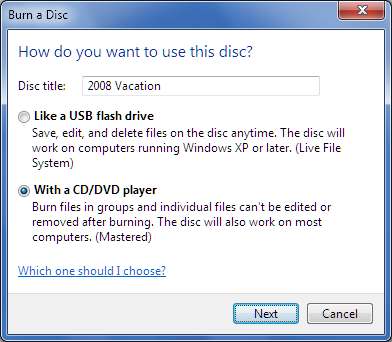
In
the Burn a Disc Wizard, type a disc title, select Like a
USB Flash Drive, as shown in Figure 7.
By default, Windows 7 burns
live discs using UDF version
2.01. When you click Next, Windows 7 formats the data disc
and
then copies the selected pictures and videos to the disc.
Click Start and then click Computer. In the Computer window,
right-click the CD/DVD drive you were working with and then
select
Open. The data disc is opened in Windows Explorer.
Because
you are working with a live disc, there is no burn
list. You can now work with the disc as follows:
To add files that are on your
computer but not in your
gallery, drag the files to the burn list in Windows
Explorer.
You can add any type of file using this technique; not
just
pictures or videos.
To add pictures and videos in your gallery, select
the
pictures and videos in Windows Live Photo Gallery, click
Make,
and then click Burn a Data CD. The files will be copied
to the
live data disc.
To remove a picture or video from the disc, click it
and
then press Delete, or right-click it and then select
Delete.
With rewritable (RW) discs, the file is
removed and the space is freed for other files. With
recordable (R) discs, the file is marked
as deleted but actually still exists on the disc.
Because of
this, the space used by the deleted file is still
allocated
and cannot be used by other files.
While the disc is inserted, Windows 7 will maintain an open
burn
session for the disc. If you eject the live data disc, Windows 7
will
close the burn session so that you can use the disc with other
computers. From then on, whenever you insert the disc, you’ll be
able
to add or remove files using Windows Explorer, Windows Live
Photo
Gallery, and other Windows programs. Windows 7 will open another
burn
session only if you modify the disc’s contents. As before, you
can
close the session by ejecting the disc.
NOTE
You can also close a burn session
by right-clicking the CD/DVD
drive in the Computer window and selecting “Close
session.”
