5. Importing Digital Videos from Cameras, CDs, and DVDs
Windows Live Photo Gallery has one set of import settings
for both pictures and videos, and handles the importing of most types of
digital videos in the same way as pictures. If you want to import
digital videos using the same basic technique as pictures, follow the
steps discussed in the previous section titled Section 9.3.4. You’ll then be
able to preview and delete your videos prior to importing them.
You also can import digital videos into your gallery and
automatically name your imported items by completing the following
steps:
Connect your camera, video camera, or memory storage device to
your computer or insert a data CD or DVD containing pictures into
your CD/DVD drive.
You’ll usually see an AutoPlay dialog box similar to the one
shown previously in Figure 1.
In the AutoPlay dialog box, you’ll want to click “Import pictures
and videos using Windows” to begin the import process. If you don’t
see the AutoPlay dialog box, click Start→Computer, right-click the
device and then select Open AutoPlay.
NOTE
If you always want to import videos when you connect this camera
or insert this type of memory card, select the “Always do this for
video files” checkbox and then click “Import pictures and videos.” The
next time you import videos, you’ll bypass the AutoPlay dialog box and
go straight to the Import Pictures and Videos dialog box.
After the Import Videos Wizard determines how many videos are
available for importing, you’ll see the Importing Pictures and
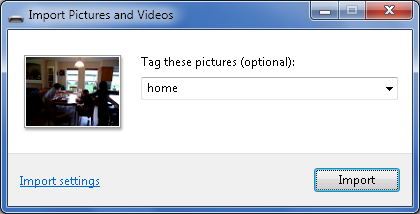
Videos dialog box, shown in Figure 5.
In the “Tag these pictures” text box, enter a tag for the
videos you are importing. Click Import Settings to manage the import
options .
Click Import to import the videos into a subfolder of your
default videos folder. By default, the subfolder is named with the
date imported and videos retain their original filename.
6. Changing the Default AutoPlay Settings
AutoPlay settings are designed to make your life easier by
remembering your preferred choices for various types of media and then
performing related actions for you automatically. Sometimes, though, the
AutoPlay settings won’t perform the desired action and you’ll want to
reset them so that the AutoPlay dialog box is displayed.
You can reset the AutoPlay settings by completing the following
steps:
In the Windows Live Photo Gallery main view, click File and
then select Options. This displays the Windows Live Photo Gallery
Options dialog box.
NOTE
If the File menu doesn’t have an Options item, it’s because
you aren’t in the main view. Click the Back to Gallery button and
then repeat this step.
On the Import tab, click the “Change default AutoPlay options”
link. This displays the AutoPlay page in the Control Panel, as shown
in Figure 6.
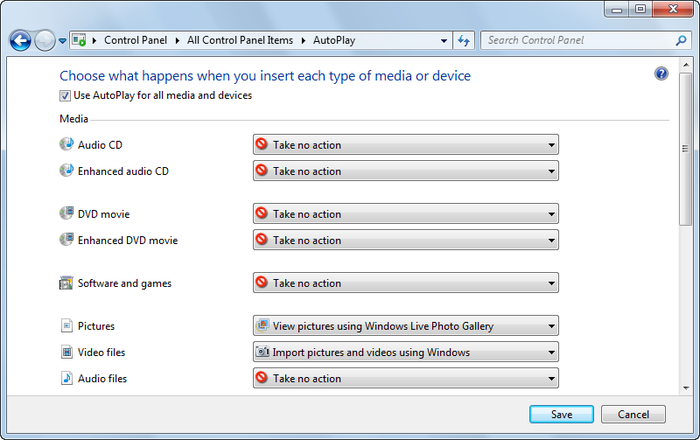
Make sure the “Use AutoPlay for all media and devices”
checkbox is selected.
To ensure that the AutoPlay dialog box is displayed, set the
AutoPlay options for Pictures and Video Files to “Ask me every
time.” Alternatively, if you want to begin importing immediately
every time you connect a device, select “Import Pictures and Videos
using Windows Live Photo Gallery” for Pictures and “Import Pictures
and Videos Using Windows” for Video Files.
Click Save to save your settings.
7. Configuring Import Settings
The import settings in Windows Live Photo Gallery control
how digital pictures and digital videos are imported. You can set
separate default settings by completing the following steps:
In the Windows Live Photo Gallery main view, click File and
then select Options.
NOTE
If the File menu doesn’t have an Options item, it’s because
you aren’t in the main view. Click the Back to Gallery button and
then repeat this step.
In the Windows Live Photo Gallery Options dialog box, click
the Import tab, as shown in Figure 7. This is the same
dialog you will see if you click More Options from the Import Photos
and Videos dialog.
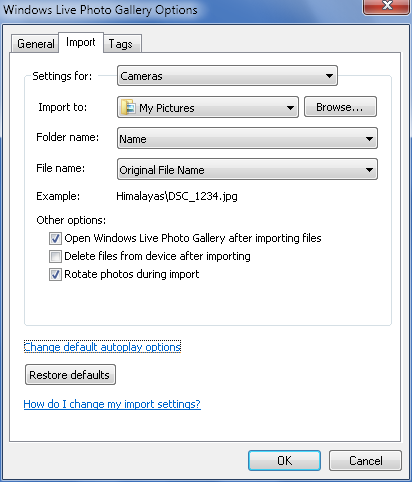
On the “Settings for” list, select Cameras, Video Cameras,
Album Download, or CD and DVDs as appropriate.
The “Import to” list shows the default import location. If you
want to set a different default import location, click Browse and
then use the Browse for Folder dialog box to select the folder to
use. This folder should be one that is monitored by Windows Live
Photo Gallery or a subfolder of a monitored folder.
Use the Folder Name list options to specify the naming scheme
of the folder created for storing the imported items. You can set
this to:
Date Imported + Name
Date Taken + Name
Date Taken Range + Name
Name + Date Imported
Name + Date Taken
Name + Date Taken Range
Name
(None)
Use the “File name” list options to specify the default naming
scheme for imported pictures and videos. You can select “Name,”
“Original file name,” “Original file name (preserve folders),” “Name
+ Date Taken,” or “Date Taken + Name.” If you don’t use the original
filename, filenames will include a sequential numeric suffix, such
as Halloween 001.jpg, Halloween 002.jpg, and so on.
If you don’t want to keep the pictures or videos on your
camera or memory stick after importing, select the “Delete files
from device after importing” checkbox. Because pictures or videos
are erased only when the import completes successfully, you don’t
have to worry about accidentally deleting pictures or videos that
didn’t get imported.
If your camera has a sensor that can detect whether you took a
picture horizontally or vertically, Windows Live Photo Gallery can
use the related information to automatically rotate pictures that
would otherwise appear to be sideways on your computer. To enable
automatic rotation, select the “Rotate photos during import” checkbox.
To ensure that pictures are opened in Windows Live Photo
Gallery after importing, select the “Open Windows Live Photo Gallery
after importing files” checkbox.
Click OK to save your settings.
