Windows Live Photo Gallery (Figure 1) is one of several
free programs available as part of the Windows Live Essentials program from Microsoft. Other free
programs available include Windows Live Mail, Windows Live Messenger, and
Windows Live Writer. To get Windows Live Photo Gallery and other programs,
all you need to do is visit http://www.windowslive.com. After you sign up for the
program and sign in, you’ll be able to click the Download Now button or a
similar option and then follow the prompts to download and run the Windows
Live Setup program. When Setup starts, select the programs you want to
install and then click Install. That’s it! Once you install the Windows Live programs, they are
available by clicking Start→All Programs→Windows Live and then selecting the program
that you want to run.NOTE
If you’ve never worked with live web-enabled programs before,
you’ll notice some important changes when working with the Windows Live
Essentials programs. When you install the Windows Live Essentials
programs, your computer is configured to use an enhanced version of
Windows Update called Microsoft Update (if this isn’t already installed). Microsoft Update checks for
updates to Microsoft programs as well as Windows and this helps ensure
the Windows Live Essentials programs can be updated automatically and in
much the same way as Windows itself.
Because these programs are completely web based, they are updated
out of band from Windows and from other Microsoft programs, like Office.
This means that Microsoft can more easily deploy new versions of the
programs. New versions of Windows Live Essentials programs typically
aren’t installed automatically and instead may appear as optional
updates in Windows Update that you need to select and then install. You
would need to check Windows Update periodically for these types of
updates. That said, if you know there are new versions of the programs,
you can download and install the new versions manually simply by
repeating the download process you used to install the programs in the
first place. When you start the download process and Setup starts, Setup
will tell you if there are new versions that can be installed. You can
then select the new versions to install or cancel the install if there
aren’t new versions available.
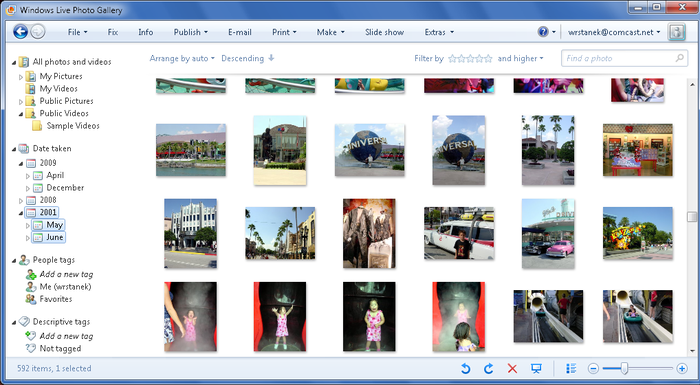
Windows Live Photo Gallery allows you to view, edit,
organize, and share pictures and videos. You start Windows Live Photo
Gallery by clicking Start→All Programs→Windows Live→Windows Live Photo Gallery. The
first time you start Windows Live Photo Gallery you are prompted to sign
in to Windows Live and then prompted to use the program as the default for
supported file types. As Figure 1 shows, the main
window has these key elements:
Navigation toolbar
Provides browser-like Back and Next buttons that let you
navigate to pages you’ve viewed previously. It also has these Quick
Access buttons: File, Fix, Info, Publish, E-Mail, Print, Make, Slide
Show, and Extras.
Navigation Pane
Provides quick access for organizing and displaying
pictures and videos by type, folders, date taken, and tags.
Preview/work area
Displays thumbnail previews of pictures and videos when you
select a particular category or type, and provides the main work
area for when you are performing tasks such as fixing
pictures.
Controls toolbar
Provides basic controls for manipulating a selected picture or
video. You can rotate pictures clockwise or counterclockwise, delete
selected items, begin and navigate a picture slideshow, view details
or thumbnails, and change the default display size.
NOTE
The controls toolbar lists the total number of items in Windows
Live Photo Gallery as well as the total number of items you’ve selected.
By default, Windows Live Photo
Gallery uses only your My Pictures and My
Videos folders as well as Public
Pictures and Public Videos
folders.
1. Accessing Key Features
As Figure 2 shows, the
Navigation toolbar includes Forward and Back buttons that
allow you to access locations you’ve previously viewed. Clicking a Quick
Access button on the Navigation toolbar allows you to access the main
areas of Windows Live Photo Gallery.

You can use the Navigation toolbar’s Quick Access buttons as
follows:
File
Allows you to add folders, import images from cameras, video
cameras, and elsewhere, and to manipulate existing files.
Fix
Allows you to edit a selected picture using Auto Adjust,
Adjust Exposure, Adjust Color, Straighten Photo, Crop Photo,
Adjust Detail, Fix Red Eye, and Black and White Effects
options.
Info
Displays an Information pane for a selected picture or video
that provides details about the related file.
Publish
Allows you to publish selected pictures or videos to
online albums, including a personal, group, or event album on the
Windows Live service.
E-Mail
Allows you to email selected pictures and videos.
Print
Allows you to print selected pictures. You can also order
prints from Kodak and other companies.
Make
Provides additional options for working with pictures and
videos. The Create Panoramic Photo option merges two or more
pictures together to create a combined, panoramic image. The
Make a Movie option opens the selected pictures and
videos in Windows Live Movie Maker so that you can make a movie.
The Burn a DVD and Burn a Data CD options allow you to create a
DVD video using Windows DVD Maker. Note that only computers
running Windows 7 Home Premium or Windows 7 Ultimate have Windows
DVD Maker.
Make a Movie
Opens the selected pictures and videos in Windows Live Movie
Maker so that you can make a movie.
Slide Show
Plays a slideshow of the currently listed or
currently selected pictures. You can also play a slideshow by
pressing F12 or Alt-S. To stop the slideshow, press the Esc
key.
Extras
Allows you to download additional photo tools that are
available as add-ins. Also allows you to open selected pictures or
videos in another program, such as Windows Media Center or
Paint.
On the far right side of the Navigation toolbar, you’ll find the
Sign In option that allows you to sign in to the Windows Live service.
When you are signed in, clicking your user id displays options that
allow you to sign out, view photos you’ve published in your personal
albums online, or access your Windows Live account. You do not need to
be logged in to Windows Live to use Windows Live Photo Gallery. You need
to sign in to the service only if you want to use the connected-online
features, such as publishing pictures to an online album.
