3. Setting the DVD Burning and Playback OptionsWindows DVD Maker allows you to add a DVD menu to your
videos, to encode your videos using an aspect ratio for widescreen or
standard screen, and to format your videos using either NTSC or PAL video format. In Windows DVD Maker, you can set these
and other options by completing the following steps: On the “Add pictures and video to the DVD” page, the “DVD
burner” list shows which drive will be used for burning the DVD. If
your computer has multiple DVD burners, select the disc you want to
use. Use the “DVD title” text box to set the working title for the
DVD. The Options link is in the lower-right corner. Click this link
to display the Options dialog box shown in Figure 9.
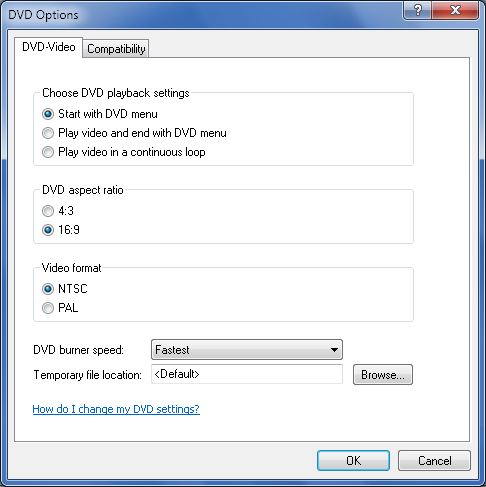
Under “Choose DVD playback settings,” choose how you want the
DVD to play by selecting one of the following options: If you want the DVD menu to display when the disc is
inserted in a DVD player, click Start with DVD Menu. If you want the video to play immediately when the disc is
inserted in a DVD player and show the menu at the end, click
“Play video and end with DVD menu.”
If you want the video to play automatically and loop
continuously, click “Play video in a continuous loop.” With this
setting, you will see the menu only if you choose the Menu option
using the remote control for your DVD player. Under “DVD aspect ratio,” choose the DVD aspect ratio.
The aspect ratio is expressed as the relation of the video width to
the video height. For widescreen, choose 16:9 as the aspect ratio.
For standard (full) screen, choose 4:3 as the aspect ratio.
NOTE When deciding which aspect ratio to choose, consider who will be
playing your video and the type of screen she has. Although all
monitors and TVs can play videos recorded in either aspect ratio, your
video will look best when using the native format supported by the
monitor or TV. A widescreen video will look best on a widescreen
monitor or TV. A standard video will look best on a standard monitor
or TV. Under “Video format,” select either NTSC or PAL. If you are unsure of which format to use, don’t
change the default format, because this is set based on the Regional
and Language Options in the Control Panel. You will need to change
the format only when you plan to share your video DVD with a friend
who lives in another country or region.
NOTE Video signals are broadcast using a standard format. NTSC is the
standard format in North America and Japan. PAL is the standard format
for most of Europe. Though there are other broadcast standards, such
as SECAM used in France and variations of PAL used in some
European countries, NTSC and PAL are the standard formats in widest
use. The “DVD burner speed” list is set by default to Fastest,
allowing you to encode the DVD at the fastest speed your DVD burner
supports. The rated speed of the DVDs you are using will largely
determine your success when burning at faster speeds. If you
experience problems when burning DVDs at the fastest speed
supported, try using a slower setting or discs rated for a higher
burn speed. On some DVDs, the top-rated burn speed is imprinted
clearly as part of the label. On other DVDs, you may have to look
closely at the packaging or the small-print lettering on the DVD
itself. By default, Windows DVD Maker creates a working version of the
DVD in a temporary folder within your profile. Because your profile
is stored on the system drive, which is typically the C: drive, this drive must have at least 5
GB of available disk space when you are creating a single-sided
single-layered DVD, and 10 GB of available disk space when you are
creating a single-sided double-layered DVD. If you want to choose a
folder on another drive for the temporary files, click Browse and
then use the Browse for Folder dialog box to select the new folder
to use. Click OK to save your settings.
4. Customizing the DVD MenuVideo DVDs can include a menu that is displayed either at
the start of the video or at the end of the video. The primary options
on this menu are as follows:
Play Plays the video from the start.
Scenes Displays a scenes selection page, allowing you to navigate
to a particular part of the video.
Notes Displays a notes page if you’ve added notes to the
video.
You can customize the menu and the related menu pages on the
“Ready to burn DVD” page. From the “Add pictures and video to the DVD”
page, you can display the “Ready to burn disc” page, which is shown in
Figure 10, by clicking Next. 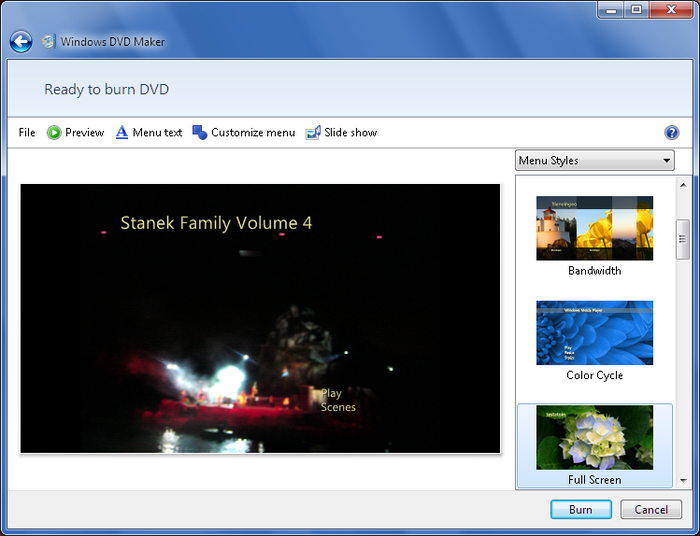
On the “Ready to burn disc” page, you can use the options on the
Menu Styles list to choose a menu style, such as Highlights or Video
Wall. When you select a style, Windows DVD Maker displays a large
preview of that style in the main work area. After you’ve selected a menu style, you can customize the menu
text by completing the following steps: 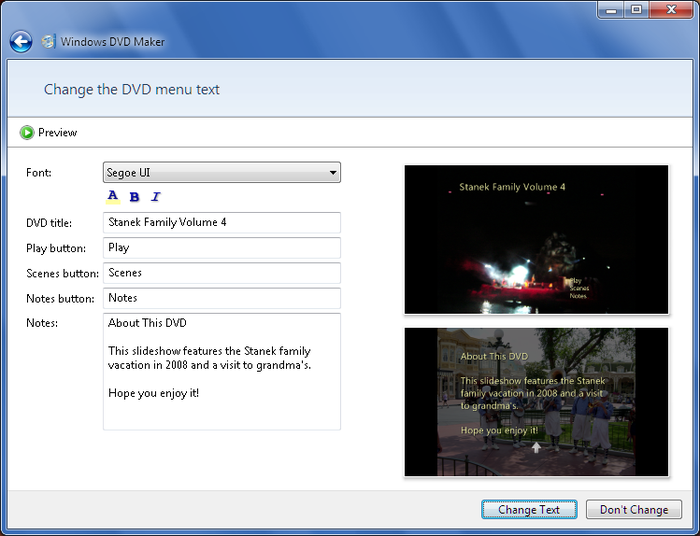
Click the “Menu text” button on the toolbar. This displays the
“Change the DVD menu text” page, shown in Figure 11. Each menu style has default font settings. If you want to
change the font used for menu text, click the Font list and select
the font you want to use. To change the font color, click the Font Color button (it
shows the letter A), choose a color in the Color dialog box, and
then click OK. Most menu text is displayed in bold but not italic by default.
To toggle bold and italic on and off, click the related
buttons. If you didn’t already set the disc title, type in the text box
provided. By default, the text for the Play, Scenes, and Notes buttons
says Play, Scenes, and Notes, respectively. If you want to make this
text more descriptive, enter the text you’d like to use in the
fields provided. For example, you may want to use Play Video, View
Scenes, and Display Notes instead of the default text. The Notes button is displayed only when you type notes for the
DVD. If you want to add notes to the DVD, enter the notes in the
text box provided. As shown in the example, you may want to preface
your notes with a heading, such as the one shown, leave a blank
space, and then type the main text of your note. When you are finished customizing the menu text, click Change
Text to save your changes and return to the “Ready to burn”
page.
After you’ve customized the menu text, you can customize the menu
style by completing the following steps: 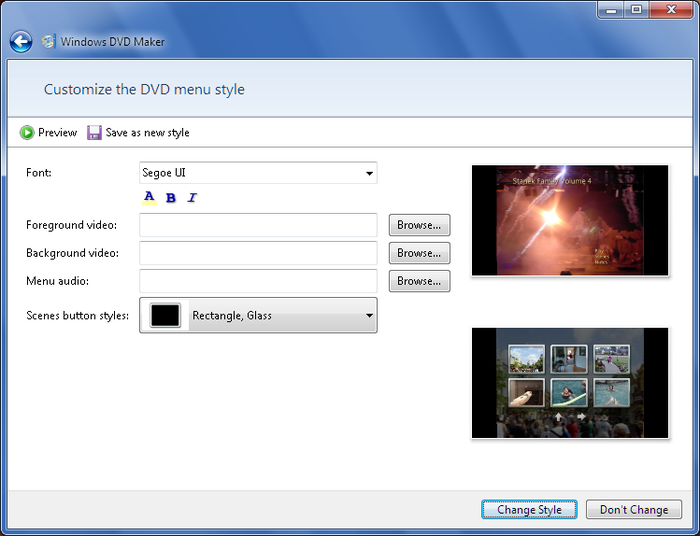
Click the “Customize menu” button on the toolbar. This
displays the “Customize the disc menu style” page, shown in Figure 12. The Font options on this page are the same as those on the
“Change the DVD menu text” page. If you’ve already set the font
options, you don’t need to again. Each menu style has two key characteristics: a background and
one or more cut frames in the foreground. With some menu styles, you
can specify a picture or video to display in the background and a
picture or video to display in the cut frames. Click the Browse
button to the right of the “Background video” text box to set the background
video. Click the Browse button to the right of the “Foreground video” text box to set the foreground
video for the cut frames. To play an audio file whenever the DVD menu is accessed, click
the Browse button to the right of the “Menu audio” text box. Use the
“Add audio to the menu” dialog box to select the audio file to play,
and then click Add. When choosing an audio file, keep in mind that
only a 5- to 10-second clip of the selected audio file is played,
and this clip comes from the beginning of the audio file. On the scenes page in the finished DVD, scene buttons show a
preview of scenes to which you can navigate in the video. Each menu
style has a default button style, but you can choose your own button
style using the options on the “Scenes button styles” list. If you’d like to save
your menu style as a custom style you can use in another project,
click “Save as a new style.” When you are finished customizing the menu style, click Change
Style to save your changes and return to the “Ready to burn”
page.
|
