The default network settings in most cases produce a
working network environment with minimal fuss and bother. However, you
might want to modify some of the settings for your network.
1. Specifying the Order and Connection Properties of Preferred Wi-Fi Networks
The first time you
connect to a wireless network, Windows adds that network to the top of
the list of networks that use your wireless connection. If you take your
computer to a different location and connect to a new network, that
location is added to the list of wireless networks.
Each time you turn on your
computer or enable your wireless adapter, Windows attempts to make a
connection. The WLAN AutoConfig service tries to connect to each network
in the list in the order that those networks appear. Unlike Windows XP,
which included in its preferred networks list only networks that
broadcast their SSID, Windows 7 includes non-broadcast networks also.
This makes it possible to set a nonbroadcast network to a higher
priority than an available broadcast network; Windows XP exhausts the
list of broadcast networks before attempting to connect to an available
nonbroadcast network.
You can alter the order
of networks in the list and configure any entry for manual rather than
automatic connection. To manage the settings of entries on the list of
preferred networks, in Network And Sharing Center, click Manage Wireless
Networks to open the window shown in Figure 1.
To change the order of
entries in the list, select the entry you want to move and then click
Move Up or Move Down. Alternatively, you can drag a network to the
desired position.
|
Windows switches between preferred networks
If you're within
range of more than one preferred network, Windows might switch
repeatedly between the networks as signal strengths vary. This causes
delays as your computer negotiates each new connection and sometimes
drops the connection altogether. To prevent this from happening, in
Manage Wireless Networks, double-click one of the interfering networks.
On the Connection tab, clear Connect To A More Preferred Network If
Available and then click OK.
|

Manage Wireless Networks
is also the place to review and, optionally, change connection settings
for a network. To do that, double-click a network, which opens the
network's properties dialog box, shown in Figure 2.
To change an entry in the networks list from automatic
to manual, or vice versa, select or clear Connect Automatically When
This Network Is In Range. Settings on the Security tab let you specify
the type of
security and encryption and enter the security key or passphrase; if
that information has changed since you set up the connection initially,
you can change it here instead of creating a new network.

2. Renaming Your Workgroup
A workgroup is
identified by a name; all computers in a workgroup must be in the same
local area network and subnet, and all must share the same workgroup
name. In Windows 7, the workgroup name is largely invisible and
irrelevant; when you open the Network folder or look at a network map,
Windows displays all computers in the network, regardless of which
workgroup they're in. (However, network discovery is faster when all
computers are in the same workgroup.)
That was not the case in
Windows XP and earlier versions of Windows, which display in their
network folders only computers in the same workgroup as your computer.
Therefore, if your network includes computers running earlier versions
of Windows, you should use the same workgroup name for all computers so
that they can see each other. The default name for a new workgroup in
Windows 7, Windows Vista, and Windows XP Professional is WORKGROUP; in
Windows XP Home, it is MSHOME.
To set the workgroup name in Windows 7, follow these steps:
In the Start menu search box or in Control Panel, type workgroup and click Change Workgroup Name.
On the Computer Name tab of the System Properties dialog box, click Change, which displays the following dialog box:
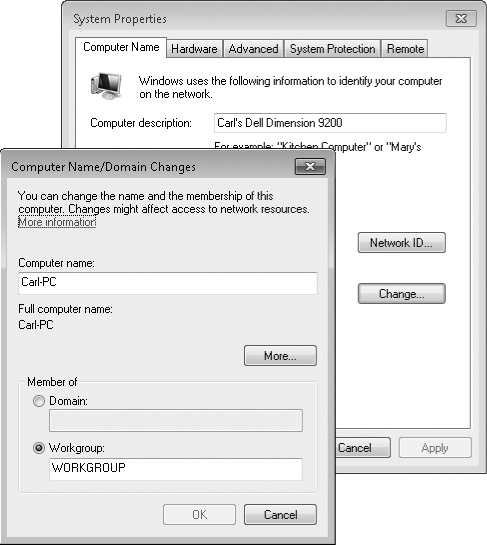
In
the Computer Name/Domain Changes dialog box, select Workgroup and type
the name of the workgroup (15-character maximum; the name can't include
any of these characters: ; : < > * + = \ | / ? ,). Then click OK
in each dialog box.
Except for the first
step, the process for changing the workgroup name in Windows XP is
nearly identical: Right-click My Computer and choose Properties. Then
follow steps 2 through 4 in the procedure just shown.
3. Renaming Your Network
You can change the name
and the icon for your network. This information appears in Network And
Sharing Center and in the information that pops up when you click the
Network icon in the taskbar notification area. The network initially
takes on the name of the wireless SSID or, if you join a domain, the
domain name. (The default name of a wired network is Home or Network.)
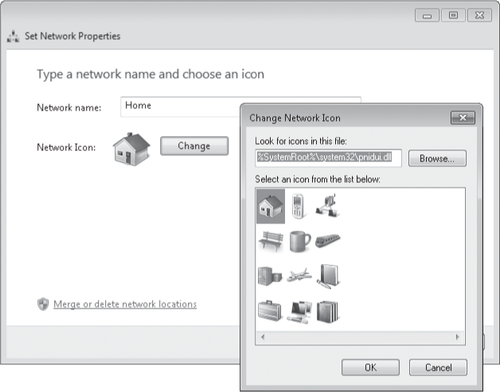
To make the change, in Network And Sharing Center, under View Your Active Networks,
click the icon for your network. Type the name you want in the Network
Name box. If you want to select a different icon, click Change, where
you'll find icons suggestive of a library, office building, park bench,
airport, coffee shop, and more.
Note:
Changing the network
name does not affect the workgroup name, wireless SSID, or domain name.
And the name you choose is visible only on your computer; other
computers can assign different names to the same network with no ill
effects.
|
The Manage Wireless Networks window (shown earlier in Figure 19-4),
can be a more convenient place to change the network name because it
lets you rename networks to which you're not currently connected. Simply
right-click a network and choose Rename.
|
4. Removing a Network
A computer that travels often is likely to accumulate settings for a large number of networks.
Although these collected settings don't have any significant impact on
performance or disk space, you might find it helpful to remove from the
list entries that you don't plan to use again, such as one for a network
at a hotel you don't expect to revisit.
To remove a wireless
network, in Network And Sharing Center, click Manage Wireless Networks.
Select a network to delete and click Remove.
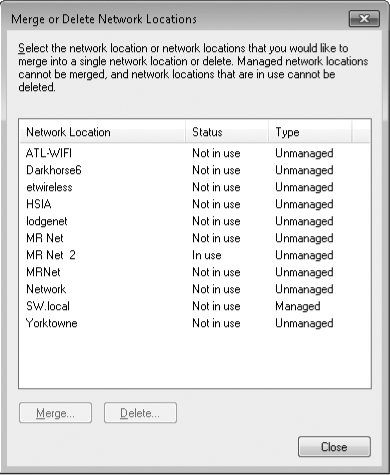
Windows includes
another tool that lets you delete unneeded wired networks as well as
wireless networks. To use it, in Network And Sharing Center, click your
network's icon to open the dialog box shown in the preceding section. In
the Set Network Properties dialog box, click Merge Or Delete Network
Locations. In the Merge Or Delete Network Locations dialog box (shown in
Figure 3), select the networks to remove and click Delete.