4. Configuring Performance Options
When you first use
Remote Desktop Connection, you might notice that the remote desktop
doesn't display a background. Disabling the background is one of several
settings you can make that affect the perceived performance of your
remote session. How you set these options depends in large measure on
the speed of the connection between the two computers. If you're using a
dial-up connection, you should disable as many features as possible to
reduce the amount of information that must be transmitted across the
wire and keep the mouse and windows movements responsive. On the other
hand, if you're connecting to another desktop over a fast local area
network, you might as well enable all features to enjoy the full
experience of working at the remote computer.
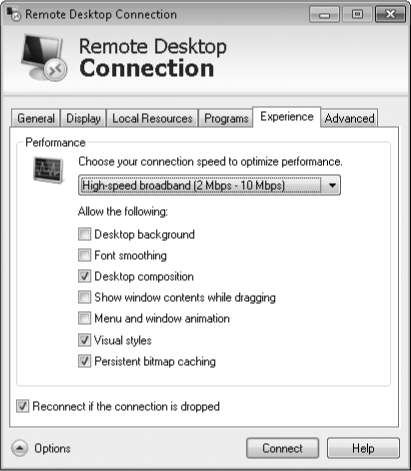
The performance-related options are on the Experience tab of the Remote Desktop Connection dialog box, shown in Figure 5. To quickly select an appropriate set of prepackaged options, select the speed of your connection from the list box.
Use those settings or select your own options. Three options on the Experience tab deserve further explanation:
Visual Styles
Clearing the Visual Styles check box disables the Aero themes and
Windows 7 Basic theme, causing everything to display using the Windows
Classic theme—the one used in earlier versions of Windows.
Persistent Bitmap Caching Unlike the other options on the Experience tab, you get the fastest performance if you select
(not clear) Persistent Bitmap Caching. Bitmap caching can speed up your
connection by storing frequently used images on a local drive.
Desktop Composition This option must be selected if you plan to use Windows Aero visual effects. Note that if you use multiple monitors for a remote
desktop connection, desktop composition cannot be used.
4.1. Saving a Remote Desktop Configuration
Changes you make in
the expanded Remote Desktop Connection dialog box are automatically
saved in a hidden file named Default.rdp (stored in your default save
location for documents), and they're automatically used the next time
you open Remote Desktop Connection. But you might want to have several
different Remote Desktop Connection configurations for connections to
different computers. If you have a portable computer, you might want
different settings for use with different connections to the same
computer (for example, dial-up versus LAN).
You can also save your
credentials (user name and password) along with the other settings. To
do so, enter your user name in the Logon Settings section of the General
tab and select Allow Me To Save Credentials. You'll be prompted to save
the password (in encrypted form, of course) when you log on.
To save a configuration, simply make all your settings, click the General tab, and click Save As.
To reuse a
stored configuration at a later time, start Remote Desktop Connection,
click Options, click Open, and then double-click the stored file. More
simply, select it from the Jump List for Remote Desktop Connection (on
the taskbar or Start menu), or double-click the stored file in Windows
Explorer.
4.2. Ending a Remote Session
When you're
through with a Remote Desktop Connection session, you can lock,
disconnect, or log off. These options appear in the lower right corner
of the remote session's Start menu, in place of the shutdown and power
options that appear on a local session's Start menu. (You must click the
arrow to see all the options.)
Locking the
computer keeps the remote session connected and all programs running,
but it hides everything behind a logon screen that requests a password;
this is comparable to pressing Windows logo key+L to lock your computer.
If you disconnect, your
programs continue to run on the remote computer, but the remote
connection is ended. The Welcome screen is visible on the remote
computer, and it's available for another user. If you log on
later—either locally or through a remote connection—you can pick up
right where you left off. As an alternative to the Start menu command,
you can disconnect by simply clicking the Close button on the title bar
of the remote session.
Logging off closes all your programs and exits your user session before disconnecting.
You cannot turn off or
restart the remote computer using options on the Start menu. To perform
either task in a remote session, open the Start menu and choose Windows
Security. In the lower right corner of the Windows Security screen,
click the arrow next to the red power button to select an option.
Choosing any of these options, of course, disconnects your remote
session; if you want to use the remote computer after a restart, you'll
need to reconnect.
