Sharing computer resources over
a network, when properly configured, gives you access to all the files
you might need, wherever they're stored. But sometimes even that is not
enough. You might need to run a program that is installed only on
another computer, or you might need to configure and manage another
computer's files and settings in ways that can be done only by working
at that computer. Actually, there is another way: Remote Desktop. Remote
Desktop enables you to operate a computer by remote control, over a
local network or over the internet.
When you use a Remote
Desktop connection, you're able to operate that computer as if you were
sitting right in front of it. You have access to all of the other
computer's files, applications, and network resources. You can connect
to your work PC from your home office and run a query on a corporate
database using an application that isn't available at home. If you work
all night to finish an important presentation and forget to bring it to
the office, you can connect to your home computer from your office
network and use Remote Desktop to retrieve the file and make your
deadline. And unlike earlier versions of Remote Desktop, the version in
Windows 7 can play videos and other media, and its bidirectional audio
support makes it possible to use the remote computer for Voice over Internet Protocol (VoIP) telephony applications and speech recognition.
On a home or small business network, you can use Remote
Desktop as a remote management console. From your main desktop, you can
connect to any computer on your network and install updates, change
system settings, or perform other routine maintenance tasks without
having to leave the comfort of your couch or cubicle.
With Remote
Desktop, applications run on the remote computer; your computer is
effectively used as a dumb terminal. You can use a low-powered
computer—an inexpensive netbook or even an old clunker—and enjoy the
speed and power of the remote computer. Remote Desktop connections are
encrypted, so your information is secure, even if you're making a
connection over the internet.
The basic requirements
for using Remote Desktop are pretty simple: you need two computers that
are connected via a local area network, the internet, or a dial-up
connection.
Note:
The computer that you want to control—the one at the remote location—is called the remote computer. The computer you want to use to control the remote computer is called the client computer.
These are the requirements for the two computers:
Remote computer You need a computer running Windows 7 Professional, Enterprise, or Ultimate. (Windows 7 Starter, Home Basic, and Home Premium editions
do not include the software required for hosting Remote Desktop
sessions.) The remote computer can also use Windows Vista (Business,
Enterprise, or Ultimate editions), Windows XP Professional (or Windows
XP Media Center or Tablet PC editions), Windows Home Server, Windows
Server 2008, or Windows Server 2003. This computer must have a
connection to a local area network or to the internet. If you're going
to connect to this computer over the internet, its internet connection
must have a known, public IP address. (For ways around this last
requirement, see Section 18.4.1 on Section 18.4.1.)
Note:
It is possible to set up
an incoming Remote Desktop connection to use a dial-up modem that's
configured to answer incoming calls automatically. For reasons of
practicality, we don't recommend this configuration, nor do we cover it
in this book.
Client computer You can access Remote Desktop from a computer running any version of Windows. In Windows 7, you use the Remote Desktop Connection program (Mstsc.exe), which is included in all editions.
Windows Vista Service Pack 1 (SP1) and Windows XP SP3 also include the
most recent Remote Desktop Connection, version 6.1. For other operating systems, download the most recent version from one of these sources:
For Windows XP SP2, download Remote Desktop Connection version 6.1 from w7io.com/1801.
For
older versions of Windows, including Windows 95/98/Me, Windows NT 4.0,
Windows 2000, and Windows 2003 Server, version 5.1 of the Remote Desktop client software can be downloaded from w7io.com/1803.
Mac clients can download a compatible version of the client software from Microsoft's Mactopia site, at w7io.com/1802.
An open-source Linux client is available from w7io.com/1804.
|
Remote Desktop is an
elegant and well-engineered solution to a common problem, but it's not
your only option when you need to connect to another PC. If you're
looking for alternatives, especially for a system running Windows 7
Starter or Home Premium edition, consider a third-party program that
offers similar features, or use one of several browser-based services.
Among commercial third-party programs, Laplink
Gold has a stellar reputation and a long history. Remote access is only
one of its many features, which also include PC-to-PC file transfer and
synchronization. For more information, visit w7io.com/1805.
An excellent free alternative is UltraVNC (uvnc.com),
which is one of many variants of the Virtual Network Computing (VNC)
software first developed by Olivetti and Oracle Research Labs and
released as open source in 2002. RealVNC (realvnc.com) uses the same code base and offers a version that is free for personal use.
Browser-based
alternatives typically work on a subscription model. You create an
account with an online service (paid or free) and run a service on the
PC to which you want to enable remote access. You can then connect to
that PC over the internet by opening a web browser, going to the
service's home page, and logging in. To see if this option is right for
you, look at GoToMyPC (gotomypc.com), LogMeIn (logmein.com), or Laplink Everywhere (w7io.com/1806).
|
1. Configuring Your Network for Remote Desktop Connections
When you enable Remote
Desktop on Windows 7 Professional, Enterprise, or Ultimate, the remote
computer listens for incoming connections on port 3389. Enabling Remote
Desktop also creates an exception in Windows Firewall that allows
authenticated traffic on this port.
That makes Remote
Desktop easy to use over a local network where no third-party security
software is installed. But it doesn't solve the many problems you face
when trying to connect to Remote Desktop over the internet. To connect
through the internet, you must be able to reach the remote computer
using a known public IP address, and you have to get through a router
and past any security software in between the two computers. If you're
sitting in a hotel room or an airport, connecting to Remote Desktop
poses several challenges imposed by firewalls, routers, and IP
addresses. The solutions to these issues depend on your specific
hardware configuration, but we can offer the following general advice.
1.1. Configuring a Router for Remote Desktop
If the remote
computer is connected to the internet through a router, you need to
accomplish two tasks. First, you have to ascertain the router's public
IP address. Then you have to configure the router to forward Remote
Desktop Protocol traffic it receives on port 3389 to the remote
computer.
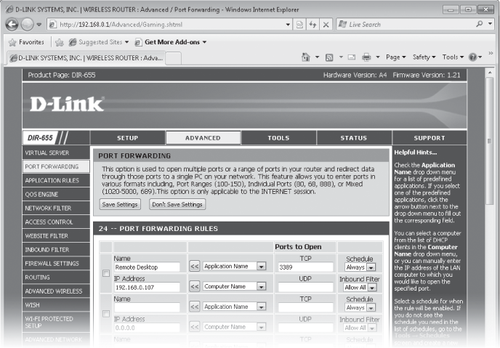
To find the router's IP
address, open its browser-based administration interface and find the
status screen. The public IP address is typically labeled as the WAN
(wide area network) address; don't use the local area network (LAN)
address, which is the private IP address used to forward traffic to
computers on your local network.
To make sure
Remote Desktop Protocol (RDP) traffic reaches your remote PC, look for a
"port forwarding" page in the same router administration interface
(it's often buried within an advanced configuration section). You'll
need to specify the local (private) IP address of the remote computer
and tell the router that you want all traffic on port 3389 to be
forwarded to that PC instead of being discarded. Figure 1 shows this configuration on a D-Link router for a remote computer with an IP address of 192.168.0.107.
|
Using a bare IP address for Remote
Desktop connections is easy but potentially risky. If you forget the
public IP address assigned to your computer, you'll be unable to make a
connection. Worse, if your ISP decides to change your IP address, you'll
be stymied until you discover the new address, which is a challenge if
you're away from home. The solution is to use a dynamic DNS service, such as those offered by Dynamic Network Services (dyndns.com) and TZO (fzo.com).
(A web search for "dynamic DNS service" will turn up many more
options.) Such services map the public IP address on your router to a
domain name that doesn't change. Dynamic DNS services typically rely on
software installed on your remote computer, which notifies the service
provider's domain name servers if your IP address changes. Because the
domain name server correlates your domain name with its current IP
address, you (or anyone you designate) can always find your computer by
using your registered domain name instead of a numeric IP address.
|
1.2. Using a Windows Server as a Remote Desktop Gateway
The mechanics of configuring
a home or small office network for remote access can be daunting, and
port forwarding suffers from the limitation that it allows remote access
to one and only one PC on your local network. For a simpler (but
certainly not free) solution to these problems, consider adding a
Windows server to your network.
Windows Home
Server is designed for use on home and very small office networks. One
of its key features is an easy remote access interface. When you enable
remote access on the server, you can connect to that server over the
internet and browse shared folders. If you've enabled Remote Desktop on
any computers that are connected to the Windows Home Server, you can
connect to those computers through the server's Remote Access interface.
The Windows Home
Server option has other advantages as well, including a configuration
tool that automates port forwarding for most UPnP-capable routers and
sets up dynamic DNS. Also of note is that the remote desktop appears
within a browser window rather than in a separate Remote Desktop
Connection window. This means you don't need to install software on the
client computer; displaying the remote desktop requires an ActiveX
control, which means that remote access works only with Internet
Explorer running under Windows on the client computer.
For larger or more sophisticated networks, you can use a Windows Server 2008
Terminal Services Gateway. When users connect to a server that has been
configured to use this service, they can connect to any computer on the
network that has Remote Desktop enabled, using a web-based interface. A
network administrator can also designate individual programs that can
be run in Remote Desktop sessions. When you connect to one of these
RemoteApp programs, it runs in a window on your desktop that looks just
like any other program being run from a local source; the only clue that
it's running from another computer is the word remote in parentheses after the program's name in Windows Task Manager.
Note:
For more information about using a Terminal Services Gateway, see Windows Server 2008 Inside Out by William R. Stanek (Microsoft Press, 2008).
