4. Setting Up an Ad Hoc Network
An ad hoc network
is a temporary network that connects two or more wireless computers and
devices without requiring a hub or wireless access point. The
computers' network adapters communicate directly with each other. An ad
hoc network is handy when you need to exchange files or share an
internet connection with someone who isn't normally part of your
network—for example, in a meeting. Another common use: multiplayer
games.
To set up an ad hoc network, follow these steps:
Open Network And Sharing Center, and click Set Up A New Connection Or Network.
In the Set Up A Connection Or Network wizard, select Set Up A Wireless Ad Hoc (Computer-To-Computer) Network and click Next. On the next page, click Next. Doing this brings you to the page shown here:
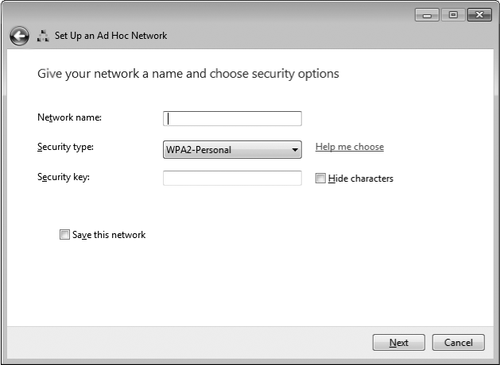
Specify
a network name. The name can be up to 32 characters long; can contain
letters, numbers, and underscores; and is case-sensitive.
Specify a security type. Ad
hoc networks support WEP and WPA2-Personal encryption; the only other
option is an open, unsecured network. An open network is the easiest for
others to join—whether that's an advantage or disadvantage depends on
whether potential interlopers might be nearby and whether you expect to
transmit sensitive information.
If you choose to encrypt the ad hoc network, enter a security key or passphrase in one of these forms:
For WPA encryption, up to 63 characters (letters, numbers, and spaces)
For WEP encryption, 5 or 10 case-sensitive characters (letters, numbers, and punctuation) or a 13-digit or 26-digit hexadecimal number (numbers and letters A–F)
If you plan to use the ad
hoc network again, select Save This Network. If you do not, Windows
automatically deletes the network after the user who set up the network
or all other users on the network disconnect.
Click
Next. If your computer is connected directly to the internet (through a
network adapter other than the wireless adapter you're using for the ad
hoc network) and you want to share the internet connection, click Turn
On Internet Connection Sharing.
The network is now set
up and ready to use. Others can join the network just as they join any
other wireless network: Click the network icon in the taskbar's
notification area, select the ad hoc network, and click Connect. If the
ad hoc network is secured with WEP or WPA encryption, another dialog box
asks for the security key; enter it and click Connect.
5. Connecting Wireless Devices to Your Network
A simple, standard method for connecting other devices
with wireless capabilities—such as cameras, PDAs, media players, and
mobile phones—hasn't yet been widely adopted. At the time of this book's
printing, Wi-Fi Protected Setup is just beginning to make inroads with
device manufacturers. Until the devices are made to support connection
by using the router's WPS button or entering the router's PIN, you'll
need to enter the security key or use other methods, as described in the
instructions that came with the device.
