Configuring each device on a wireless network so that
they all communicate with each other (and not with nearby networks that
share the same airwaves) has traditionally been a tricky task.
Understanding the alphabet soup of abbreviations—SSID, WEP, WPA, PSK,
and MAC, to name a few—and providing appropriate values for each is a
task for a true wizard. Fortunately, Windows 7 includes a wizard for
each configuration task in wireless
networking. These wizards, combined with configuration support such as
Wi-Fi Protected Setup (which encompasses an earlier technology called
Windows Connect Now) in modern wireless networking equipment, truly make
setup simple.
Before we get into the details of setup and configuration, however, we discuss security.
Because wireless signals potentially expose your network to anybody who
comes near, it's important to understand and consider security
implications before you make your first wireless connection.
1. Understanding Security for Wireless Networks
On a
conventional wired network, physical security is a given: if someone
plugs a computer into your hub, you'll know about it immediately, and
you can trace the physical wire back to the intruder's computer. On
wireless networks, however, anyone who comes into range of your wireless
access point can tap into your network and intercept signals from it.
Finding open access points has become something of a sport; participants
call it war driving.
Although some war drivers seek open access points just for fun, other
users who find their way into your network present several risks:
Theft of service
An intruder might be able to access the internet using your connection,
which could degrade the quality of your internet service. Denial of service
An intruder who is unable to connect to your network can still cause
some degree of havoc by flooding the network with connection requests.
With enough persistence, an attacker could completely deny legitimate
users access to the network. Privacy violations
An intruder with the right tools can monitor all data sent over the
network and can therefore see which websites you visit (along with your
passwords for those sites), documents you download from a shared network
folder, and so on. Theft or destruction of data
Outsiders who successfully connect to your network can browse shared
folders and printers. Depending on the permissions assigned to these
resources, they can change, rename, or delete existing files, or add new
ones. Network takeover
An intruder who manages to log on to the network and exploit an
unpatched vulnerability can install a Trojan horse program or tamper
with permissions, potentially exposing computers on the LAN to attacks
from over the internet.
To prevent any of these dire possibilities, you can and should configure the best available security for your access point and all wireless devices on your network. Depending on your hardware, you should have a choice of one or more of the following options:
Wired Equivalent Privacy (WEP)
WEP is a first-generation scheme for protecting authorized users of a wireless
network from eavesdroppers by encrypting the data flow between the
networked computer and the access point. WEP suffers from some known
security flaws that make it extremely easy for an attacker to "crack"
the key using off-the-shelf hardware. As a result, WEP is inappropriate
for use on any network that contains sensitive data. Most modern Wi-Fi
equipment supports WEP for backward compatibility with older hardware,
but we strongly advise against using it unless no other options are
available. To enter a WEP key, you supply a string of ASCII or hex
characters (5 ASCII or 10 hex characters for a 64-bit key; 13 ASCII or
26 hex characters for a 128-bit key). The key you provide when setting
up your wireless adapter must match the key on your access point, and
all devices on the network must use the same encryption strength—either
64 or 128 bits. Wi-Fi Protected Access (WPA)
WPA is a newer, stronger encryption scheme that was specifically
designed to overcome weaknesses of WEP. On a small network that uses
WPA, clients and access points use a shared network password (called a pre-shared key, or PSK)
that consists of a 256-bit number or a passphrase that is from 8 to 63
bytes long. (A longer passphrase produces a stronger key.) With a
sufficiently strong key based on a truly random sequence, the likelihood
of an outside attack is very, very slim. Most network hardware that
supports the 802.11g standard also supports WPA. With older hardware,
you might be able to add WPA compatibility via a firmware upgrade. Wi-Fi Protected Access 2 (WPA2) Based on the 802.11i standard, WPA2
provides the strongest protection yet for wireless networks. It uses
802.1x-based authentication and Advanced Encryption Standard (AES)
encryption; combined, these technologies ensure that only authorized
users can access the network, and that any intercepted data cannot be
deciphered. WPA2 comes in two flavors: WPA2-Personal and
WPA2-Enterprise. WPA2-Personal uses a passphrase to create its
encryption keys and is currently the best available security for
wireless networks in homes and small offices. WPA2-Enterprise requires a
server to verify network users. WPA2 can work with all flavors of
Wi-Fi, including 802.11b, 802.11g, and 802.11a. (WPA2 support is also
included in all devices that use the 802.11n [draft] standard and is
currently scheduled to be part of the final specification.) All wireless
products sold since early 2006 must support WPA2 to bear the Wi-Fi
CERTIFIED label.
You must use the same
encryption option on all wireless devices on your network—access points,
routers, network adapters, print servers, cameras, and so on—so choose
the best option that is supported by all your devices. If you have an
older device that supports only WEP (and it can't be upgraded with a firmware update) consider retiring or replacing that device.
The alternative to these encryption methods is to use no security
at all, an option that produces an "open" network. If you own a coffee
shop or bookstore and your goal is to provide free internet access for
your customers, this option is acceptable as long as you make sure to
protect other computers on your network from unauthorized access. (The
primary tools for doing so are a firewall, sharing permissions, and
folder permissions.) But for most people, the risks of running an open
network are unacceptable.
2. Configuring a Router or Wireless Access Point
You begin setting up your wireless network by configuring the wireless
access point (or a router that includes a wireless access point), which
is the hub of your Wi-Fi network. The process is simple if you use a
device that supports Wi-Fi Protected Setup (WPS); most routers
sold since 2008 do, although it's not always clear from the product
literature. Older routers and other noncompliant devices offer a variety
of third-party solutions or ask you to perform configuration manually.
(If you're not sure whether your router supports WPS, try the following
steps. If this method doesn't work, check the instructions that came
with your router.)
You can set up a Wi-Fi
Protected Setup–compliant router or access point using either a wired or
wireless connection. To configure a wireless access point or router
that supports Wi-Fi Protected Setup, follow these steps:
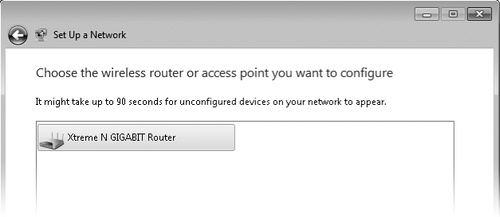
Open
Network And Sharing Center. (Click the Network icon in the notification
area, and then click Open Network And Sharing Center.) Click Set Up A
New Connection Or Network. In
the Set Up A Connection Or Network wizard, select Set Up A New Network
and click Next. Wait for the wizard to find the unconfigured router or
access point. When it appears, as shown below, select it and click Next.
|
The router doesn't appear in the Set Up A Network wizard
If, after waiting for a
minute or two, the router you want to set up does not appear in the
wizard, either it is already configured or it does not support Wi-Fi
Protected Setup.
You can reset a
configured router by following the manufacturer's instructions (in many
cases, you use a paper clip to press a recessed reset button). Be aware
that doing so removes all configuration data from the router. If it's
already configured, you might be better off skipping this procedure
altogether and connecting your devices to the router.
For routers that do not support WPS, check the instructions that came with the router for information about configuring wireless settings.
|
|
With a computer
that has a Wi-Fi adapter, you can go directly to the Set Up A Network
wizard without going through Network And Sharing Center. If Windows
detects a wireless network and you're not currently connected to one,
the Network icon in the notification area shows an orange glow. Click
the icon, and you'll see a connection for your new router—usually with
the name of the router's manufacturer. Click the connection, click the
Connect button, and Windows displays the message shown below.
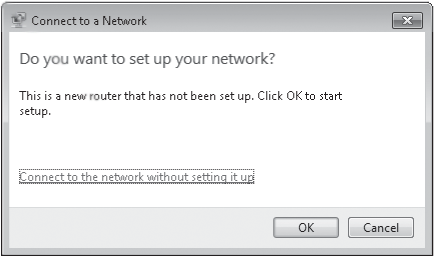
Click OK, and then follow the procedure beginning with step 3.
|
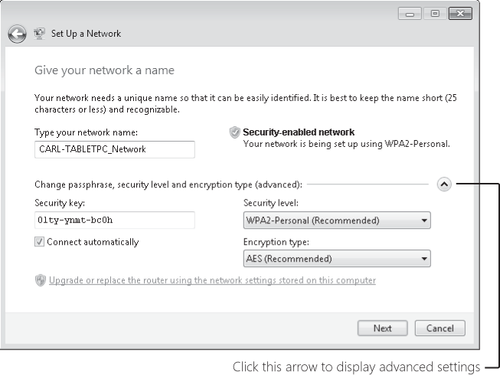
Enter the eight-digit PIN (sometimes identified as "WPS PIN") on the router's label, and then click Next. Enter a name for your wireless
network. This name, also known as the SSID (for service set
identifier), can contain only letters, numbers, and underscores. Windows
suggests using the name of your computer with "_Network" appended;
because it's the name by which all devices on a WLAN identify the
network, you might want to come up with something more meaningful.
|
If the router you're setting up replaces an existing router, you can apply wireless
networking settings from your old router to your new one. By doing
this, you won't need to reconfigure any other wireless devices on your
network, because their existing configuration will work with the new
router. (However, be aware that your old—and possibly unsecure—security
method remains intact.) To use your existing settings, click the
Upgrade Or Replace The Router Using The Network Settings Stored On This
Computer link, which is near the bottom of the dialog box shown above.
|
Click
the arrow to display advanced settings. Then select the best security
method supported by all your wireless devices—WPA2-Personal (best),
WPA-Personal, WEP, or No Security. Enter a passphrase, which Windows uses to generate a security
key. Windows suggests a security key, but you can replace it with one
of your own choosing. (You might prefer to use a memorable phrase
instead of random characters. If you do, choose a phrase that's not
easily guessed, make it long, and consider incorporating letter
substitution or misspellings to thwart attackers. Because you seldom
have to type the passphrase—it's ordinarily needed only during setup,
and even then it's usually transferred automatically from a USB
flash drive [UFD] or, at worst, by cut and paste—using a memorable
phrase for WPA is less appealing than it is for, say, a login password.)
A passphrase for WPA or WPA2 can be up to 63 characters long and can
contain letters (case-sensitive), numbers, and spaces (no spaces at the
beginning or end, however). A WEP security key must be exactly 26
hexadecimal characters (numbers 0–9 and letters A–F) or 10 letters
(case-sensitive), numbers, and symbols. Click Next, and Windows
transmits the configuration information to the router or access point. You
can click Close to complete the wizard. But before you do, we recommend
that you click the Copy The Network Profile To A USB Drive link, plug a
USB flash drive into your computer, select it from the list, and click
Next. You don't need to use a UFD dedicated to the purpose; all the
files (Autorun.inf and Setupsnk.exe
in the root folder, plus a handful of files in the \Smrtntky folder)
take only a few kilobytes of space and don't interfere with other files
on the UFD. You can use the UFD to quickly set up other wireless
devices—including game consoles, printers, and computers running
Windows XP, Windows Vista, or Windows 7—so they can connect to your wireless network. It also comes in handy when a visiting friend wants access to your wireless network to use its internet connection, or when you upgrade the firmware in your router and it loses all its settings.
|
The final page of the Set
Up A Network wizard offers an opportunity to print configuration
details. The document includes the network name (SSID) for your wireless
network and the passphrase or security key that you created along with
other details, so it's handy to have for future reference.
If you click Close
before you print the document, you have another option: open the
\Smrtntky\Wsetting.txt file on the UFD. This plain-text document also
includes other details of your WLAN configuration.
|
Many routers that don't support WPS have comparable, proprietary systems—usually provided on a setup CD—for configuring
the router's SSID, encryption, and other settings. Check the
instructions that came with your router for more information.
If your data is
sensitive and your network is in an apartment building or an office
complex where you can reasonably expect other people to wander into
range with wireless adapters, you should take extra
security precautions in addition to enabling WPA. Consider any or all
of the following measures to protect your wireless access point from
intruders:
Change the
network name (SSID) of your access point to one that doesn't match the
hardware defaults and doesn't give away any information about you or
your business. Disable remote administration of the access point; if you need to change settings, you can do so directly, using a wired connection. If you decide to allow remote administration of the access point, set a strong password. Upgrade the firmware
of your wireless hardware (access point and adapter) to the most recent
versions, which might incorporate security fixes. Consider using virtual private networks for wireless connections.
On larger
networks with one or more domain servers available, you can set up a
Remote Authentication Dial-In User Service (RADIUS) server to allow the
most secure option of all, 802.1x authentication. In addition, consider enabling Internet Protocol security (IPsec).
|
