Logo
programming4us
programming4us
programming4us
programming4us
Home
programming4us
XP
programming4us
Windows Vista
programming4us
Windows 7
programming4us
Windows Azure
programming4us
Windows Server
programming4us
Windows Phone
 
programming4us
Windows 7

Connecting to Another Computer with Remote Desktop (part 2) - Enabling Inbound Remote Desktop Connections

- Free product key for windows 10
- Free Product Key for Microsoft office 365
- Malwarebytes Premium 3.7.1 Serial Keys (LifeTime) 2019
3/24/2011 3:20:24 PM

2. Enabling Inbound Remote Desktop Connections

If you intend to connect to a remote computer while you're away from home or out of the office, you must first enable Remote Desktop on that computer. To set up a computer running Windows 7 Professional, Enterprise, or Ultimate to accept Remote Desktop connections, follow these steps:

  1. Open the System Properties dialog box. (Press the Windows logo key+Break or, in Control Panel, open System And Security, System.) In the left pane, click Remote Settings. (Or use the undocumented command systempropertiesremote.)

  2. Under Remote Desktop, select either of the options that begin with Allow Connections…, as shown below:
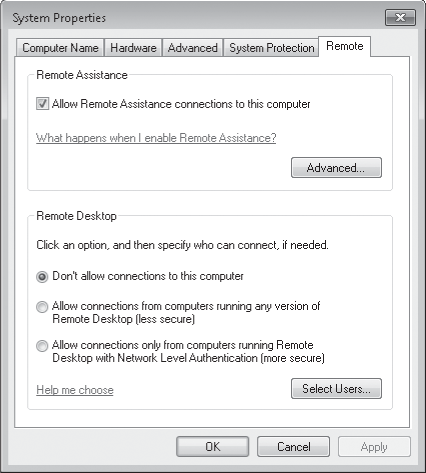


    • If you anticipate that you will need to access your computer from a computer running a version of the Remote Desktop Connection software older than version 6.0, select Allow Connections From Computers Running Any Version Of Remote Desktop (Less Secure). You must also choose this option if you plan to connect through Windows Home Server.

    • If you are certain that you will access your computer only using the most recent Remote Desktop software (included with Windows 7, Windows Vista, Windows XP SP3, or Windows Server 2008), select Allow Connections Only From Computers Running Remote Desktop With Network Level Authentication (More Secure).

    At this point, the current user account and any user account that is a member of the local Administrators group can be used to connect remotely to the computer, provided that the account has a logon password.


    Note:

    As a security precaution, accounts that use a blank password cannot be used to make a remote connection.


  3. If you want to change which users can connect remotely, click Select Users. The Remote Desktop Users dialog box appears.


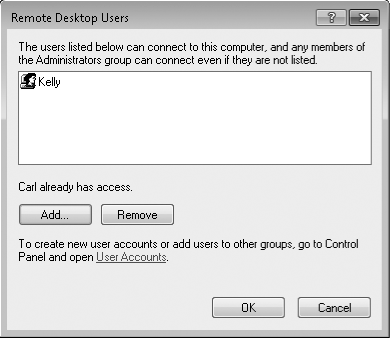
    • To add a user to the Remote Desktop Users group, click Add. Then type the user's name in the Select Users dialog box that appears (or click Advanced, Find Now to select names from a list). You can type the name of any local user account or, if your computer is in a domain, any domain user account. You can add multiple users by separating each user name with a semicolon.

    • To delete a user from the Remote Desktop Users group, select the user's name in the Remote Desktop Users dialog box and click Remove.

    That's all you need to do to set up the remote computer. Windows configures rules for Remote Desktop in Windows Firewall when Remote Desktop is enabled, allowing connection requests on port 3389 to be received from any IP address.

    If your connection has to pass through a router to get to your computer. If you have replaced Windows Firewall with a third-party software firewall, you need to configure it to allow incoming access to TCP port 3389.

Inside Out: Change the Remote Desktop port number

You can use a different port for Remote Desktop connections. Although there's seldom reason to do so, changing to a different port can provide increased security because you don't expose a listening port where intruders might expect to find Remote Desktop. You can also use this capability to provide access to multiple remote PCs through a single router. For details about changing the port, see Microsoft Knowledge Base article 306759 (w7io.com/1807). For example, you might use the default port of 3389 on a computer named Rock, and assign port 3390 to Remote Desktop on a PC named Paper. Then, using your router's administrative interface, map incoming traffic on port 3389 to Rock and traffic on port 3390 to Paper. To connect to Rock from the internet, you would use the Remote Desktop Connection software normally. To connect to Paper, append a colon followed by the port number after the computer name (paper:3390) in the Remote Desktop Connection dialog box.
Other -----------------
- Finding and Using Shared Resources on a Windows Network
- Sharing Resources with Older Windows Versions (part 4) - Sharing a Printer & Setting Server Properties
- Sharing Resources with Older Windows Versions (part 3) - Setting Advanced Sharing Properties
- Sharing Resources with Older Windows Versions (part 2) - Sharing Files with Public Folders & Sharing Files and Folders from Any Folder
- Sharing Resources with Older Windows Versions (part 1) - Configuring Your Network for Sharing
- Sharing Files, Digital Media, and Printers in a Homegroup (part 2)
- Sharing Files, Digital Media, and Printers in a Homegroup (part 1) - Deciding What to Share—And What Not to Share
- Using HomeGroup to Connect Your Computers at Home
- Setting Up a Wireless Network (part 3) - Setting Up an Ad Hoc Network
- Setting Up a Wireless Network (part 2) - Connecting to a Wireless Network
 
 
Top 10
- Microsoft Visio 2013 : Adding Structure to Your Diagrams - Finding containers and lists in Visio (part 2) - Wireframes,Legends
- Microsoft Visio 2013 : Adding Structure to Your Diagrams - Finding containers and lists in Visio (part 1) - Swimlanes
- Microsoft Visio 2013 : Adding Structure to Your Diagrams - Formatting and sizing lists
- Microsoft Visio 2013 : Adding Structure to Your Diagrams - Adding shapes to lists
- Microsoft Visio 2013 : Adding Structure to Your Diagrams - Sizing containers
- Microsoft Access 2010 : Control Properties and Why to Use Them (part 3) - The Other Properties of a Control
- Microsoft Access 2010 : Control Properties and Why to Use Them (part 2) - The Data Properties of a Control
- Microsoft Access 2010 : Control Properties and Why to Use Them (part 1) - The Format Properties of a Control
- Microsoft Access 2010 : Form Properties and Why Should You Use Them - Working with the Properties Window
- Microsoft Visio 2013 : Using the Organization Chart Wizard with new data
 
programming4us
Windows Vista
programming4us
Windows 7
programming4us
Windows Azure
programming4us
Windows Server