3. Ownership Permissions
The owner of a file or a folder is the highest permission
holder. Regardless of whether the permissions on the file or folder
allow the owner to open the file or folder, the owner can always reset
the permissions via the file or folder’s Properties dialog box. The
default owner of a file or a folder is the person who created the
resource.
You can assign or take ownership if you have the required
permissions or privileges. Individuals with the required permissions
include the owner and anyone with an administrator account.
If you are an administrator or the current owner of a file, you
can assign ownership of a file or a folder to another user or group by
completing these steps:

In Windows Explorer, right-click the file or folder you want
to work with and then select Properties.
In the Properties dialog box, select the Security tab and then
click Advanced. This opens the “Advanced Security Settings for”
dialog box.
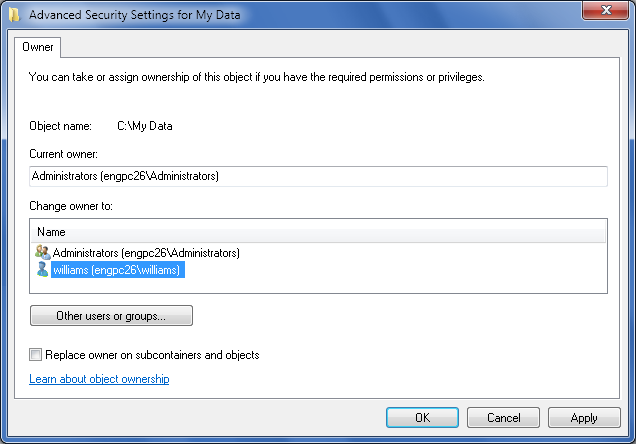
On the Owner tab, click Edit. This opens an editable view of
the Owner tab in a new dialog box (see Figure 5).
Click “Other users or groups” to display the Select User or
Group dialog box.
Type the name of a user or a group account. Click Check Names
and then do one of the following:
If a single match is found for each entry, the dialog box
is automatically updated as appropriate and the entry is
underlined.
If multiple matches are found, you’ll see an additional
dialog box that allows you to select the name you want to use,
and then click OK.
If no matches are found, you’ve probably entered an
incorrect name. Modify the name in the Name Not Found dialog box
and then click Check Names again.
In the “Change owner to” listbox, select the new owner. If
you’re taking ownership of a folder, you can take ownership of all
subfolders and files within the folder by selecting the “Replace
owner on subcontainers and objects” checkbox.
Click OK twice to save your settings.
If you are an administrator, you can take ownership of a file or a
folder by completing the following steps:
In Windows Explorer, right-click the file or folder you want
to work with and then select Properties.
In the Properties dialog box, select the Security tab and then
click Advanced. This opens the “Advanced Security Settings for”
dialog box.
On the Owner tab, click Edit. This opens an editable view of
the Owner tab in a new dialog box.
In the “Change owner to” listbox, select the new owner. If
you’re taking ownership of a folder, you can take ownership of all
subfolders and files within the folder by selecting the “Replace
owner on subcontainers and objects” checkbox.
Click OK twice to save your settings.
NOTE
If you encounter a file or folder that doesn’t allow you to take
ownership, the takeown command-line
utility can often get the job done. To use it, open an elevated,
administrator Command Prompt by clicking Start→All
Programs→Accessories, then right-clicking on Command Prompt and
selecting Run as Administrator. Next, use the cd command to change to the directory that
contains the file or folder, and enter:
takeown /f filename
where filename is the name of the
file you want to take ownership of. This will assign ownership to the
currently logged-on user. takeown
has a number of other options. Enter takeown
/? to list them.