2. Configuring
Standard Folder Sharing
With
standard folder sharing, two levels of permissions are used:
share permissions and NTFS permissions. Share permissions define the maximum level of
access, and
no one can ever have more permissions than those granted by the
share.
NTFS permissions set on files and folders further restrict the
permitted
actions. Table 1 lists the share
permissions you can assign.
Table 1. Share permissions
| Permission | How it’s
used |
|---|
| Owner | Grants full access to
the
shared file or folder. People with this permission can
read
files, change files, change file and folder permissions,
and
take ownership of files and folders. |
| Read/Write | Grants permission to read
files, create files and subfolders, modify files, change
attributes on files and subfolders, and delete files and
subfolders. |
| Read | Grants permission to view
file and subfolder names, read files and file attributes,
access
the subfolders of the share, and run program
files. |
As with NTFS permissions, you can assign share
permissions to both
users and groups. If you’ve granted share permissions to a group
and a
user is a member of that group, the user also has those
permissions. If
a user is a member of multiple groups, the user’s effective share
permissions are the highest level assigned. For example, if
someone is a
member of both Group A, to which you’ve assigned Reader
permission, and
Group B, to which you’ve assigned Owner permission, this person’s
effective permissions are those of Owner.
You can override this behavior by specifically
denying an access
permission. Denying permission takes precedence and overrides
permissions that you’ve granted to groups. If you don’t want a
user or a
group to have a permission, configure the share permissions so
that the
user or the group is denied that permission. For example, if you
don’t
want the user to have Owner permission, deny this permission to
the
user’s account.
When
you create the first standard folder share on a computer,
Windows creates the File and Printer Sharing exception in Windows
Firewall to allow other computers on the network to access the
share.
This inbound exception is configured for Server Message Block
(SMB).
Windows Explorer supports basic sharing and advanced
sharing. With
basic sharing, you can share any folder except for the root folder
of a
drive. With advanced sharing, you can share the root folder of a
drive
and any other folder. Keep the following in mind:
When you create a share outside of
your profile, users access
the share by using the UNC path to the share. For example, if
you
share the C:\My Data folder as
Data on EngPC26, other people
can access the folder using the UNC path \\EngPC26\Data.
When you share a folder
within your profile, other people
access the share by using a path that is relative to the Users folder on your computer. This
occurs because Windows configures sharing in relation to where
the
folder is located in the Users
folder. For example, if my login name is WilliamS and I share
my
Documents folder on EngPC18,
the UNC path to the share is \\EngPC18\Users\WilliamS\Documents.
To use basic sharing,
right-click the folder you want to share in
Windows Explorer, click Share With and then do one of the
following:
Select
Nobody to turn off sharing.
Select Homegroup (Read) to create a read-only shared folder
for computers in the homegroup.
Select Homegroup (Read/Write) to create a
read-write shared
folder for computers in the homegroup.
Select Specific People to
explicitly specify who should be
able to access the shared folder.
When you select Specific People, Windows Explorer opens the File Sharing Wizard, shown in Figure 6.
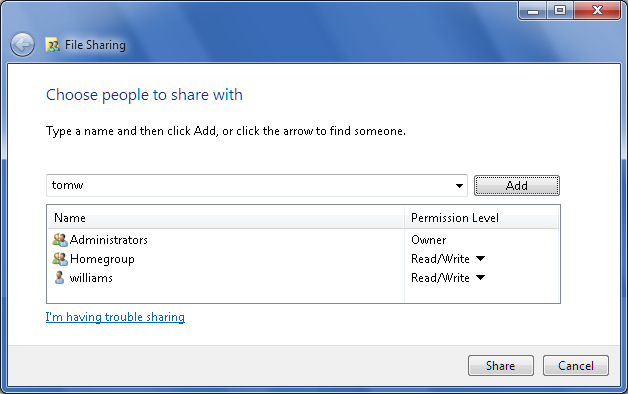
Use the wizard to specify the users and groups that have
access to
the share by completing the following steps.
Type
a name, and then Click Add, or click the selection arrow
to find someone. In homegroups, you’ll be able to select
Homegroup
to share the folder within the homegroup. In workgroups,
computers
will always show only local accounts and groups. In domains,
you’ll
see local users and groups and also be able to find users in
domains.
When you click Add, the
selected users and groups are added to
the Name list. You can then configure permissions for each
user and
group by clicking an account name to display the Permission
Level
options and then choosing the appropriate permission level.
The
options for permission levels are Read, Read/Write, and
Remove. You
can’t assign ownership when working with file shares.
Click
Share to create the share. After Windows creates the
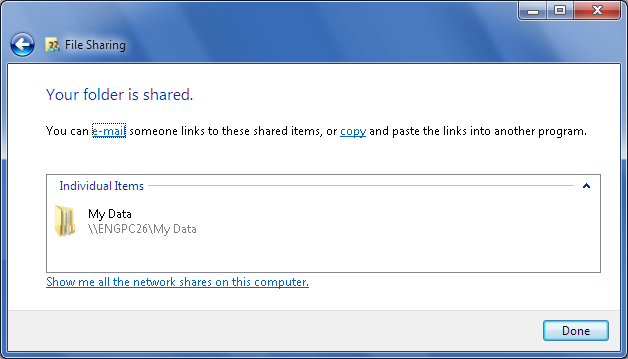
share, write down the share name or click the “copy” link to
copy
the link so you can paste into another program (see Figure 7). Click Done.
You can use advanced sharing by following these steps:
In
Windows Explorer, right-click the folder you want to share
and then select Properties. This opens the folder’s Properties
dialog box.
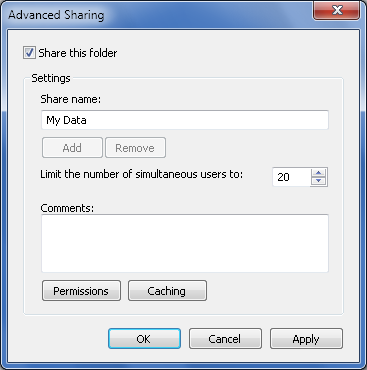
On the Sharing
tab, click Advanced Sharing. In the Advanced
Sharing dialog box, shown in Figure 8, select “Share this
folder.”
Windows sets the share name to
the folder name by default. You
can change the name if you want to.
Click
Permissions. Use the “Permissions For...” dialog box to
configure access permissions for the share. The options for
permission levels are Full Control (which is the equivalent of
Owner), Change (which is the equivalent of Read/Write) and
Read.
Click OK.
Click Caching. Use the Offline
Settings dialog box to specify
whether and how data is cached for offline use. Click OK.
On
the Sharing tab, you’ll see the network path to the share.
Write down the share path. Click Close.
To stop sharing a folder,
right-click a folder that is shared,
point to Share With and then select Nobody.
3. Accessing Shared
Data
Once you share your data, other people can
connect to it
as a network resource or map to it by using a driver letter on
their
computer. Once a network drive is mapped, other people can access
it
just as they would a local drive on their computer.
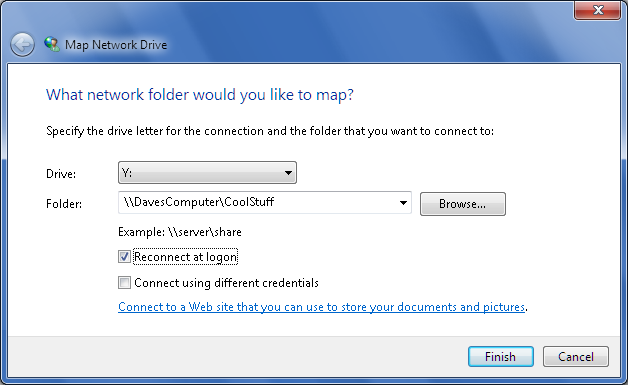
You can map a network drive
to a shared file or folder by
following these steps:
Click Start and then click
Computer. In Windows Explorer,
select Map Network Drive from the menu bar. This displays the
Map
Network Drive dialog box, shown in Figure 9.
Use
the Drive field to select a free drive letter to
use.
Click the Browse button to the
right of the Folder field. In
the Browse for Folder dialog box, expand the Network folders
until
you can select the name of the computer with which you want to
work.
You’ll see a list of shared
folders. Select the shared folder
you want to work with and click OK.
Select “Reconnect at
logon” if you want Windows 7 to connect
to the shared folder automatically at the start of each
session.
If
your current logon doesn’t have appropriate access
permissions for the share, click the “Connect using different
credentials” checkbox.
Click
Finish. If you specified that you wanted to connect with
different credentials enter the username and password of the
account
with which you want to connect to the shared folder. Select
“Remember my credentials” to have Windows remember the
credentials
so that you don’t need to provide them each time you connect.
Click
OK.
You can stop mapping a network drive to a shared file or
folder by
completing the following steps:
Click Start and then click
Computer.
In Windows Explorer, under
Network Location, right-click the
network drive icon and choose Disconnect.
