2. Adding Your Pictures and Videos, and Setting the Play
Order
With Windows DVD Maker, you can create video DVDs that include and
combine pictures, videos, and recorded TV. Windows DVD Maker works with
these different media types in different ways. Digital videos and
recorded TV shows you select are added as individual items on the burn
list. Pictures you select are added to a Slide
show folder. Each video DVD can have up to 998 videos or
recorded TV shows but only one Slide
show folder. The Slide
show folder is handled as a media item separate from videos
and recorded TV, and can itself hold up to 999 pictures.
2.1. Selecting pictures and videos for your DVD
Windows DVD Maker gives you several ways to select the
pictures and videos to include in your video. My favorite way is to
select all the pictures and videos I want to use in Windows Live Photo
Gallery first and then add the selected items automatically to Windows
DVD Maker. One way to do this is to click the first picture or video
to add, hold the Ctrl key, and then select each additional picture or
video to add individually. When you are done selecting items, you
release the Ctrl key, and then click Make→Burn a DVD in Windows Live
Photo Gallery. Unfortunately, once you’ve selected an initial list in
Windows Live Photo Gallery and accessed Windows DVD Maker, you can’t
go back to Windows Live Photo Gallery and select an additional set of
pictures and videos to add. This means you’ll have to select all the
pictures and videos first to make the most out of this
shortcut.
Sometimes, though, you want to add hundreds of items to a video,
and it isn’t always practical to select each item individually in
Windows Live Photo Gallery before starting Windows DVD Maker. Here’s
one handy workaround I’ve come up with:

In Windows Live Photo Gallery, turn on the Info pane by
clicking the Info button.
NOTE
Only one instance of Windows DVD Maker can be open at a
time. Because of this, you must start Windows Live Photo Gallery
and then click Make→Burn a DVD to open Windows DVD Maker.
Select one or more items that you want to add to the video
DVD.
In the Info pane, click Add Descriptive Tags, type a unique
name that identifies the video you are creating, such as Stanek
Family DVD Volume 4, and then press Enter (see Figure 4).
Repeat steps 2 and 3 until you’ve added this tag to all the
pictures and videos for the video DVD. You don’t have to type the
tag each time, however. Instead, when you click Add Descriptive
Tags, select the tag in the list provided, and then press
Enter.
In the Navigation pane, select Descriptive Tags to view the
list of tags associated with your pictures and videos, and then
click the tag you’re using for the video.
In the work area, select all the items for the video by
clicking the first item in the list, holding the Shift key, and
then clicking the last item in the list. Alternatively, you can
press Ctrl-A.
Click Make and then click Burn a DVD to open Windows DVD
Maker with these items selected.
I often find myself creating video DVDs related to
specific dates on which I took pictures and videos. With that in mind,
here’s another handy workaround I’ve come up with:
In Windows Live Photo Gallery, right-click Date Taken and
then select Expand All. If you don’t see an Expand All option,
right-click Date Taken and then select Collapse and then
right-click Date Taken again and then select Expand All.
In the Navigation pane, click the node for the first year,
month, or date to include in the video.
While holding the Ctrl key, click the next node to include
in the video and repeat this step until you’ve selected all the
pictures and videos for the video.
In the work area, select all the related items by clicking
the first item in the list, holding the Shift key, and then
clicking the last item in the list. Alternatively, you can press
Ctrl-A.
Click Make and then click Burn a DVD to open Windows DVD
Maker with these items selected.
In Windows DVD Maker, the total runtime of all selected
items is shown in the lower-left corner of the main window.
In Windows DVD Maker, you can select the items to add to your
video by completing the following steps:
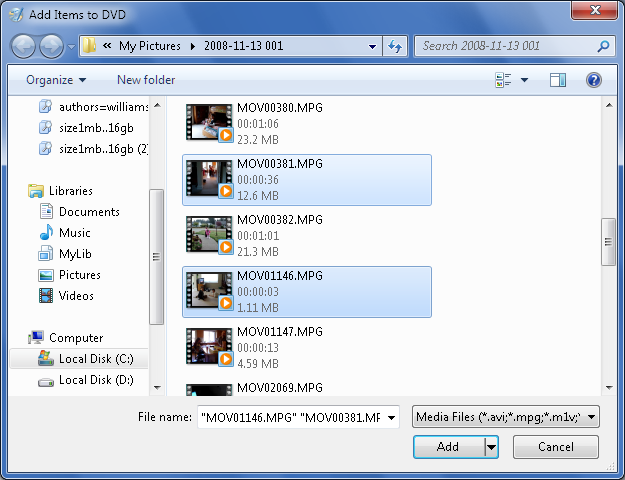
On the “Add pictures and video to the DVD” page, click the
“Add items” button on the toolbar.
As shown in Figure 5, use
the “Add Items to DVD” dialog box to browse to a folder containing
pictures or videos you want to add.
Select the items to add using one of the following
techniques:
Select an individual item by clicking it.
Select a series of items by clicking the first item,
pressing and holding the Shift key, clicking the last item,
and then releasing Shift.
Select multiple items individually by clicking the first
item, pressing and holding the Ctrl key, clicking each
additional item in turn, and then releasing Ctrl.
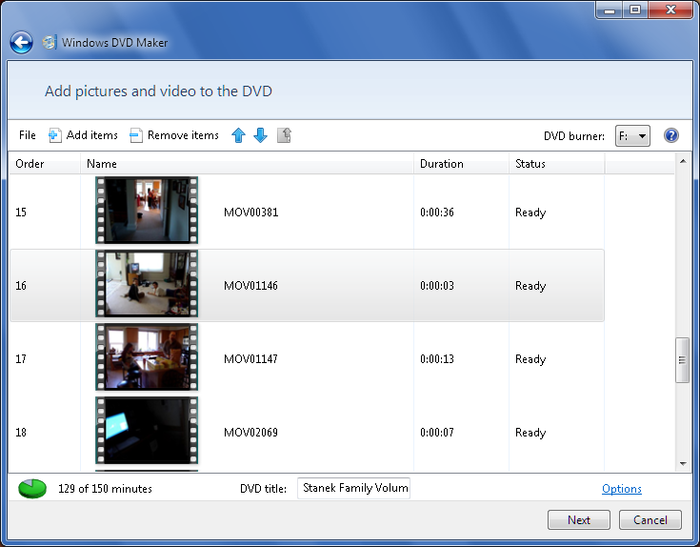
As Figure 6 shows, Windows
DVD Maker lists the runtime of all selected items as a portion of the
total running time possible in the lower-left corner of the main
window. This runtime may change if you modify the slideshow
properties. Most single-sided DVDs can have a total running time of up
to 150 minutes. Most single-sided double-layered DVDs can have a total
running time of up to 300 minutes.
NOTE
If you want your video to play on home DVD players,
ensure wide compatibility for your video by using a single-sided
single-layered DVD rather than a single-sided double-layered DVD. In
addition, if your DVD burner supports multiple formats, the type of
disc you use will determine the format. DVD-R and DVD+R have the
widest support, with DVD-RW and DVD+RW close behind in terms of
support.
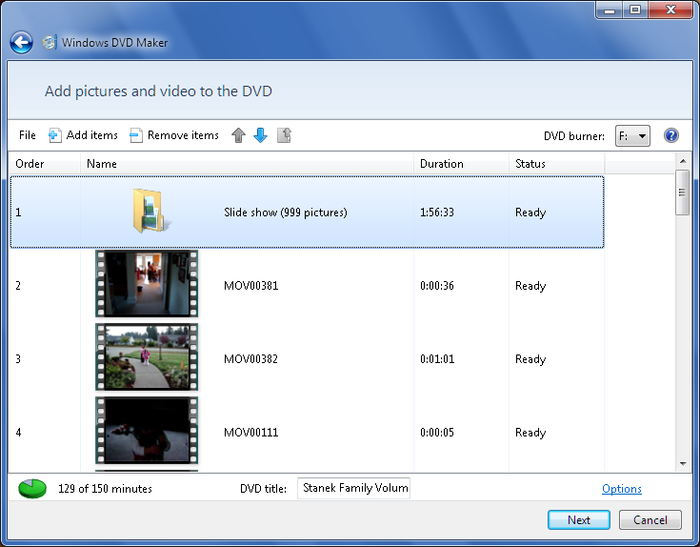
2.2. Setting the play order
In Windows DVD Maker, the listing order sets the order
in which items are played (see Figure 7). The first item
on the list plays first, the second item plays second, and so on. You
can control an item’s play order using the Move Up and Move Down
buttons. Click an item you want to move and then click the Move Up or
Move Down button until the item is in the desired position on the
playlist. You can also drag and drop items to reorder them. When
setting the play order, note the duration and status of each
item.
NOTE
On video DVDs that include both digital pictures and digital
videos, I’ve found that it’s often best to have the picture
slideshow first. One of the reasons for this is that you can sync
the slideshow to a music soundtrack, and this helps to keep the
audience engaged. Additionally, if you show the live video first, it
seems anticlimactic for you then to start showing a slideshow—even
if that slideshow does have a cool soundtrack. After all, it is hard
for digital pictures to compete with live action.
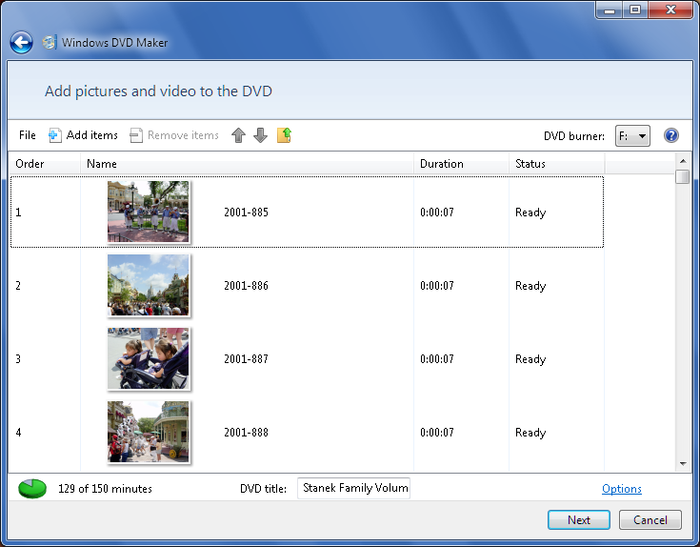
Pictures in the Slide
show folder also have a play order. If you double-click the
Slide show folder, you can then
view and set the play order for pictures, as shown in Figure 8. You can control the
play order of pictures in the slideshow using the Move Up and Move
Down buttons. Click a picture you want to move and then click the Move
Up or Move Down button until the picture is in the desired position on
the playlist. When you are done working with pictures, you can click
the parent folder button to go back to the main burn list. This button
is displayed as a folder icon and an up arrow.
NOTE
If your pictures span a period of months or years rather than
hours or days you may want to ensure that the pictures are viewed in
the order that they were taken. This seems to be one of the best
approaches. But there’s one interesting effect when you’re doing a
tribute to an individual, and that is to work from the present to
the past, especially if you have pictures that go through the
person’s life from the present to when he was a child.
Alternatively, you can go from a person’s childhood to the present,
but it is sort of fun to slip back slowly into past memories.
By default, each picture in the slideshow is displayed for seven
seconds. You’ll be able to change this setting and sync the slideshow
length with your soundtrack later.
