3. Editing Your Storyboard
As you add media items to the storyboard, Windows Movie
Maker lists the runtime of the video as the second time entry in the
preview area. This runtime may change if you modify the transitions and
effects applied. Most single-sided DVDs can have a total running time of
up to 150 minutes. Most single-sided double-layered DVDs can have a
total running time of up to 300 minutes.
After you add items, you can fine-tune the play order. To change
the play order of an item or a group of items, select the item or items
and then drag left or right until you reach the desired position. To
remove an item, right-click it and then select Remove. Removing an item
removes it from the storyboard but does not delete it from your
computer.
While you are optimizing the play order, you may want to preview
the video. As Figure 5 shows, the Preview
pane provides the following button controls:
Play/Pause
If you click the Play button, the video plays from the
current position in the storyboard. Clicking the Play button again
pauses playback.
Previous Frame
Rewinds to the previous frame of the video.
Next Frame
Advances to the next frame of the video.
Split
Splits a video clip you are playing into two clips
at the current position.

Above the button controls, you’ll find a Timeline slider for
previewing your video and managing playback. If you click and drag the
Current Frame button on the end of the Timeline slider, you can
fast-forward or rewind through a video. If you click a specific part of
the timeline, you can go to that time in the video.
NOTE
On the left side of the Storyboard pane, you’ll find Play/Pause
buttons as well as a Rewind Storyboard button. Clicking the Rewind
Storyboard button moves to and selects the first storyboard in your
video.
Anytime you are working with video clips, you have several editing
options. When you are playing video clips, you can:
Click the Split button to split the video into two clips at
the current position.
Trim the video so that it only includes footage from the
current position to the end of the clip by clicking Clip→Clip Trim
Beginning, or by pressing I.
Trim the video so that it only includes footage from the
current position to the beginning of the clip by clicking Clip→Clip
Trim End, or by pressing O.
Clear trim points to restore the original video clip by
clicking Clip→Clear Trim Points.
Combine video clips you previously split by selecting the
videos and then clicking Clip→Combine, or by pressing N.
While you are fixing your storyboard, you can use the Undo button
to undo any changes you don’t like, or the redo button to redo changes
you previously undid. Multiple undo and redo changes are saved, allowing
you to step backward and forward through changes. You can also undo and
redo specific changes.
To undo a specific change or changes, follow these steps:
Click the option button to the right of the Undo button. This
displays a shortcut menu with a list of Undo changes, as shown in
Figure 6.
The most recent change is listed first. To undo this change,
click it.
You can also undo multiple actions, but only in the exact
order in which they were performed. To undo multiple actions, drag
down until all the actions you want to undo are selected, and then
click the shortcut menu.

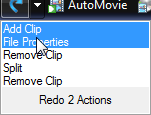
To redo a specific change or changes, follow these steps:
Click the option button to the right of the Redo button. This
displays a shortcut menu with a list of Redo changes, as shown in
Figure 7.
The most recent change is listed first. To redo this change,
click it.
You can also redo multiple actions, but only in the exact
order in which they were performed. To redo multiple actions, drag
down until all the actions you want to redo are selected, and then
click the shortcut menu.
By default, each picture in the slideshow is displayed for 5
seconds, and transitions last 1.25 seconds.
4. Creating an AutoMovie
After you finish creating and editing your storyboard, you
are ready to move on to the next phase of video production, which
involves adding effects, transitions, titles, credits, and a soundtrack.
While you can perform each of these tasks manually, you can also have
Windows Movie Maker perform them for you automatically using the
AutoMovie feature. Not only is this a great timesaver, but it also
allows you to see firsthand how various approaches to video production
work.
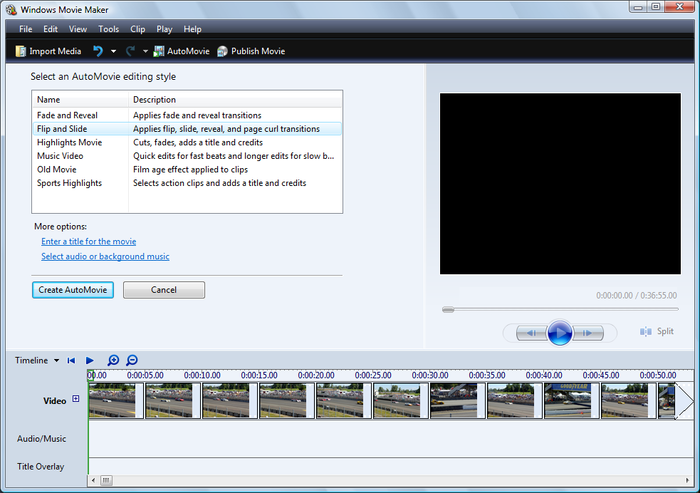
To create an AutoMovie, complete the following steps:
In Windows Movie Maker, click the AutoMovie button on the
toolbar.
As shown in Figure 8,
you can now select one of the following AutoMovie editing
styles:
Fade and Reveal
Applies fade and reveal transitions throughout
the video.
Flip and Slide
Applies flip, slide, reveal, and page curl
transitions throughout the video.
Highlights Movie
Adds cut and fade transitions throughout the
video, and inserts title and credit frames.
Music Video
Attempts to sync the video to music you select. This
works best if the selected music is as long in duration as the
video.
Old Movie
Applies the film age effect to media
items.
Sports Highlights
Selects video clips showing action, and inserts
title and credit frames.
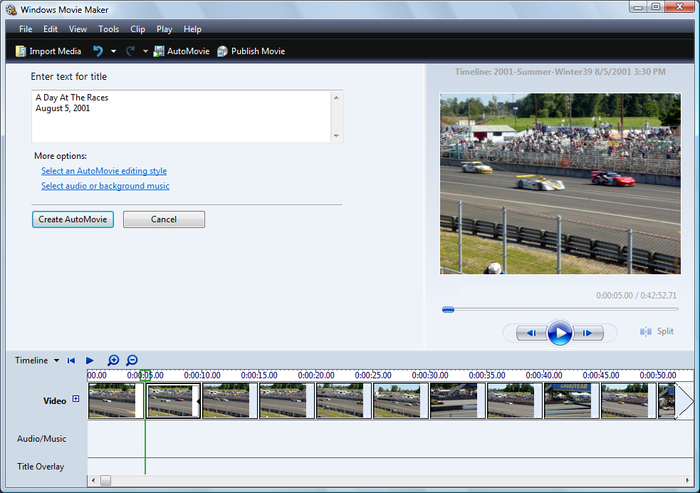
Click the “Enter a title for the movie” link and then type the
title text, as shown in Figure 9.
Click the “Select audio or background music” link to
display the “Add audio or background music” page shown in Figure 10.
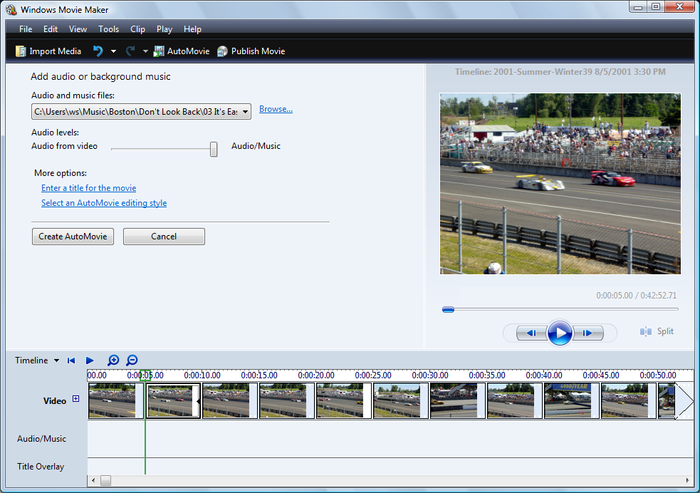
To select audio or music files to play with the video, click
the Browse link. In the Open dialog box, select the first audio file
you want to use in the video and then click Open. Repeat this
process to select each additional audio file to include.
NOTE
The total running time of all the audio files you select
should be at least as much as or more than the total running time of
the video. If it isn’t, Windows Movie Maker will fill in the tracks
from last to first, starting at the end of the video, and there will
be a gap at the beginning of the video with no soundtrack.
Use the “Audio levels” slider to control whether the audio
from the video or the audio/music you’ve added should have
precedence. To play your audio/music without hearing the audio from
the video, move the slider all the way to the right. To mix the
audio from the video back in, move the slider to the left. The more
you move the slider to the left, the more prevalent the audio from
the video will be.
Click Create AutoMovie to have Windows Movie Maker create the
movie for you. If you don’t like the results, you can always
fine-tune the movie before finalizing it.
