Windows Live Movie Maker is one of several free programs available
as part of the Windows Live Essentials program from Microsoft. You can get
Windows Live Movie Maker and other programs by visiting
http://www.windowslive.com/desktop.1. Getting Started with Windows Live Movie Maker
When you are working with Windows Live Photo Gallery, you can
select the initial pictures and videos you want to work with, click Make
and then click “Make a Movie” to open Windows Live Movie Maker with
these items selected. Otherwise, you can start Windows Live Movie Maker
by clicking Start→All Programs→Windows Live→Windows Live Movie
Maker.
As Table 1 shows, Windows
Live Movie Maker works with a wide variety of image, sound, and video
formats. This list is different from the formats supported by Windows
DVD Maker. The key change is that Windows Live Movie Maker supports AIFF
and AU sound formats, and Windows DVD Maker does not.
NOTE
Windows Live Movie Maker can open Windows Movie Maker project
files with the file extension .mswmm. When you open a Movie Maker project
file, it is imported and converted to the Windows Live Movie Maker
format. If you later save the project, it will be saved with the file
extension .wlmp.
Table 1. File formats supported by Windows Live Movie Maker
| File
format/type | File
extensions |
|---|
| Bitmap
image | .bmp |
| DIB image | .dib |
| GIF image | .gif |
| Icon image | .ico, .icon |
| JPEG image | .jpg, .jpe, .jpeg, .jfif |
| PNG image | .png |
| TIFF image | .tif, .tiff |
| Word Perfect
image | .wdp |
| Windows Meta
File | .wmf, .emf |
| Other image
types | .rle, .exif |
| Sound formats | |
| MP3 audio | .mp3 |
| WAV audio | .wav |
| Windows Media
Audio | .wma |
| Video formats | |
| AVCHD
video | .m2t, .m2ts, .mts |
| AVI video | .avi |
| DVD video | .mpa, .m1v, .m2ts, .mp2v, .mpv2 |
| MPEG 1 and MPEG 2
video | .mpe, .mpeg, .mpg, .ts, .tts |
| MPEG-4
video | .m4v, .mp4, .mp4v |
| MOD and other
formats | .mod, .vob |
| Audio/Video format | |
| 3GPP2
Audio/Video | .3g2, .3gp, .3gp2,
.3gpp |
| Windows Media Audio/Video
Professional | .asf, .wm, .wmv |
| Recorded TV format | |
| Microsoft Digital Video
Recorder | .dvr-ms, .wtv |
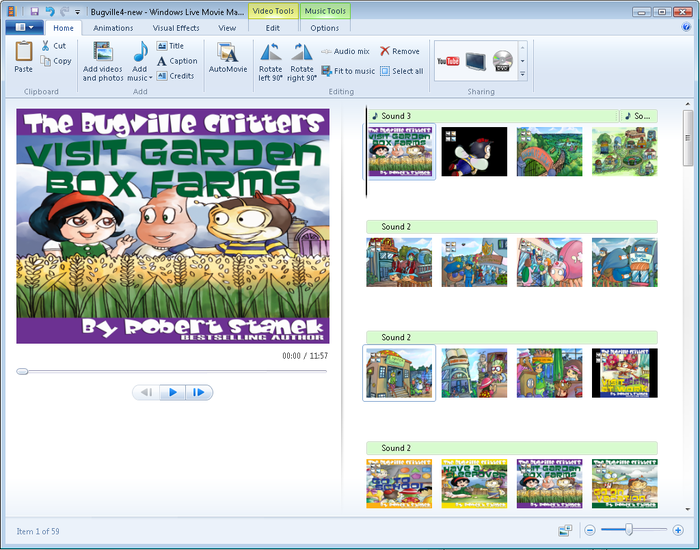
Windows Live Movie Maker works with files that are already in the
proper formats and doesn’t include features for converting formats. When
you start working with Windows Live Movie Maker, shown in Figure 1, you’ll see that it
has these key features:
- A menu ribbon
Has Home, Animations, Visual Effects panes with
options for the common tasks that you may need to perform when
making a movie as well as View, Edit and Options panes for
preview, editing and configuring additional settings. These panes
are accessed by selecting the related tab. The menu button to the
right of the Home tab is referred to as the Movie Maker
button.
- A Preview pane
Allows you to preview the video.
- A work area
Allows you to manage the media items you’ve added to the
video.
Using the options provided in the main window, you create movies
by following a series of prescribed steps. The basic steps are as
follows:
Create your live storyboard.
Edit the live storyboard.
Add effects and transitions.
Add narration, music, and other audio.
Add titles, credits, and captions.
Preview and save your video project.
I discuss tasks related to each step in the sections that
follow.
2. Creating and Editing Your Live Storyboard
In Windows Live Movie Maker, each video you are producing
is created as a video project with a live storyboard. The live
storyboard provides a representation of each media item you’ve added to
the video in the order the items are played. In this way, the live
storyboard not only serves as an outline for the presentation, but it
also lets you visualize the project in a way you otherwise would not be
able to. At a glance, you can see the work from start to finish, and
this is extremely important in the way you conceptualize the
project.
As you add media items to your video, you build the live
storyboard and set the play order for each item you are including. To
your live storyboard, you can add text, effects, and transitions. Unlike
Windows DVD Maker, Windows Live Movie Maker doesn’t put pictures into a
separate folder. Instead, all media items are added to the same
storyboard.
As with Windows DVD Maker, you can select all the pictures and
videos you want to use in Windows Live Photo Gallery first, and then add
the selected items automatically to Windows Live Movie Maker.
In Windows Live Movie Maker, you can select the items to add to
your video by completing the following steps:
Click Home and then click Add Videos and Photos.
As shown in Figure 2, use
the Add Videos and Photos dialog box to browse to a folder
containing pictures or videos you want to add.
Select the items to add using one of the following
techniques:
Select an individual item by clicking it.
Select a series of items by clicking the first item,
pressing and holding the Shift key, clicking the last item, and
then releasing Shift.
Select multiple items individually by clicking the first
item, pressing and holding the Ctrl key, clicking each
additional item in turn, and then releasing Ctrl.
The items you selected are added to the storyboard. The first
item in the first row will be displayed first, the second item in
the first row will be displayed second, and so on.

As you add media items to the storyboard, Windows Live Movie Maker
lists the runtime of the video as the second time entry in the preview
area. This runtime may change if you modify the transitions and effects
applied.
After you add items, you can fine-tune the play order. To change
the play order of an item or a group of items, select the item or items
and then drag left, right, up or down until you reach the desired
position. To remove an item, right-click it and then select Remove.
Removing an item removes it from the storyboard but does not delete it
from your computer.
While you are optimizing the play order,
you may want to preview the video. As Figure 3 shows, the Preview
pane provides the following button controls:
Play/Pause
If you click the Play button, the video plays from the
current position in the storyboard. Clicking the Play button again
pauses playback.
Previous Frame
Rewinds to the previous frame of the video.
Next Frame
Advances to the next frame of the video.
Timeline
Tracks the video timeline and the current frame position
within the video. If you click and drag the Current Frame button
on the end of the timeline slider, you can fast-forward or rewind
through a video. If you click a specific part of the timeline, you
can go to that time in the video.
By default, each picture in the slideshow is displayed for 3
seconds, and transitions last for a portion of the display time. You can
change the display time for a selected picture or pictures by clicking
Edit on the toolbar to display the Edit bar and then entering a new
display time in the Duration text box (see Figure 4).
When deciding the length of time to display pictures, keep in mind
the prospective audience and the tempo of your soundtrack. If the music
in your soundtrack has a relatively fast beat, you may want to use a
shorter display duration. If the music in your soundtrack has a slower
beat, you might want to use a longer display duration. In most cases,
you’ll want pictures to be displayed for between 3 and 10
seconds.
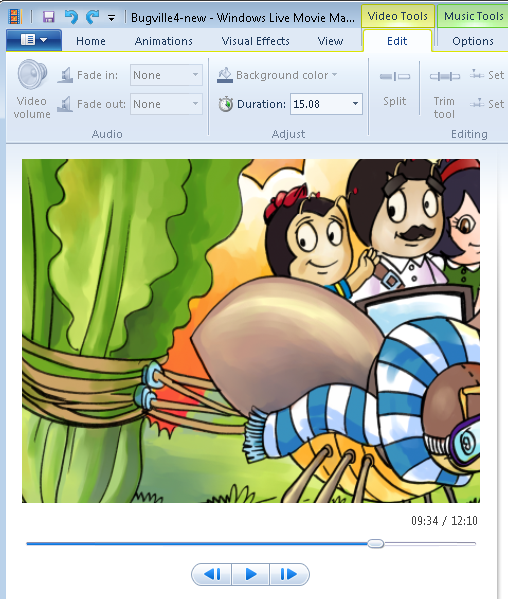
Anytime you are working with a video clip, you have several
editing options. To view these options, click Edit on the toolbar to
display the Edit bar. On the Video panel of the Edit bar, you have sound
and video editing options. To control the sound in the video, you
can:
Click Video Volume and then change the volume or mute the
sound of the video.
Click in the Fade In list to use the Slow, Medium, or Fast
fade in options for the sound.
Click in the Fade Out list to use the Slow, Medium, or Fast
fade out options for the sound.
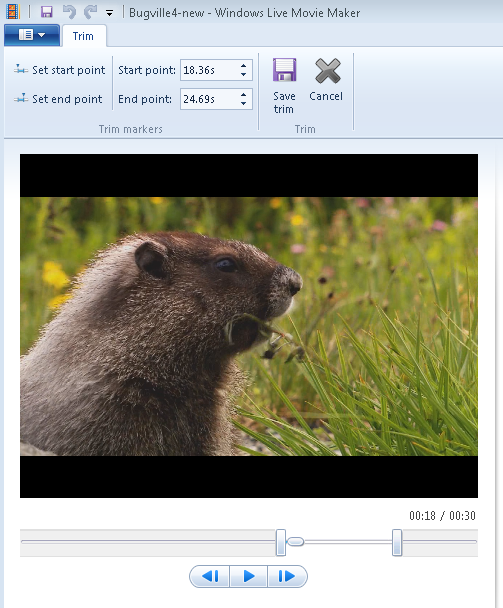
You can click the Split button to split the video into two clips
at the current position. You also can click Trim to access the Trim bar,
which is shown in Figure 5. While working
with the Trim bar, you can:
Trim the beginning of the video clip by clicking and dragging
the Trim Beginning slider
Trim the ending of the video clip by clicking and dragging the
Trim Ending slider
Save the trimmed values and exit the Trim bar by clicking Save
Trim
Exit the trim bar without saving by clicking Cancel
While you are fixing your storyboard, you can use the Undo button
(Ctrl-Z) to undo any changes you don’t like, or the Redo button (Ctrl-Y)
to redo changes you previously undid.
