Microsoft designed Windows Live Photo Gallery to help you create and
organize a picture and video gallery. Your gallery automatically contains
pictures in your personal Pictures folder, videos in your personal
Videos folder, shared pictures in your computer’s
Public Pictures folder, and shared videos in your
computer’s Public Videos folder. Your gallery can
also include other folders that you’ve added as well as pictures and
videos from cameras. Within your gallery, your pictures and videos are
grouped and sorted automatically so that you can browse them by tags, date
taken, ratings, folders, and more.1. Grouping and Sorting Your Gallery
As Figure 1 shows, the work
area of Windows Live Photo Gallery includes Arrange By, Sort Direction,
and Filter By options. You can use the Arrange By button to display the
grouping options.

The Arrange By options control how Windows Live Photo Gallery
groups related sets of pictures and videos in the All Pictures, All
Pictures→My Pictures, All Pictures→My Videos, and any other views you
select. By default, pictures and videos are automatically grouped, which
typically means they’re grouped by month and year taken if your gallery
includes media taken over several years, or day and month taken if your
gallery includes media taken only in a particular year. The grouping
options are similar to those you can select by browsing the Navigation
pane. You can group pictures and videos by name, date, rating, type,
descriptive tag, and people tag.
By default, groups are organized in ascending order, which means
that with time-related groupings the newest groups are listed first. You
can also organize groups in descending order, which means that with
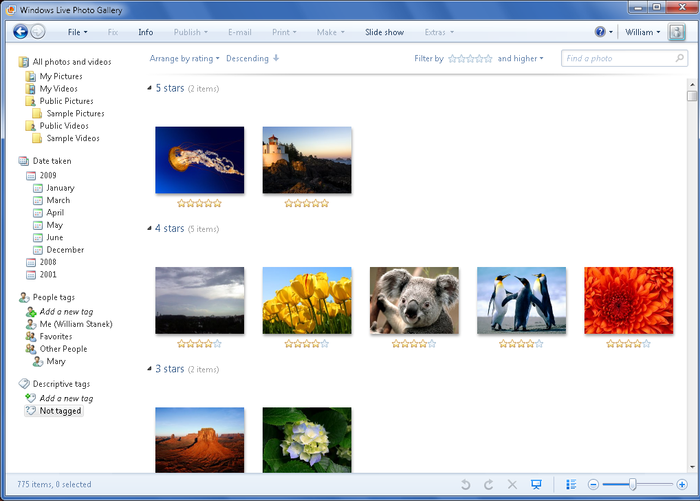
time-related groupings the oldest groups are listed first. Figure 2 shows pictures
arranged in descending order according to their rating.
The Sort Direction options control how Windows Live Photo Gallery
sorts pictures and videos within grouped sets. By default, pictures and
videos are sorted in ascending order according to the date taken. You
can also sort within groups by filename, date modified, rating,
descriptive tag, and people tag.
The Filter By options control whether Windows Live Photo
Gallery filters pictures and videos according to their rating. By
default, all pictures and videos are shown regardless of their rating.
If you want to filter by rating, select the star rating and then specify a constraint. The star rating
goes from 1 to 5 stars. The constraints are: “and higher,” “and lower,”
and “only.” For example, you could show pictures and videos rated 3
stars and higher by selecting 3 stars and then clicking “And higher.” Or
you show only pictures and videos rated 5 stars by selecting 5 stars and
then clicking “Only.”
2. Viewing Your Pictures and Videos
Windows Live Photo Gallery provides several ways to view
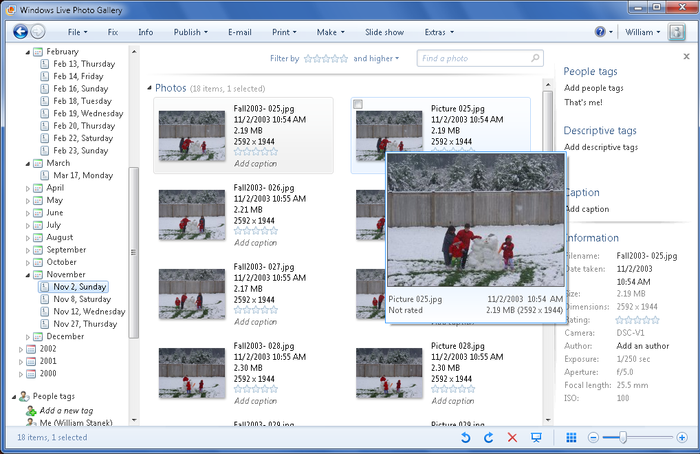
your pictures and videos. If you move the pointer over a picture for
several seconds, you’ll see a close-up preview such as the one shown in
Figure 3. With
videos, you’ll see a preview of the first frame of the video.
You can open a picture for viewing or play a video by
double-clicking it. The picture or video will then fill the work area.
If the Info pane is displayed, you can close it by clicking the Close
Info pane button. This will give you more area for viewing pictures and
videos.
When viewing pictures, the Controls toolbar is displayed in the
lower portion of the main window, as shown in Figure 4.

From left to right, the controls on the toolbar are:
Previous
Moves to the previous picture or video. You can also view
the previous picture by pressing the left arrow key on your
keyboard.
Next
Moves to the next picture or video. You can also view the
next picture by pressing the right arrow key on your
keyboard.
Rotate Counterclockwise
Rotates the selected picture counterclockwise. You can also
rotate a picture counterclockwise by pressing the Ctrl key and the
comma (,) key.
Rotate Clockwise
Rotate the selected picture clockwise. You can also rotate a
picture clockwise by pressing the Ctrl key and the period (.)
key.
Delete
Deletes the selected picture. You can also delete a picture
by pressing the Delete key. Deleting a picture will remove it from
the gallery and your computer.
Play Slide Show
Plays a slideshow of the currently listed pictures.
You can also play a slideshow by pressing F12 or Alt-S. To stop
the slideshow, press the Esc key.
NOTE
Picture slideshows start with the picture you are viewing
and continue through all pictures in the currently selected node
in the Navigation pane. With this in mind, you can play
slideshows of all pictures taken during a specific year, month,
or date by clicking the related Date Taken node, clicking the
first picture, and then starting a slideshow by clicking the
Play Slide Show button. You can play slideshows of all pictures
with a particular tag or rating by selecting the tag or rating,
double-clicking the first picture, and then starting the
slideshow by clicking the Play Slide Show button.
Actual Size/Fit to Window
Lets you view the picture at its actual size or fit it to
the window size. You can also press Ctrl-0 to switch between
actual size and window size.
Zoom in
Increases magnification by zooming in. You can also zoom in
by pressing -.
Zoom in or out
Increases or decreases magnification by zooming in or
out.
Zoom out
Decreases magnification by zooming out. You can also zoom
out by pressing =.
When viewing videos, Windows Live Photo Gallery displays the
Controls toolbar in the lower portion of the main window, as shown in
Figure 5.

From left to right, the selectable controls on the toolbar
are:
Timeline
Tracks the video timeline and the current frame
position within the video. If you click and drag the Current Frame
button that moves along the timeline slider, you can fast-forward
or rewind through a video. If you click a specific part of the
timeline, you can go to that time in the video.
Previous
Moves to the previous video or picture. You can also view
the previous video or picture by pressing the left arrow key on
your keyboard.
Play/Pause
Plays or pauses the video. You can also play or pause the
video by pressing Ctrl-Space.
Next
Moves to the next picture or video. You can also view the
next picture by pressing the right arrow key on your
keyboard.
Delete
Deletes the selected video. You can also delete a video by
pressing the Delete key. Deleting a video will remove it from the
gallery and your computer.
Play Slideshow
Plays a slideshow of pictures. If you click this button when
viewing a video, you’ll see a slideshow of any pictures in the
current selection you made before playing the video.
