As you’ve seen, Windows Live Photo Gallery handles most of the
important organization tasks for you, and this makes adding to your
gallery easy. All you need to do is add picture and video folders for
Windows Live Photo Gallery to monitor, or copy pictures and videos to
folders that it already monitors. You can also get pictures and videos
from cameras. Using the built-in print, email, and burn features, getting
your media out of your gallery is just as easy. You can print copies of
your pictures and videos, save copies of your media to data CDs and DVDs,
and email pictures and videos to friends.1. Adding or Removing Media Folders
Whenever you start Windows Live Photo Gallery, it checks
your My Pictures and My Videos folders for any picture or video
files that have been added and then updates your gallery to reflect
these changes automatically. Because of this, the easiest way to add
media to your gallery is simply to move the media files to the
appropriate folder. To add digital pictures to your library, simply copy or move the digital pictures to your
My Pictures folder. To add videos
to your library, simply copy or move the videos to your My Videos folder.
Windows Live Photo Gallery also monitors the Public Pictures and Public Videos folders. Therefore, if you have
pictures or videos that you’d like to share with others who use your
computer, you can put the shared pictures and videos in these
folders.
You can have Windows Live Photo Gallery add media from and monitor
other folders in exactly the same way by completing the following
steps:
Right-click the “All photos and video” category in the
Navigation pane, and then select Include a Folder in the Gallery.
This displays the Include a Folder in the Gallery dialog box.
In the Include a Folder in the Gallery dialog box, select the
folder containing pictures, videos, or both that you’d like to add,
and then click OK.
As long as you have appropriate permissions to access the folder,
Windows Live Photo Gallery will then begin adding pictures and videos
from the folder to your gallery. How long this takes depends on how many
pictures and videos you are adding. While adding media, the application
may run more slowly than usual.
You can remove a folder that you added if you no longer want to
include a folder’s items in your gallery. To do this, right-click the
folder and then select Remove from the Gallery. When prompted, confirm
that you want to remove the folder from the gallery by clicking Yes.
Removing the folder from the gallery tells Windows Live Photo Gallery to
stop monitoring the folder. It doesn’t delete the folder or its contents
from your computer.
2. Getting Your Digital Pictures
One way of using a digital picture camera with your
computer is to connect the camera directly. After you run your digital
camera’s Setup program (if any), you can connect most digital cameras
directly to your computer using a USB or FireWire cable. With your
camera turned on, you then access the digital pictures on it as you
would any other device with removable storage. In Windows Live Photo
Gallery, you can also select the Import from Camera or Scanner option on
the File menu to import digital pictures directly.
Rather than connecting your camera directly, you can purchase a
memory-card reader that plugs into a USB slot on your
computer. Once you’ve connected the card reader to your computer, you
simply insert the memory card. As with a direct camera connection, you
then access your digital pictures as you would any other device with
removable storage. Because most digital cameras use memory sticks,
computers and monitors increasingly are being shipped with built-in
memory card slots. You simply insert your memory card into the slot that
works with the type of memory card you have.
Table 1 provides an
overview of the picture formats Windows Live Photo Gallery supports.
Windows Live Photo Gallery is meant to be used with digital cameras and
video cameras and not with web images. Because of this, it does not
support some older file formats, such as GIF.
Table 1. Picture formats supported by Windows Live Photo Gallery
| File
type | File
extensions |
|---|
| Bitmap
image | .bmp, .dib |
| HD photo | .wdp |
| Icon image | .ico |
| JPEG image | .jpe, .jpeg, .jpg, .jfif |
| PNG image | .png |
| TIFF image | .tif, .tiff |
You’ll find that viewing pictures in Windows Live Photo Gallery is
similar to viewing pictures in Windows Media Player. The two
applications do in fact share subcomponents. However, Windows Media
Player provides only basic features for viewing pictures and playing
slideshows. Windows Live Photo Gallery, on the other hand, has extended
viewing, editing, and slideshow features.
3. Getting Your Videos
When it comes to video cameras, getting videos to your
computer requires a mixed bag of tricks. This is because, unlike digital
picture cameras, you can capture video from both analog video cameras
and digital video cameras.
3.1. Capturing video from analog video cameras
An analog-only video camera records video to tape and
outputs video using an analog signal. To capture video from a video
camera that only supports analog output, you will need to have a video
capture card that can support analog input (usually the yellow, red,
and white cables). You can find many video and TV capture cards on the
market, but many of these are designed primarily for capturing a
digital television signal, so be sure to obtain a video capture card
that supports this older analog input.
You’ll need to install the video capture program that came with
your video capture card before capturing video.
An A/V cable for an older video camera will have a
connection jack on one end that plugs into your video camera and mono
or stereo audio and video connectors on the other end of the plug. You
plug the audio and video connectors into the audio and video jacks on
your video capture card. If your video capture card has stereo inputs,
you’ll need a Y connector cable that passes the mono audio into left
and right stereo channels.
An A/V cable for a newer video camera will have a connection
jack on one end that plugs into your video camera and stereo audio and
video connectors on the other end of the plug. You plug the audio and
video connectors into the left audio, right audio, and video capture
jacks on your video card. If your video capture card has mono input
for audio, you’ll need a Y connector cable that passes the left and
right stereo channels into the mono input channel.
To capture video, you’ll need to turn your camera on and then
start the video capture program. After you rewind the tape to the
beginning or position the tape at the desired start point, press Play
on the video camera and then begin to capture the video. When you are
finished capturing, you’ll need to save the video using a format that
Windows Live Photo Gallery supports.
NOTE
MiniDV and similar video cameras have tapes but store data
digitally. To capture video from a video camera that uses tapes to
store data digitally and that supports digital output. If your
camera has a FireWire or USB connection, it most likely records in a
digital format and you don’t need to use analog inputs to capture
the video. However, some digital video cameras have USB connections
that transfer only still images taken with the camera. When in
doubt, check the manual that came with the camera or consult the
manufacturer’s website.
3.2. Getting video from digital video cameras or cell phones
Digital video cameras store data digitally on a tape,
data disc, memory card, or hard disk drive. Table 2 provides an
overview of the digital video formats Windows Live Photo Gallery
supports.
Table 2. Video formats supported by Windows Live Photo Gallery
| Video
formats | File
extensions |
|---|
| 3GPP2
audio/video | .3g2, .3gp, .3gp2, .3gpp |
| AVCHD
video | .m2t, .m2ts, .mts |
| DVD
video | .mpa, .m1v, .m2v, .mp2, .mp2v, .mpv2 |
| MPEG 1 and MPEG 2
video | .mpe, .mpeg, .mpg, .ts, .tts |
| MPEG-4
video | .m4v, .mp4, .mp4v |
| Windows Media
Audio/Video Professional | .asf, .wm, .wmv |
As with digital picture cameras, one way of using a digital
video camera with your computer is to connect the camera directly.
After you run your digital camera’s Setup program, you can connect
most digital video cameras directly to your computer using a USB or
FireWire cable. With the camera turned on, you then access the digital
media on your camera as you would any other device with removable
storage or a CD/DVD drive. Most digital video cameras can take digital
pictures as well as digital videos.
If your digital video camera uses data discs in a size and
format that your computer’s CD/DVD drive can read, you have it easy.
All you need to do is insert the data disc into the CD/DVD drive and
then you can work with your media as you would any other data disc. In
Windows Live Photo Gallery, you can also select the Import from Camera
or Scanner option on the File menu to import digital videos and
pictures directly.
If your digital video camera uses memory sticks, you can
purchase a memory card reader that plugs into a USB slot on your
computer. Once you’ve connected the card reader to your computer, you
simply insert the memory card and access your digital media as you
would any other device with removable storage. Because most digital
cameras use memory sticks, computers and monitors increasingly are
being shipped with built-in memory card slots. You simply insert the
memory card into the slot that works with the type of memory card you
have.
4. Importing Digital Pictures from Cameras, Scanners, CDs, and
DVDs
You can import digital pictures into your gallery and
automatically name your imported items by completing the following
steps:
Connect your camera or video camera to your computer, insert a
data CD or DVD containing pictures into your CD/DVD drive, or
connect your memory card reader to your computer with a memory stick
inserted.
You’ll usually see an AutoPlay dialog box similar to the one shown in Figure 1. If you don’t, click
Start→Computer, right-click the device and then select Open
AutoPlay.
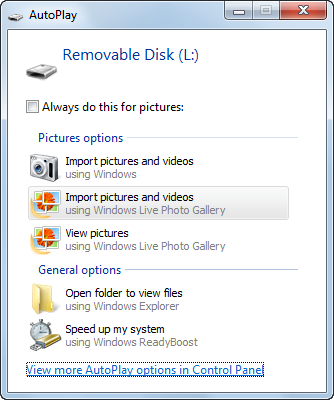
In the AutoPlay dialog box, click “View pictures using Windows
Live Photo Gallery.” If you always want to import pictures into
Photo Gallery when you connect this camera or insert this type of
memory card, select the “Always do this for pictures” checkbox and
click “View pictures using Windows Live Photo Gallery.” Then, the
next time you import pictures, you’ll bypass the AutoPlay dialog box
and go straight to the View Pictures dialog box.
NOTE
If you don’t want to rotate or edit pictures prior to importing
them, you can bypass the view part of the import process by selecting
“Import Pictures and Videos using Windows Live Photo Gallery” instead
of selecting “View Pictures and Videos using Windows Live Photo
Gallery.” You’ll then start the import process with step 7.
As shown in Figure 2, your pictures
are open for importing in Windows Live Photo Gallery. You’ll see the
first picture in the group of pictures being imported. The current
image number and the total number of images available for import are
listed in the lower-left corner of the window.
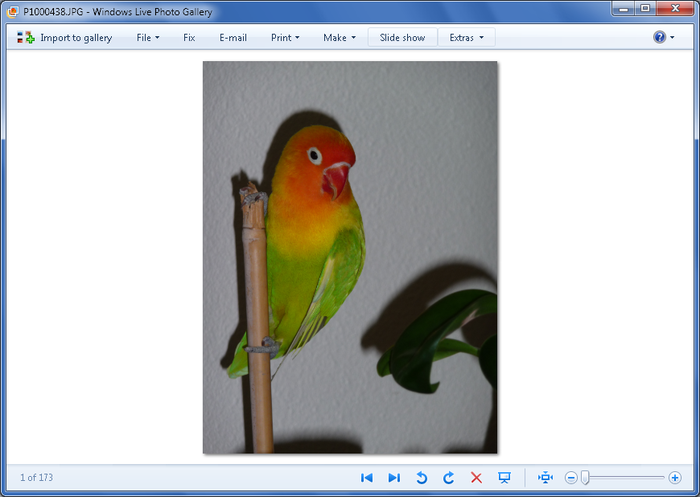
Using the controls on the toolbar, you can preview and perform
basic manipulation of each image available for importing. If the
image needs to be rotated prior to importing, you can rotate the
image. If you want to permanently remove it from the camera, you can
delete it. If you want to preview all images before importing, you
can view a slideshow.
Using the menu bar and menu options, you can make copies of an
image, view image properties, fix an image in Editing mode and more.
Editing mode allows you to adjust exposure and color, straighten or
crop a picture, fix red-eye, add effects and more. One of the
coolest editing features is Adjust Detail, which you can use to
sharpen an image or reduce noise. In Figure 9-15, an out-of-focus image
was brought into focus by clicking Adjust Detail and then clicking
Analyze. When you are fixing an image, you’ll stay in the Editing
mode until you close the Editing pane by clicking the Close Edit
Pane button.
When you are ready to begin importing, click Import to
Gallery. In the Import Photos and Videos dialog box, you can:
Review, organize, and group items to import
Items are grouped automatically by date. Use the Adjust
Group slider to change the amount of time between groups. For
each unique grouping, you can specify whether items in the
group are imported by selecting or clearing the Select All
Items in This Group checkbox. You also can assign each group a
name and tags. By default, the subfolders in which pictures
are stored are named by date or by the group name. By default,
the filenames for pictures are the same as their original file
names on the device. Tags are added to each picture in the
group.
Import all new items now
All new items are selected for importing. Items are
grouped automatically by date. By default, the subfolders in
which pictures are stored are named by date or by the name you
assign. By default, the filenames for pictures are the same as
their original filenames on the device. Your tags are added to
every picture.
More options
Allows you to manage the import options.
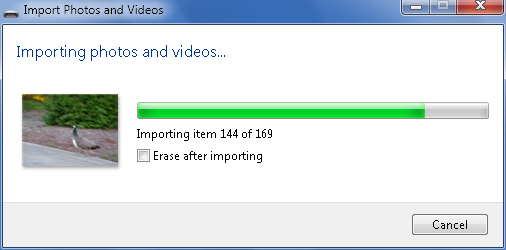
When you click Import, Import Photos and Videos will begin
importing the selected pictures. As shown in Figure 4, you’ll see the progress of
the import process. You’ll also have the option of selecting the
Erase After Importing checkbox to remove all pictures you are
importing from the device or memory stick.