3. Using the On-Screen Keyboard
The On-Screen Keyboard is designed to make it easier to
use a mouse or an alternative input device for typing. Similar to Input
Panel, characters typed on the On-Screen Keyboard are inserted into the
current application.
You can turn on the On-Screen Keyboard by completing these
steps:
Click Start→Control Panel→Ease of Access→Ease of Access
Center. (You can also press Windows-U to quickly open the Ease of
Access Center.)
Click Start On-Screen Keyboard.
To exit the On-Screen Keyboard and prevent it from starting
automatically, click File and then click Exit.
When the keyboard is on, as shown in Figure 2, use the mouse,
pen, or other input device to select characters, press function keys, or
click a special-purpose key, such as Home, Page Up, or Insert.
Ctrl, Windows, and Alt keys are provided, allowing you to enter
keystroke combinations, such as Ctrl-Alt-Delete, by clicking each
required key. Between the right Windows logo key and the right Ctrl key,
you’ll find a Properties button. Clicking this button is the equivalent
of right-clicking and selecting Properties in the active window.
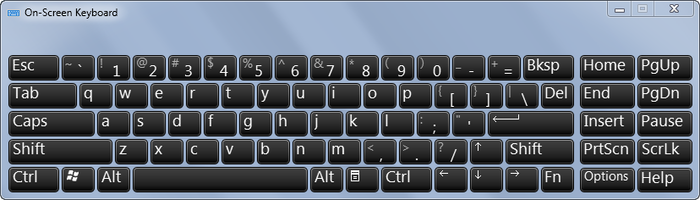
By default, the keyboard is configured to type characters when you
click the keys. You can also configure the keyboard to use hovering to
select characters or to accept input from a joystick. With hovering, you
move the pointer over a character for a specified period, such as 1
second, to select that character. With a joystick, you move the joystick
and then click the joystick button when over a character to select that
character.
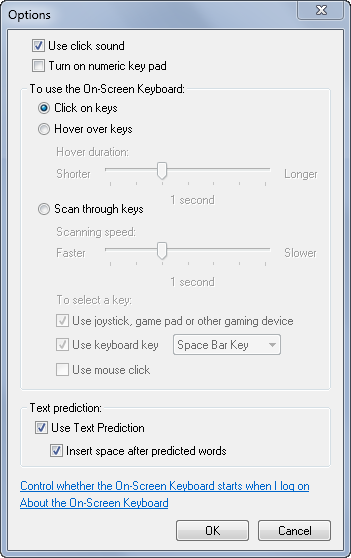
You can configure the way characters are selected by completing
the following steps:
In the On-Screen Keyboard, click the Options button.
In the Options box, shown in Figure 3, choose an appropriate
typing mode.
To click to select a key, choose “Click on keys.”
To hover to select a key, choose “Hover over keys” and then set the minimum hover time,
such as 1.00 seconds.
To use a joystick or space bar to select a key, choose
“Scan through keys” and then set the interval at which
Windows 7 scans for button presses on the joystick or space bar,
such as 0.50 seconds.
Click OK to save your settings. Your preferences are
remembered each time you start and use the On-Screen
Keyboard.
4. Using Narrator
Narrator is a text-to-speech program that reads aloud what
is displayed on the screen as you navigate the keyboard. You can use the
program to read aloud users’ keystrokes, system messages, menu commands,
and dialog box options.
You can turn on Narrator by completing these steps:
Click Start→Control Panel→Ease of Access→Ease of Access
Center. (You can also press Windows-U to quickly open the Ease of
Access Center.)
To exit Narrator and prevent it from starting automatically, click
File and then click Exit.
Narrator’s default voice is Microsoft Anna. You can configure
Narrator using the following techniques:
By clicking the Voice Settings button in the Microsoft
Narrator window, you can modify the speed, volume, and pitch of the
default voice.
By default, Narrator echoes user keystrokes and announces
system messages. You can also configure it to announce scroll
notifications and automatically monitor screen elements. You can use
the Preferences menu options to toggle these options on and
off.
By selecting Preferences and then clicking “Background message settings,” you can configure
whether and when background messages are discarded if they have not
been presented to the user. By default, messages are discarded after
30 seconds.
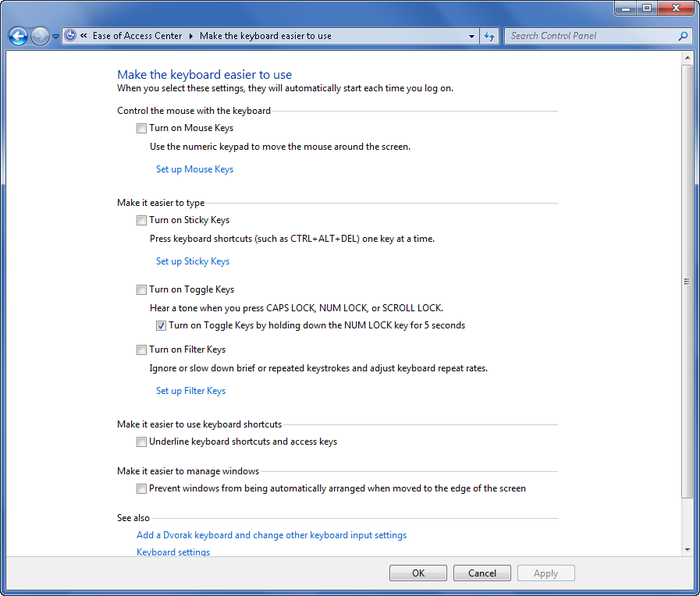
5. Making the Keyboard Easier to Use
For those who have difficulty pressing keys on keyboards
or reading onscreen text, Windows 7 includes several other useful
accessibility features to make the keyboard easier to use. To access and
turn on these features, complete the following steps:
Click Start→Control Panel→Ease of Access→Ease of Access
Center. (You can also press Windows-U to quickly open the Ease of
Access Center.)
In the Ease of Access Center, under Explore All Settings,
click “Make the keyboard easier to use.” This displays the
“Make the keyboard easier to use” page, shown in Figure 4.
The Mouse Keys feature lets you move the mouse around
the screen using the left, right, up, and down arrows on the numeric
keypad. To enable Mouse Keys, select the “Turn on Mouse Keys”
checkbox.
The Sticky Keys feature lets you press key
combinations, such as Ctrl-Alt-Delete, one key at a time. Modifier
keys are locked and selected automatically if you press them twice
in a row. To enable Sticky Keys, select the “Turn on Sticky Keys”
checkbox.
The Toggle Keys feature plays a warning tone whenever
you press the Caps Lock, Num Lock, or Scroll Lock key. To enable
Toggle Keys, select the “Turn on Toggle Keys” checkbox.
The Filter Keys feature lets you automatically filter
unintentional keystrokes. When this feature is enabled, you must
press and hold a key for a specific length of time before it is
accepted or repeated. To turn on Filter Keys, select the “Turn on
Filter Keys” checkbox.
Click Save to save and apply your settings.