If you hear someone talking to his computer, odds are he’s not going
crazy—he’s using Windows 7’s built-in speech recognition software to take
his computing experience to the next level. Speech recognition software
allows you to dictate documents and email messages. It also allows you to
browse the Web and navigate program menus using voice controls. Not only
does this allow you to create documents quickly and perform common tasks,
but it can also reduce the risk of repetitive stress injuries.1. Getting Started with Speech Recognition
You can access Windows 7’s speech recognition software by
clicking Start→All Programs→Accessories→Ease of Access→Windows Speech
Recognition. However, before you do this, you should take a moment to
learn more about this powerful feature.
Speech recognition allows you to control your computer by speaking
into a microphone. When you talk, the software uses context-sensitive
controls to determine whether to convert your words to text, as with
dictation, or to navigate program menus, as with control commands.
Generally, when you use speech recognition, Windows 7 enters your
dictation text into the current active document and your control
commands are used to navigate the current active program’s menus.
Speech recognition works best when you use a quality microphone,
such as a USB headset microphone or an array microphone. The environment
in which you use the microphone should be relatively quiet. If it isn’t,
you may find that background noise is interpreted as spoken speech. A
microphone with noise cancellation technology may resolve this
problem.
Having started with speech recognition software in the early days
of Dragon Dictate, I found the built-in software easy to use and
surprisingly reliable. The software provides enhanced user interfaces
that offer a simple yet efficient way to dictate text, make changes, and
correct mistakes. The software includes an interactive tutorial that
teaches you while you are training the computer to understand your
voice. The software also improves in accuracy over time by learning as
you use it, and by prompting for clarification when you give a command
that can be interpreted in multiple ways.
Windows Speech Recognition isn’t designed to handle every type of
writing or to work with every type of application. Rather, it is
intended for those who frequently use word-processing applications,
email applications, and web browsers. By using speech recognition with
these programs, you can use your voice to enter text and perform
commands, thereby significantly reducing the use of the keyboard and
mouse.
Speech recognition dictation works only in applications that
support the Microsoft Text Services Framework. Applications that support
this framework include:
Speech recognition won’t work with applications that don’t support
the Text Services Framework.
2. Configuring Speech Recognition for First Use
Before you can use Windows Speech Recognition, you must
ensure that your computer has a sound card and that the sound card is
properly configured. If your computer does not have a built-in
microphone (most portables do), you must then connect a microphone to
the computer’s microphone jack.
Once you’ve connected your microphone, ensure that the microphone is enabled and
adjust the microphone volume to a proper level before you configure
Windows Speech Recognition for first use. Although Windows Speech
Recognition will help you set the audio input levels as part of the
microphone setup process, the related wizard will not enable your
microphone if it is muted and it will not boost the decibel levels of
the microphone, which may be required to achieve proper input levels. To
ensure that the microphone is ready to be used, follow these
steps:
Click Start, and then click Control Panel.
In the Control Panel, click Hardware and Sound→Sound.
In the Sound dialog box, go to the Recording tab and
double-click on the microphone you wish to use.
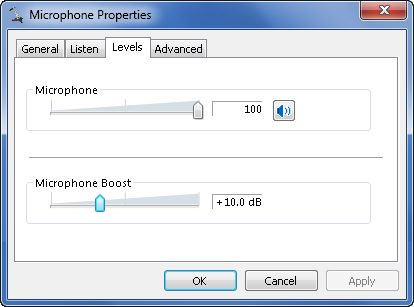
On the Levels tab, the Microphone button is used to mute or
unmute the microphone. If the microphone is muted, click the button
to unmute it, as shown in Figure 1.
Optionally, use the Microphone slider to set base the input
level for the microphone. During the microphone setup process,
Windows Speech Recognition will adjust the input levels for
you.
Use the Microphone Boost slider if you need to boost the input
levels for your microphone.
To set up the speech software for first use, complete the
following steps:
Click Start, click All Programs→Accessories.
Click Ease of Access→Speech Recognition. This starts the Set
up Speech Recognition Wizard.
On the Welcome to Speech Recognition page, read the
introductory text and then click Next.
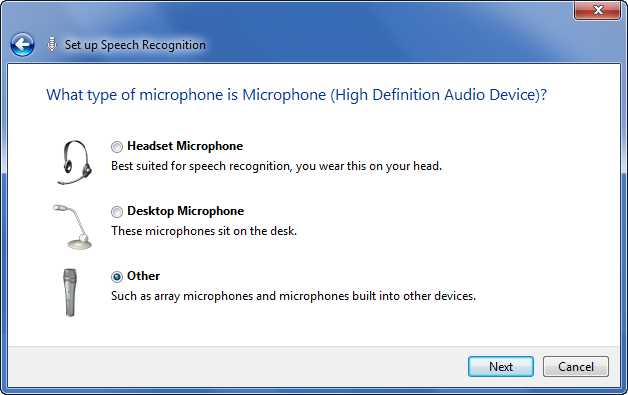
On the “What type of microphone is Microphone” page, shown in
Figure 2, select
the type of microphone you are using. If you are using a portable PC
with a built-in microphone, select Other as the microphone
type.
On the “Set up your microphone” page, follow the instructions
for setting up and positioning your microphone. Different directions
are provided for each type of microphone. Click Next.
On the “Adjust the volume of Microphone” page, shown in Figure 13-8, read the
sample text aloud into your microphone. Ensure that you are
positioned where you will be when you use your computer and that you
speak in a natural voice. Your voice will be used to automatically
adjust the microphone volume if the levels are too low or too
high.
Click Next twice. On the “Improve speech recognition accuracy”
page, specify whether the speech recognition software should scan
your documents and email messages to learn the words and phrases you
use. If you want to enable this feature, click “Enable document
review.” Otherwise, click “Disable document review” to turn off this feature. Click
Next.
On the “Choose an activation mode” page, specify how the speech
recognition software is activated after you say “stop listening.” To
activate the software by clicking the Microphone button or by
pressing the Ctrl-Windows keys, select “Use manual activation mode.”
To activate the software by saying “start listening,” select “Use
voice activation mode.”
NOTE
The Microphone button is displayed on the Speech Recognition
toolbar. By default, this toolbar is docked at the top of the
screen. You can undock the toolbar by clicking and dragging it to
a new location. If you click the toolbar’s Minimize button, the
toolbar is minimized to the Notification area of the
taskbar.
You can rerun microphone setup by right-clicking on the
speech recognition toolbar and selecting Configuration→“Set up my
microphone.”
On the “Print the speech reference card” page, click “View reference sheet.” In Windows Help and Support, click
Print to print out the reference sheet.
Click Next. By default, the speech recognition software will
run each time you start your computer. If you’d rather start the
software yourself, clear the “Run Speech Recognition at Startup” checkbox.
Click Next and then click Start Tutorial. Follow the prompts
and work your way through the tutorial. While you are learning about
speech recognition, Windows Speech Recognition will also train the
computer to recognize your voice. The tutorial requires a minimum
resolution of 1,024 × 768.

3. Using Speech Recognition for Dictation
The most common way you’ll use speech recognition is for
dictating documents. You dictate documents by following these general
steps:
Start your word-processing application.
Create a new document or open an existing document.
In Microsoft Office Word or WordPad, you can use speech
recognition to perform these tasks by following these steps:
If speech recognition is not running, start it. Click
Start→All Programs→Accessories→Ease of Access→Speech
Recognition.
The way the software starts depends on the activation mode you
selected. With automatic activation, you can start the software by
saying “start listening.” With manual activation, you can start the
software by clicking the Microphone button or by pressing the
Ctrl-Windows keys.
Say “open Word” to open Microsoft Office Word or “open
WordPad” to open WordPad.
Start dictating. Use the spoken-word commands for punctuation
marks and special characters as necessary. For example, to insert a
comma, you say “comma.” To end a sentence with a period, you say
“period.”
To correct mistakes, say “correct” and the word that the
computer typed by mistake. Select the correct word from the list
offered, or say the correct word again. For example, if the computer
misrecognized days as daze, say “correct daze,” and then select the
right word from the list or say the word “days” again.
The way you save the document depends on the program you are
using:
To save the document using Office Word 2003 or WordPad,
say “file,” say “save as,” and then say the name of the
document, such as “My Shopping List.” Finish by saying
“save.”
To save the document using Office Word 2007 or later, say
“Office button,” say “save as,” and then say the name of the
document, such as “My Shopping List.” Finish by saying
“save.”
