Logo
programming4us
programming4us
programming4us
programming4us
Home
programming4us
XP
programming4us
Windows Vista
programming4us
Windows 7
programming4us
Windows Azure
programming4us
Windows Server
programming4us
Windows Phone
 
programming4us
Windows 7

Making the Most of Windows’ Accessories : Creating Sticky Notes

- Free product key for windows 10
- Free Product Key for Microsoft office 365
- Malwarebytes Premium 3.7.1 Serial Keys (LifeTime) 2019
4/9/2011 5:03:41 PM
Sticky Notes provides a scratch pad for creating memos. Because any sticky notes you create remain on the desktop until you delete them, you don’t have to worry about losing notes when you log off or shut down your computer. Sticky Notes is not included in Starter editions of Windows 7.

You can start Sticky Notes by clicking Start→All 
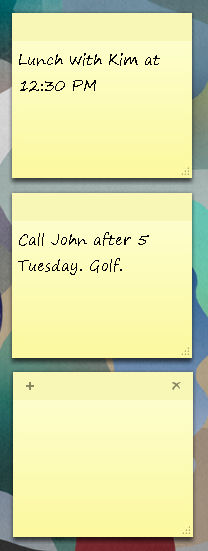
Programs→Accessories, and then selecting Sticky Notes. As shown in Figure 1, Sticky Notes gives you a scratch pad on which you can write notes using the keyboard (or a stylus on a tablet PC). You can create a new note by clicking the New Note (+) button or pressing Ctrl-N. To modify a note, click the sticky note to select it and then enter the changes.

Figure 1. Creating written memos


As you add notes, the number of sticky notes on your desktop grows. You can copy the contents of a note and insert it into a word processing document by following these steps:

  1. Click the sticky note to select.

  2. Press Ctrl-A and then press Ctrl-C to select and then copy all the text in the note.

  3. In your word processing document, press Ctrl-V to insert the note.

If you no longer want a sticky note, click the note and then click the Delete button (the red X) on the toolbar. Confirm the action by clicking Yes.

Other -----------------
- Capturing Screens and Windows with the Snipping Tool (part 2) - Editing and Saving Your Snips & Setting Snipping Options
- Capturing Screens and Windows with the Snipping Tool (part 1) - Creating Snips
- Managing Print, Fax, and Scan Jobs (part 2) - Working with Scanners and Fax Machines
- Managing Print, Fax, and Scan Jobs (part 1) - Working with Print Jobs & Working with Printers
- Configuring Printer, Scanner, and Fax Machine Properties (part 2)
- Configuring Printer, Scanner, and Fax Machine Properties (part 1) - Changing Ports for Printers, Scanners, and Fax Machines
- Sharing Printers, Scanners, and Fax Machines
- Installing Printers, Scanners, and Fax Machines (part 3) - Installing Network-Attached Printers, Scanners, and Fax Machines
- Installing Printers, Scanners, and Fax Machines (part 2) - Installing Wireless and Bluetooth Printers
- Installing Printers, Scanners, and Fax Machines (part 1) - Installing Physically Attached Printers, Scanners, and Fax Machines
 
 
Top 10
- Microsoft Visio 2013 : Adding Structure to Your Diagrams - Finding containers and lists in Visio (part 2) - Wireframes,Legends
- Microsoft Visio 2013 : Adding Structure to Your Diagrams - Finding containers and lists in Visio (part 1) - Swimlanes
- Microsoft Visio 2013 : Adding Structure to Your Diagrams - Formatting and sizing lists
- Microsoft Visio 2013 : Adding Structure to Your Diagrams - Adding shapes to lists
- Microsoft Visio 2013 : Adding Structure to Your Diagrams - Sizing containers
- Microsoft Access 2010 : Control Properties and Why to Use Them (part 3) - The Other Properties of a Control
- Microsoft Access 2010 : Control Properties and Why to Use Them (part 2) - The Data Properties of a Control
- Microsoft Access 2010 : Control Properties and Why to Use Them (part 1) - The Format Properties of a Control
- Microsoft Access 2010 : Form Properties and Why Should You Use Them - Working with the Properties Window
- Microsoft Visio 2013 : Using the Organization Chart Wizard with new data
 
programming4us
Windows Vista
programming4us
Windows 7
programming4us
Windows Azure
programming4us
Windows Server