5. Enabling and Disabling Windows Firewall
Windows Firewall helps prevent hackers and malicious
programs from gaining access to your computer. The firewall blocks
access to your computer through network or Internet connections. The
firewall can also block packets being sent by your computer, helping to
protect others from malicious content on your computer, such as a virus
or worm. The firewall is essential to help protect your computer and
your data, and you will want to leave it enabled.
If you use Windows Firewall, make sure you do not run other
software firewalls on your computer, as it takes considerable effort to
troubleshoot networking issues when you have multiple firewalls enabled
on your computer. If you are using an Ethernet or Wi-Fi router, you should enable the firewall
on the router as well, as this will also help block attacks against your
network. Although no firewall has the capability to stop all harmful
attacks against your computer, it is well worth the time to configure
Windows Firewall and any firewall that may be available on your
router.
Windows 7 offers you the ability to configure the options of the
Windows Firewall feature by giving you an easy-to-use interface. The Windows
Firewall is enabled by default for all connections and can be enabled or
disabled for each type of network to which a user connects. You can
determine the status of Windows Firewall for each network location type
by following these steps:
Click Start→Control Panel→System and Security heading→Windows
Firewall.
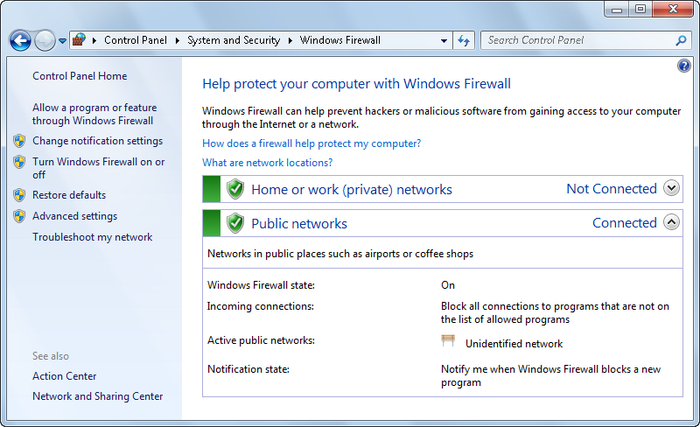
As shown in Figure 17, you’ll see a
summary of the firewall status and configuration. To change the
basic firewall settings, click “Change notification
settings.”
As Figure 18
shows, Windows Firewall settings for each network type to which a
user can connect are listed in the Customize Settings page. Select
Turn on Windows Firewall or Turn off Windows Firewall for each
network type as appropriate. Note that turning the firewall off
makes your computer vulnerable to remote attacks through network and
Internet connections.
When you are connecting to networks that are less secure, you
may want to block all incoming connections to your computer. To do
this, select the “Block all incoming connections” checkbox. This
setting ignores all settings in the firewall configuration and
blocks every connection to your computer.
By default you are notified when Windows Firewall blocks a new
program. If you don’t want to be notified, clear the “Notify me when
Windows Firewall blocks a new program” checkbox.
Once you have completed making changes to the firewall
settings, complete the steps by clicking OK, and Windows 7 applies
your changes to the system. If you are a member of a domain and you
cannot change some of your firewall configuration options, your
network administrator may be controlling the settings through Group
Policy. You also need the correct credentials to change your
firewall settings. If you do not have local administrative rights,
some features of Windows Firewall are unavailable for your
configuration.

6. Establishing Network Connections
Network connections are the actual settings that allow you
to connect to a network. They require several configurations in order to
work. First, you must have a hardware device offering you connectivity
to the network. You also need a profile associated with the network
connection, and you must configure the network protocols to use on the
related network adapter. Each setting is required for any connection to
work properly.
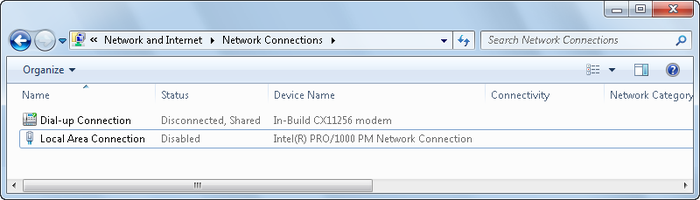
You must have a connection defined in order to establish a
connection to a network. To verify that you have a connection defined,
you can use the Network Connections window (from Network and Sharing
Center, click Change Adapter Settings), as shown in Figure 19. The Network
Connections window holds all of the network connections defined for your computer.
When you install network hardware in your computer, Windows 7 creates a
connection in the Network Connections window. If you install an
Ethernet card, Windows 7 creates a Local Area Connection
in the Network Connections window. If you install a wireless network
adapter, Windows 7 creates a Wireless Network Connection in the Network
Connections window.
To open the Network Connections window, click Start→Control
Panel→Network and Internet→Network and Sharing Center→“Change adapter
settings” in the left pane.
In the Network Connections window, you will see the status of each
connection. If a connection is active, you will see a connectivity entry
that shows whether the connection has access to the Internet. Once
you’ve verified that you have network connection entries but do no have
an active connection, you will want to connect to a network or the
Internet using dial-up, broadband, or VPN.
To activate a connection that is not connected, right-click the
connection and then select Connect. Confirm or provide the required
username and password and then click Dial or Connect as appropriate. If
your connection fails, Windows 7 displays an error dialog box. With
dial-up and broadband, you are able to redial/retry to try to make the
connection again using the same settings.
Some connections, such as wireless broadband adapters that use
cellular networks, should be started and stopped using the utility
supplied by your cellular provider. |
|
To enable a disabled connection, right-click the connection and
select Enable.
