Virtual Desktop Infrastructure (VDI)
has come a long way in the past few years. In short, VDI is the
practice of hosting one or more virtual desktop operating systems on a
desktop operating system. The desktop operating system is referred to as
the host, and the virtual systems are referred to as virtual machines,
virtual images, and sometimes just virtual applications.
As an example, you can run an
instance of Windows 7 as the host operating system. Then, within the
Windows 7 host, you can run other operating systems such as Windows XP,
another virtual machine running Windows 7, and a third running Windows
Server 2008.
With the cheap but
abundant processing power built into desktop PCs, using VDI is now being
seriously considered an alternative to Remote Desktop Services (RDS).
Desktop PCs rarely use much of their processing power, and VDI
applications and operating systems can provide distinct isolation from
the host operating system.
NOTE
Remote Desktop Services
(previously known as Terminal Services in Windows) can be configured on
a server to allow users to run individual applications or entire
desktops over a network. From the users' perspective, the application or
desktop appears to be running on their individual system but is
actually running on a server.
Microsoft introduced Windows Virtual PC (VPC) with Windows 7. This was previously known as Microsoft Virtual PC
and was often used by administrators, technical trainers, and students.
It's been available as a free download for years. If you've used
Microsoft Virtual PC, you'll notice similarities with Windows Virtual
PC, but the underlying technology provides some significant
improvements.
VPC is not just for techies
anymore. It can be installed and configured for regular users to run
applications in virtual isolated environments using Windows XP Mode. It
can be used to host applications running on other operating systems. It
can even be used to host a dual-boot system using virtual hard disk
files. You'll see all of this in this section.
1. Considering a VDI Environment
The choice between a
complete physical environment and a hybrid physical and VDI environment
requires considering several different elements related to how the VDI
environment will be used. These include the following:
Existing hardware
There are several
things to consider with existing hardware. First, if it's 32-bit,
you're limited to no more than 4 GB of RAM, as discussed earlier. You're
much better off if the hardware is 64-bit and has more than 4 GB of
RAM.
Second, if the processor doesn't
support virtualization, or the BIOS doesn't support virtualization, you
won't be able to use Windows XP Mode. However, you can still use
virtual machines.
Tradeoffs between physical and VDI environments
VDI environments
require more resources. These include newer processors and more RAM.
However, if the PC supports it, the environment may allow you to remove
another PC. I've worked in some environments where users had to maintain
two PCs—one to do most of their work and another for legacy
applications. Two PCs cost more to maintain than one; this includes more
electricity and more cooling power. Many companies consider VDI
environments a "greener" alternative.
Network load considerations
Most PCs will have only a
single network interface card (NIC). This NIC will be shared with the
VDI machines. If the virtual machines are connected to the network and
have a lot of network activity, you may want to consider upgrading the
NIC.
Disk space
Windows XP Mode requires a
minimum of 1.6 GB of disk space. If you start adding additional virtual
machines, you'll find that they take significantly more. For example, a
Windows Server 2008 virtual hard disk takes about 6 GB with an initial
installation, and Windows 7 takes about the same. These are dynamically
expanding disks, so as more is installed or added to the virtual
systems, they will take more and more space.
This can be critical if the
virtual hard disks are stored on the boot or system partition. If they
are stored on one of these partitions, you should monitor disk space
usage closely.
|
I've been using Virtual PC
(VPC) for many years to create virtual desktops and even virtual
networks where I could test and learn different technologies.
As a simple example, when
first learning Windows Server 2008 and Windows Vista, I was running
Windows XP as my desktop operating system. I created two VPC images—one
of Windows Server 2008 and another of Windows Vista. I was able to load
these two systems, configure the server as a domain controller in a
domain, and configure Windows Vista to join the domain. I now had a
mini-network with a server and a client.
One of the greatest benefits of this virtual setup is that if I crashed the system, I could easily rebuild it and start over.
Similarly, that's what I've
created for this book. While I'm running Windows 7 on my PCs, I also
have a virtual network consisting of a virtual Windows Server 2008
server and another of a virtual Windows 7 client.
|
1.1. Direct Connection vs. Brokered Connection
In the context of VDI,
connections can either be direct or brokered. Direct would be directly
within a virtual machine, and brokered would be indirectly through the
virtual machine.
Direct connection
The user launches the virtual machine from within the host system, logs
on to the virtual machine, and starts the application within the
virtual machine.
Brokered connection
The user launches the application directly from the host machine. Even
though it's running within the virtual machine, this is transparent to
the user. Windows XP Mode uses a brokered
connection, and this can be used with other virtual machines.
Imagine a user needs to
launch an instance of an older application named LegacyApp. She can
launch this in a direct connection or a brokered connection. In both
instances, the application would be installed on a virtual machine, but
the difference is in how it's delivered to the user. Brokered
connections are easier for end users.
1.2. Determining a VHD Strategy
A cool feature available
with Windows 7 is the ability to boot to a virtual hard drive (VHD). The
VHD format has been used with Virtual PC for many years, but the
abilities have been expanded significantly. This can be done only with
Windows 7 or Windows Server 2008 R2, but it can be a useful feature.
Dual-boot environments allow you
to boot to different operating systems. One of the challenges with
traditional dual-boot environments is that you needed to ensure each
operating system was installed on its own partition. If not, one OS
could (and usually did) corrupt the other OS.
Now you can have
multiple operating systems available on a single machine with a single
partition. When you've finished with the operating system, simply delete
the VHD file.
The process creates a VHD file (with an extension of .vhd) at the root of C:. You can name the file whatever you want (the following exercise names it Windows7.vhd).
The size of the file should be at least 20 GB and is expressed in MB.
You can make it larger to accommodate more data and files: 10 GB is
10240, so 20 GB would be 20480, 30 GB 30720, and so on.
You can have the .vhd
file either fixed or expandable. A 20GB fixed size will always take up
20 GB of space, while a 20GB expandable file will start at less than 100
MB and expand as data is added to the file. The fixed size is quicker
since it doesn't need to expand dynamically, while the expandable size
consumes only the space needed.
Turn
on the Windows Vista system and place the Windows 7 installation DVD in
the system. When the system starts, select the option to boot from the
DVD. When
the initial installation screen appears prompting you to select a
language, time and currency format, and keyboard or input method, press
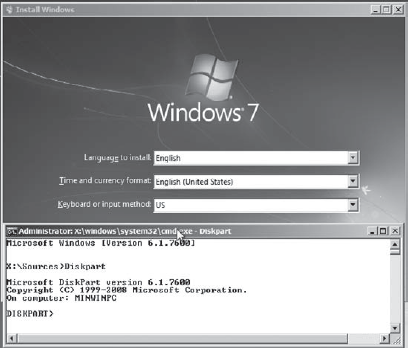
Shift+F10. This will launch a command-prompt window with the prompt X:\Sources>
X: is mapped to the DVD drive, and it is pointed to the Sources folder in the drive. At the command prompt, type diskpart and press Enter. After a moment, the command prompt will change to DISKPART> and your display will look similar to the following graphic.
Type the following command, and press Enter to create a 40GB expandable virtual disk file. Create vdisk file = c:\Windows7.vhd maximum=40960 type=expandable
You can name the .vhd file anything you want, enter a different maximum size, or omit the type=expandable
statement to create a fixed-size file. If you choose a fixed size, it
will take several minutes to complete and will show the progress. After
the file is created, Diskpart will display the message "Diskpart
successfully created the virtual disk file." Type the following command and press Enter. Select vdisk file=c:\Windows7.vhd
Diskpart will indicate it has successfully selected the virtual disk file. Type the following command and press Enter: Attach vdisk
Diskpart will indicate it has successfully attached the virtual disk file. Type Exit and press Enter to exit Diskpart. Type Exit and press Enter to exit the command-prompt window. You
will now see the Install Windows screen you saw before pressing
Shift+F10. Make sure the correct language, time and currency, and
keyboard or input method are selected and click Next. Click the Install Now button. Review the license terms, select the check box I Accept The License Terms, and click Next. Click the Custom (Advanced) type of installation. The
Where Do You Want To Install Windows screen will appear with at least
two disks showing. Below the physical disks and partitions, you will see
the virtual disk file represented as a disk with a total size of 40 GB
and free space of 40 GB (unless you created it as a different size). In
my test system, it has one physical disk shown as Disk 0 and the .vhd disk as Disk 1 Unallocated Space. Select the virtual disk and click Next.
|
When it completes and
reboots, you'll see a dual-boot screen. The Windows 7 choice will be
first and, if you don't take any action, it will boot to the Windows 7
VHD file in 30 seconds.
|
A warning may appear saying,
"Windows cannot be installed to this disk. (Show Details)," indicating
the hardware is not compatible. Don't believe it. Continue on. I've seen
that message on two different systems, but the installation and
operation worked without any problems I could identify. |
|
