2. Windows XP Mode
Windows XP Mode is a
virtualization technology that addresses a specific problem that
prevented many people from moving from Windows XP to Windows Vista. Many
applications worked well in Windows XP but would not work in Windows
Vista.
Interestingly, this problem
prevented people from moving to Windows XP from Windows 2000 in the
early XP days. It seems to be a common problem, but Windows XP Mode may
be a definitive solution for those considering Windows 7.
|
Microsoft spent a lot of
time and effort on Windows XP Mode, and from everything I've seen it
looks like it'll be a success. It's not uncommon for Microsoft to use
test topics to amplify the importance of features they've added. If
you're preparing for the 70-685 and 70-686 Windows 7 exams, make sure
you understand the benefits and requirements for Windows XP Mode.
|
|
Windows XP Mode is a virtual
instance of Windows XP running within Windows 7. Applications that won't
run in Windows 7 can be installed in this instance of Windows XP.
However, Microsoft has engineered a great solution that doesn't require
the user to launch Windows XP. When Windows XP Mode is configured, the
user simply launches the legacy application from their Start menu, and
it appears as though it's running just as any other application would
run.
Although Windows XP Mode is
free with Windows 7, there are some requirements you need to worry
about. These include the following:
The processor must be capable of hardware virtualization.
Virtualization must be enabled in the BIOS.
At least 1.6GB free hard drive space must be available.
If your system will support it,
you can download and install Virtual PC for Windows 7 and then download
and install Windows XP Mode for Windows 7.
2.1. Analyzing Your Existing Hardware Environment
Windows XP Mode
originally required a processor that supports virtualization that needed
to be enabled in the BIOS. However, Microsoft later released an update
with KB 977206 that allows Windows XP Mode to work without hardware
assisted virtualization (HAV). Intel refers to HAV as Intel VT, and AMD
calls it AMD-V. Both companies include utilities you can download and
run to determine if your processor has this capability.
NOTE
Windows XP Mode works
best if your processor supports virtualization. However, if the
processor doesn't support virtualization or it isn't enabled in the
BIOS, you can still use Windows XP Mode. Check out KB article 977206 at http://support.microsoft.com/kb/977206.
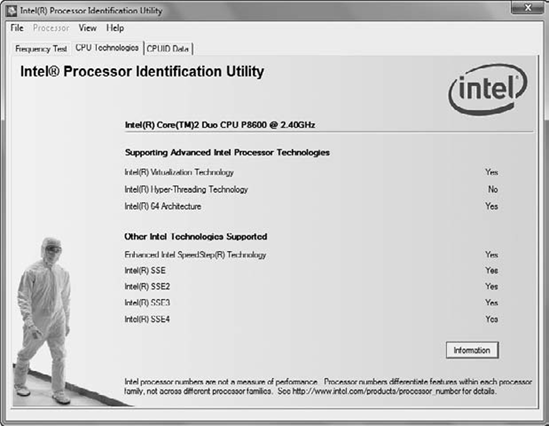
Figure 1
shows the Intel® Processor Identification Utility with the middle tab
selected. Notice that the Intel(R) Virtualization Technology is listed
as Yes, verifying that Windows XP Mode can be used on this system. This
utility can be downloaded from Intel's website here:
http://www.intel.com/support/processors/tools/piu/
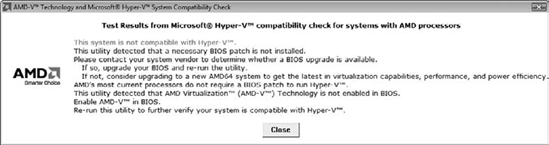
I have an older AMD system
that doesn't support virtualization. After running the AMD
Virtualization Compatibility Check Utility, the screen shown in Figure 1.5 appeared. This utility can be downloaded from AMD's support site at this address:
http://support.amd.com/us/Processor_TechDownloads/AMD-V_Hyper-V_Compatibility_Check_Utility_V2.zip
Next you'll need to enable
the virtualization option in the BIOS. My experience is that this is not
enabled by default, so you'll need to reboot your system, read the
screen to see what key to use to enter BIOS, and then search for the
virtualization option.
Many versions of BIOS are
available, and there's no standard of how to access BIOS. Sometimes
you're prompted to press F10, sometimes the Delete key, and at other
times you're prompted just to press any key at the appropriate time. The
only thing that is consistent is that a message will appear telling you
what key to press to enter the setup mode that allows access to the
system BIOS.
The virtualization setting can be called AMD-V or Intel VT or simply Virtualization Technology. Find the setting and enable it.
If the processor is capable,
but the BIOS doesn't have the Virtualization Technology setting, it's
possible you'll need to upgrade or flash the BIOS. Access the command
prompt and enter SystemInfo.
This takes a minute to complete, but it will list a significant amount
of information about your system including the BIOS version. You can
search the Internet using this information for a possible upgrade.
Follow the manufacturer's instructions to complete this process.
2.2. Downloading the Software
Once you've verified your
processor is capable and you've configured the BIOS, you can begin
downloading the software needed for Windows XP Mode. You'll need at
least 1.6 GB of free space. The space can be on any available partition.
The two files you'll need to download and install are as follows:
Windows Virtual PC
This is actually a
Windows Update labeled as KB 958559. Both an x86 version (for 32-bit
systems) and an x64 version (for 64-bit systems) exist. Make sure you
install the one that's right for your system. This will require
rebooting your system.
Windows XP Mode
This file is about 480 MB.
It's a self-extracting executable that will add Windows XP Mode to your
system and install the instance of Windows XP that can be used to run
legacy applications. There is only one version of this file, and it will
work for both 32-bit and 64-bit systems.
You can find both Windows Virtual PC and Windows XP Mode at Microsoft's download site at www.download.Microsoft.com. Search for "Windows Virtual PC" and "Windows XP Mode."
|
You'll need the version of
Virtual PC designed to work with Windows 7 and Windows XP Mode. If you
have an older version of Virtual PC, you'll need to uninstall it first.
An easy way to see if you have a compatible version is by the name; if
you're running a version called Windows Virtual PC, it'll work because
Windows Virtual PC was released with Windows 7. If you're running a
version named Microsoft Virtual PC, you'll need to uninstall it first.
|
|
Install Windows Virtual PC with the following steps: Launch
Windows Explorer. Browse to where you downloaded Windows Virtual PC and
double-click the executable. This actually installs update KB958559. If
it is already installed, it will inform you that it is installed and
you can continue with step 2. At the prompt to install the Windows software update, click Yes. Review the license terms and click I Accept. The installation will start and take a few minutes to complete. When the installation is complete, you'll be prompted to restart the computer. Click Restart Now.
Install Windows XP Mode with the following steps: Launch Windows Explorer. Browse to where you downloaded the Windows XP Mode file and double-click it. When prompted by the Security Warning to run the file, click Run. On the Welcome screen, click Next. If your C: drive has at 1.6 GB of free space, you can accept the default location of C:\Program Files\Windows XP Mode\ and click Next. Otherwise, choose another location. When prompted by User Account Control to continue, click Yes. The
installation will complete, and the Setup Completed screen will appear.
Leave Launch Windows XP Mode checked, and click Finish. Review the Windows XP Mode License Agreement. Click the check box I Accept The License Terms and click Next. You
will be prompted to identify the installation folder and enter
credentials for an XP Mode user account, as shown in the following
graphic. Accept the default installation folder, and enter a password in
the Password and Confirm Password text boxes. Make sure that the
Remember Credentials (Recommended) check box is checked. Click Next.
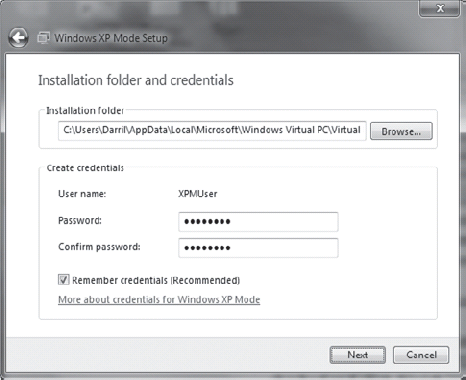
With Remember Credentials checked, users won't be prompted to enter credentials when using Windows XP Mode. Enable
automatic updates by selecting Help Protect My Computer By Turning On
Automatic Updates Now, and click Start Setup. It will take several
minutes for the setup to complete. Once it completes, a window will open
with the Windows XP Mode desktop.
|
Windows XP Mode is now
installed on your system. However, it won't be of much use until you
install some applications and configure them to run within your Windows 7
system. The next section leads you through this process.
2.3. Running Applications from Windows XP Mode
Although the previous
exercise showed you how to install Windows XP Mode, the real value comes
in using this to run applications in a virtual environment.
As an example, imagine that a
user has a program she uses quite a bit, works well in Windows XP, but
does not work at all in Windows 7. You can add Windows XP Mode to her
Windows 7 desktop and then install the legacy application in the Windows
XP Mode virtual environment.
NOTE
This feature is most
valuable for applications that work in Windows XP but not in Windows 7.
However, you can install any application in Windows XP Mode that will
work in Windows XP. The point of the exercise is not what you install
but instead how it's accessed after it is installed.
Exercise 1.6
will lead you through the steps to make an application available to end
users. As preparation for this exercise, I downloaded IrfanView (a
freeware image viewer) created by Irfan Skiljan. However, you can use
any program and, if you want to install another program, substitute your
program where I refer to IrfanView in the exercise.
From the Windows 7 host machine, click Start => All Programs => Windows Virtual PC => Windows Virtual PC. This will launch the Windows Virtual PC console. Right-click the Windows XP Mode.vmcx file and select Settings. Select
Auto Publish, and verify that Auto Publish is set to Automatically
Publish Virtual Applications, as shown in the following graphic.
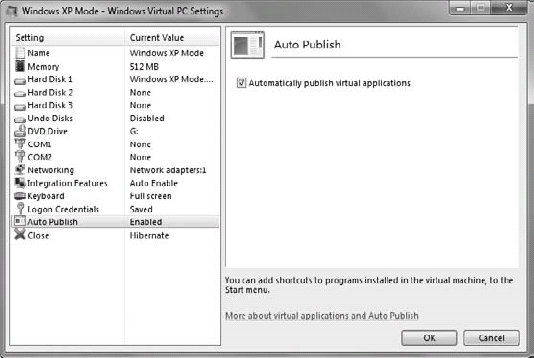
Click OK to close the Settings page, and then double-click the Windows XP Mode.vmcx file to start the Windows XP Mode VPC. After
Windows XP Mode starts, install the application you downloaded. Copy a
shortcut for this program (many applications including IrfanView place a
shortcut on the desktop that you can copy). Right-click the Start menu within Windows XP, and select Explore All Users. This will open Windows Explorer in this folder: C:\Documents and Settings\All Users\Start Menu
Double-click
Programs, and then paste the shortcut for the program that you
installed into this folder. After a moment, this application will be
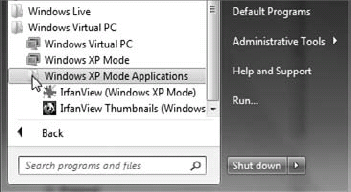
available on your host system. Click Windows 7 and select Start => All Programs => Windows Virtual PC =>
Windows XP Mode Applications. You'll see that the program that you
installed in Windows XP Mode is now available on the Windows 7 menu, as
shown in the following graphic.
While this
shows how applications published from Windows XP Mode will appear, you
can also publish applications from other Windows VPC programs. For
example, if you install a virtual instance of Windows 7 and published an
application from there, the published application will appear in a
folder named Windows 7 Applications. Try to launch the application by selecting Start => All Programs => Windows Virtual PC => Windows XP Mode Applications => IrfanView (Windows XP Mode). It will fail and inform you that you must close Windows XP Mode first. Return to Windows XP Mode, and select Start => Log Off. After you are logged off, select Action => Close. This will cause Windows XP Mode to go into Hibernate mode. Once the system finishes hibernating, try to start the program from the Windows 7 Start menu by selecting Start => All Programs => Windows Virtual PC => Windows XP Mode Applications => IrfanView (Windows XP Mode). Windows
XP Mode will awaken from Hibernate mode, and the application will
launch in its own window. Note that the full Windows XP desktop does not
launch but only the application. Browse to the Virtual PC console by clicking Start => All Programs => Windows Virtual PC => Windows Virtual PC. You'll see that the Windows XP Mode VPC has a status of Running. Close the IrfanView application. Click Start => All Programs => Windows Virtual PC => Windows XP Mode Applications. Right-click IrfanView PC, and select Copy to copy the shortcut to this program. Access the Windows 7 desktop. Right-click and select Paste Shortcut to paste the program shortcut. Double-click
the shortcut on the desktop to launch it. You'll see that it launches
the application just the same as it did from the Start menu.
|
This exercise shows
you how easily you can integrate virtual applications into a user's
desktop. Users don't have to know all the details of how the virtual
applications are installed or how they work, and many end users don't
want to know. They just want to be able to access an application when
it's needed.
If an administrator
configured the virtual application to run from a shortcut like this, the
user will have very little indication that anything is different. They
can still run their legacy application, and you are still able to
migrate your older systems to Windows 7.
Using Windows XP Mode
allows you to run legacy applications on a Windows 7 system easily.
However, you can also use VPC to run other desktops that you create.
2.4. Running Applications from Other VPCs
The previous example showed you
how to install applications in Windows XP Mode and make them available
from the Windows 7 Start menu, but you aren't restricted to doing this
with only Windows XP Mode.
Developers are
notorious for crashing their systems. They develop applications and,
during the test-and-debugging process, things sometimes go wrong. For
example, an operating system that once worked now no longer works. Not
only is the developer unable to continue the development of the
application, but they can't even access email or do other day-to-day
work. While you can't prevent a developer from crashing a development
environment, you can isolate the problem by creating a virtual
environment for development work.
You start with a regular
Windows 7 desktop. You can then install another instance of Windows 7 in
a virtual machine and install applications within the virtual machine.
As long as the Auto Publish settings are set to Enabled, the
applications will automatically appear on the host machine's Start menu
for that PC once the shortcuts are copied to the Start menu on the
virtual machine. Hibernate the VPC, and you can then launch the programs
in the same manner as you did with Windows XP Mode.
The only pieces that are missing from this puzzle are the steps you need to take to create a Virtual PC image.
Launch the Virtual PC console by clicking Start => All Programs => Windows Virtual PC => Windows Virtual PC.
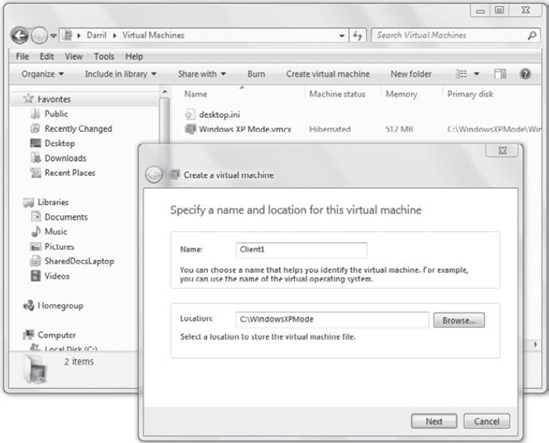
Click Create Virtual Machine in the title bar.
Enter
a name for your VPC in the Name text box. You can either accept the
default location for the VPC or select another location. Your display
will look similar to the following graphic. Click Next.
Adjust
the size of memory for the PC. For Windows XP, you can get away with
512 MB, but if you're running more applications, add more RAM.
Similarly, you can start with 1 GB of RAM for Windows 7 and add more
depending on the applications you're running. You can always adjust the
RAM later when the virtual machine is turned off. Leave the networking
check box enabled to Use Computer Network Connections unless you
specifically don't want the VPC to have access to the network. Click
Next.
The
Add A Virtual Hard Disk page appears. Since this is a new VPC, accept
the default of Create A Dynamically Expanding Virtual Hard Disk. Leave
Enable Undo Disks unchecked and click Create.
You'll
be returned to the Virtual PC console. At this point, you have a
Virtual PC image, although it's empty. The next step is to load an
operating system into it.
Load the Windows installation DVD into the host system DVD drive.
Double-click
the VPC image you just created to start it. It will boot from the DVD.
