3. Installing Integration Components
After installing an
operating system using Virtual PC, you may notice that things aren't
running as smoothly as you'd like them to be. For one thing, every time
you click within a Virtual PC environment, your mouse gets trapped
there. You can press Ctrl+Alt+left arrow to get it out, but it'd be a
lot easier if your mouse moved in and out of this window just as it can
do with other windows.
You can install the
Integration Components after the operating system has been installed on
the VPC. In addition to helping your mouse work a little better, they'll
also give access to the following resources:
Clipboard
You will be able to copy
and paste data back and forth from the host operating system to the
virtual machine. Data copied in one environment is available on the
clipboard in the other environment.
Hard drives
You'll have access to all of
the hard drives on the host system from within the virtual machine. The
drives appear as shares within Windows Explorer in the format of X on ComputerName where X is the actual drive letter and ComputerName
is the name of the host computer. For example, if the host computer is
named Client1, the C: drive would appear in Windows Explorer on the
virtual machine as C on Client1.
Printers
Printers available to
the host system are available to the virtual machine. This allows you
to print to a printer from the virtual machine.
USB devices
USB devices plugged into the host system can be accessed from the virtual machine.
With
a Windows Virtual PC console open, click the Tools drop-down menu and
select Install Integration Components. An AutoPlay box will pop up. Click Run Setup.exe within the AutoPlay dialog box. A
Welcome page will appear. Click Next on the Welcome page, and click Yes
when prompted by User Account Control. After a moment, the installation
will complete. Click Finish, and then click Yes to restart your computer. After
you reboot and log onto the system, you'll find that your mouse now
treats the VPC environment just like any other window, but you're not
finished yet. Select
the Tools drop-down menu, and select Enable Integration Features.
You'll be prompted to provide credentials that will be used on your
system. Enter the user name and password you used when creating the VPC
image, and click OK.
|
3.1. Windows Virtual PC Menu
The Windows Virtual PC
interface is different from the Microsoft Virtual PC interface. As a
matter of fact, it doesn't look like an interface at all. Instead, it
looks like Windows Explorer with a couple extra menu items.
Figure 3
shows the Windows Virtual Machines console. It shows the virtual
machines I have added to my system: one for Windows XP Mode, one Windows
7 client named Client1, and one Server 2008 system I'm using as a
domain controller in the virtual environment.
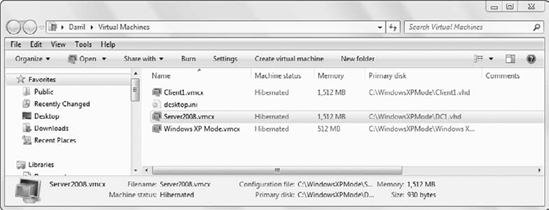
You can launch any
virtual machine console from here by double-clicking it. You can also
access the settings for any of the virtual machines by selecting the
virtual machine and clicking Settings. Some settings can be manipulated
while the system is running or hibernated. Other settings require you to
shut down the virtual machine before you can modify them.
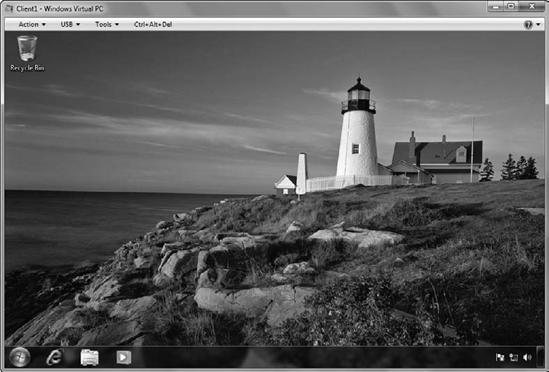
Once the virtual machine is launched, you'll see that it has a menu across the top, as shown in Figure 4. Figure 4
is a virtual instance of Windows 7 running within Windows Virtual PC.
As you can see, there are four menu choices. Each one is explained in
the following section.
3.2. Action
The Action menu includes four choices:
View Full Screen
No surprise here.
Selecting this option maximizes the VPC window to full screen. When set
to full screen, a Title tab is pinned to the top of the window. This tab
includes many of the same choices as the full menu. To the far right
are icons reminiscent of minimize, maximize, and close icons but labeled
as Switch To Your Computer Desktop, Exit Full Screen, and Close.
Sleep
Selecting Sleep puts the
VPC into a power-saving sleep mode. Once Sleep is selected, the menu
item changes to Wake Up. If you select Wake Up, the VPC will exit the
sleep mode.
Restart
Selecting Restart
forces a system restart. If you have programs running, you will be
prompted that they are open, and you may lose work if you continue. You
can click Force Restart or click Cancel to return to the desktop.
Close
The Close menu gives the
choices Hibernate, Shut Down, or Turn Off. Hibernate will cause the
current state to be saved—open windows and files remain open and, when
you launch this VPC image again, everything is returned to the exact
same state. Shut Down performs a logical shut down, and Turn Off
simulates pressing the power button on the PC.
3.3. USB
The USB drop-down menu shows
all the USB devices attached to your host system. As devices are added
or removed from the host system, they will be added or removed from this
menu.
Devices aren't automatically
available in the VPC, though. If you want the device to be available,
you need to select it from the menu, as shown in Figure 5. Devices that are attached to the VPC are removed from the host system.
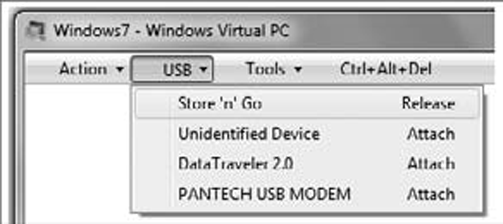
Once a device is attached to the VPC, you can release it by selecting it from the menu and choosing Release.
3.4. Tools
The Tools drop-down menu includes two choices: Integration Components and Settings.
Once you add and enable the
Integration Components, you'll be able to work with VPC images in a more
seamless manner. The mouse will easily move in and out of the VPC
window, and you can easily cut and paste data from your host system into
the VPC window.
If you select Settings, the VPC will launch a window similar to the one shown in Figure 6
that you can use to modify many of the environment settings for the
VPC. Some settings (such as the Networking setting) can be configured
while the VPC is running. Other settings (such as Memory) can be
configured only when the VPC is turned off.
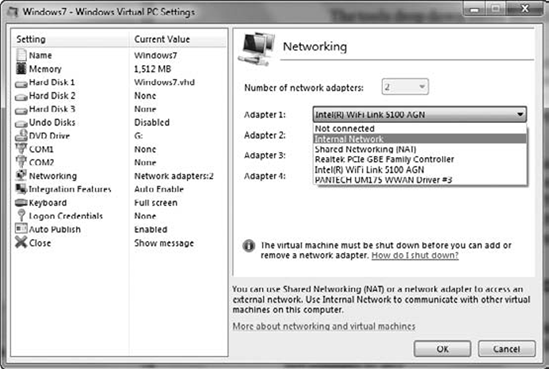
As an example, the network
adapters will start as being configured to use the network adapters on
your system. In the figure, the VPC network adapter is currently
configured to share the WiFi network adapter connected to my system. It
will have access to my system on a simulated network and can access the
Internet.
However, if I select Not
Connected, it will be completely isolated. If the VPC isn't fully
protected with anti-malware software, this is one way to isolate it. In
addition, I could select Internal Network. The VPC would be able to
communicate with other VPCs that are active on my system but not the
host machine or any systems external to the host machine.
3.5. Ctrl+Alt+Del
You can't press the Ctrl+Alt+Del
keys on a virtual system because this key combination is always trapped
by the host system. Windows Virtual PC provides the Ctrl+Alt+Del menu
item that can be used to simulate pressing the Ctrl+Alt+Del keys on the
virtual machine.
Figure 4 and Figure 5
shown earlier both show the Ctrl+Alt+Del menu item to the right of the
Tools menu. Clicking this item on a virtual system is the same as
pressing the keys on a nonvirtual system.
NOTE
Windows Virtual PC
does not support 64-bit operating systems. Since Windows Server 2008 R2
only comes in 64-bit versions, it won't run in VPC.
