3. Preinstallation Environment
The Windows Preinstallation Environment (WinPE)
is used to begin the installation for Windows 7. This minimal operating
system provides access to the tools needed to prepare a system and
begin a full installation of Windows 7.
WinPE includes disk
drive tools that can be used to partition and format them. A GUI allows
you to partition hard drives as part of the process, and you can also
press the Shift+F10 keys to launch the command prompt and use DiskPart,
the command-line disk-partitioning tool.
You can access WinPE from multiple boot methods:
Booting to the installation DVD
Performing a PXE boot and accessing a boot image from WDS
Booting to media you've created, such as a bootable USB or bootable CD
Once the system has
been booted to WinPE, the full installation can complete. If you've ever
performed an installation of Windows 7, you've accessed the WinPE
during that process.
3.1. Creating a Bootable Media
You can create bootable
media to load the WinPE environment on a USB flash drive or CD. Once
you've booted into Windows PE, you could use ImageX to capture or deploy
an image.
Bootable drives can be
created for either 32-bit systems or 64-bit systems. A 32-bit bootable
drive will be used when you are installing a 32-bit operating system,
and a 64-bit system will be used when you are installing a 64-bit
operating system.
In addition, it's possible
to create a bootable drive to connect automatically to a Windows
Deployment Services server. Normally, Preboot Execution
Environment–compliant computers are used to connect to a WDS server, but
for non-PXE computers, you can add a discover image to the bootable
drive.
Two commands are used in this process that haven't been discussed previously:
CopyPE.cmd
CopyPE.cmd is a
script file that creates three preinstallation folders in the specified
folder that can be used to create your bootable media. You need to
identify the hardware architecture (x86 or amd64) and the destination
where you want the folders created. For example, to create the folders
for a 32-bit system in the C:\MyPE folder, you'd use this command: CopyPE x86 c:\MyPE.
It will create the following three folders:
\winpe_x86
\winpe_x86\ISO
\winpe_x86\mount
OSCDImg
This command will create an .iso image using the contents of a folder. An .iso image can easily be burned to a CD. When used with the CopyPE script file, the CopyPE script file creates the \ISO folder. You can add additional files to this folder if desired and then use the OSCDImg command to create the .iso image. Once you have an .iso image, you can right-click it in Windows Explorer and select Burn To Disc.
Launch the Deployment Tools Command Prompt with administrative permissions. Select Start => All Programs => Microsoft Windows AIK, right-click the Deployment Tools Command Prompt, and select Run As Administrator. If prompted by User Account Control, click Yes to proceed. Run the following command. CopyPE.cmd x86 c:\MyPE
CopyPE.cmd is a script file that creates three folders in the specified folder (C:\MyPE). \Winpe_x86
\Winpe_x86\ISO
\Winpe_x86\Mount
To create this for a 64-bit system, use the following command instead: CopyPE.cmd AMD64 c:\MyPE
It will create these three folders instead: \Winpe_amd64
\Winpe_amd64\ISO
\Winpe_amd64\Mount
Copy the preinstallation image (Winpe.wim) file into the \ISO\sources folder, and rename it as boot.wim with the following command: Copy c:\MyPE\Winpe.wim c:\MyPE\ISO\Sources\boot.wim
Add the ImageX application to the \iso folder with the following command: copy "c:\program files\Windows AIK\Tools\x86\ImageX.exe" c:\MyPE\iso\
Although this step is
optional, the ImageX application is valuable enough that you'll want it
available for most deployments. To copy the ImageX application for a
64-bit environment, use the following command: copy "c:\program files\Windows AIK\Tools\amd64\ImageX.exe" c:\MyPE\iso\
At this point, you have created
the Windows Preinstallation Environment folder. You can create a
bootable USB from this folder by following steps 6 and 7 and/or create a
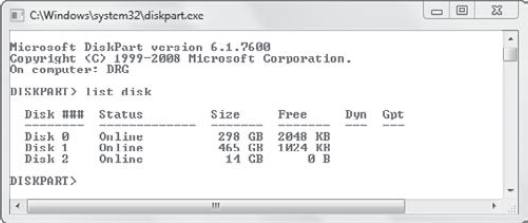
bootable CD-ROM from this folder by following steps 8, 9, and 10. Format your USB drive with DiskPart using the following commands: Launch the command prompt with administrative permissions. If prompted by User Account Control, click Yes. Type DiskPart and press Enter to access the Disk Partition tool. Type List Disk
to list all the disks on your system. You'll see a display similar to
the following graphic. Identify the correct disk number for your flash
drive. In the graphic, I have inserted a 16GB USB flash drive that is
identified as Disk 2 with a size of 14 GB.
It's very important that you identify the correct drive. Otherwise, you may delete valuable data on another disk. Enter the following commands to remove all of the data on the disk and prepare it. Substitute disk 2 with the actual disk number of your USB drive identified in the previous step. Select disk 2
Clean
Create partition primary
Select partition 1
Active
Format quick fs=fat32
Assign
Exit
At this point, the drive will
be formatted as a FAT32 disk and all data on the USB disk will be
removed. When you press Enter after typing in Assign, Autoplay (if
enabled on your system) will recognize the disk and prompt you to do
something with the disk such as Open Folder To View Files.
Copy the entire c:\MyPE\ISO folder to the USB drive. You can use Windows Explorer or use the following command. Substitute the letter x in the command with the letter assigned to your USB drive. Xcopy c:\MyPE\iso\*.* /e x:\
That's it. You now have a bootable USB drive. To create a bootable CD-ROM, you'll need first to create an .iso
image from the PE folders you've created. If it isn't still open,
launch the Deployment Tools Command Prompt with administrative
permissions. Enter the following command to create the PE .iso image. oscdimg -n -bc:\MyPE\etfsboot.com c:\MyPE\ISO c:\MyPE\MyPE.iso
The oscdimg command creates an .iso file that can be burned to DVD. The -n switch specifies that long filenames are allowed. The -b switch specifies that a bootable CD is to be created (using etfsboot.com). Note that there is no space between -b and c:\MyPE\etfsboot.com. The c:\MyPE\ISO clause identifies the source folder to use when creating the image. Last, the c:\MyPE\MyPE.iso clause identifies the target file, or the name and location of the image that will ultimately be burned to CD. Place a writeable CD into a CD burner. Launch Windows Explorer and browse to the C:\MyPE folder. Right-click the MyPE.iso file, and select Burn Disc Image. Click Burn on the Windows Disc Image Burner window. When it's done, you'll have a bootable CD.
|
Once you have a bootable USB
or CD, you can boot any computer to it. You may need to adjust the BIOS
to ensure that booting from the USB and/or CD is possible, but the
media you've created in the previous exercise will work once the system
is configured.
When you boot, the system
will copy the contents of the media to a RAM disk and label it with the
letter X. It will then load the Windows PE and open a command prompt as X:\Windows\System32.
Once you have booted to WinPE,
you can apply an image to the computer. As an example, I added a
Windows 7 image file to my USB drive. After booting, I can use the
ImageX application to apply the image on the USB drive to the computer.
My USB drive was assigned the drive letter F:, so I can use the following steps:
First, I need to change the context to the F: drive by typing F: and pressing Enter.
Next, I'll use the ImageX command with the /Apply switch to apply the image:
ImageX /apply Win7.wim 1 c:
The name of the image file is Win7.wim,
and it has only a single image, so I used the number 1. I want the
image applied to the C: drive, so I ended the command with the letter C.
While it may not be apparent, the images contained within the Win7.wim
file can be custom images. In other words, I could have used a
reference computer to install Windows 7, added applications to it,
modified the security and other settings, and then prepared the image
with Sysprep. I could then capture this image using the ImageX command
with the /capture switch and copy the image to my USB drive.
4. System Image Manager
The Windows System Image Manager (SIM) is another tool available in the Windows AIK. It can be used to create unattended answer files.
Unattended answer files can be
used to automate a Windows 7 installation. In short, a file is created
and specified for the installation. Whenever the user is prompted to
answer a question or make a choice, the installation process instead
looks for the answer in the answer file. If the answer is in the file,
the installation program uses this answer and continues without any user
interaction.
Launch the Windows SIM by clicking Start => All Programs => Microsoft Windows AIK => Windows System Image Manager. Select File => New Answer File. When prompted to open an image, click Yes. Browse to the install.wim file located in the \sources folder of the installation DVD. Click
the + symbol to open the Components section. Browse to the
x86_Microsoft-Windows-Setup... section, and select the
\DiskConfiguration\Disk\CreatePartitions\CreatePartition selection.
Right-click CreatePartition, and select Add Setting To Pass 1 WindowsPE,
as shown in the following graphic.
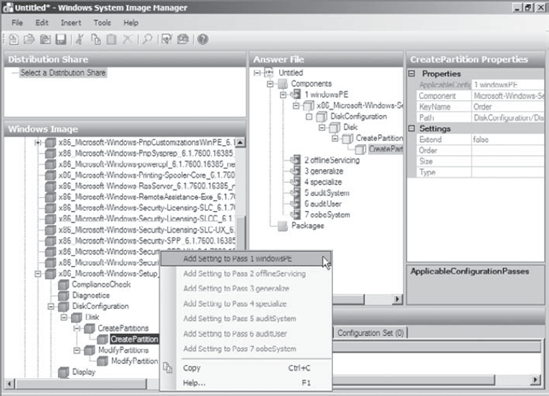
Note that your
components may start with x64 instead of x86 if you're accessing a
64-bit image. The graphic also shows what the Answer File section in the
middle pane will look like after the component has been added, not
before. Use the same procedure to add other Windows PE components to the answer file: Microsoft-Windows-Setup...
\Disk Configuration\Disk\ModifyPartitions\ModifyPartition right-click,
and select Add Setting To Pass 1 WindowsPE. Microsoft-Windows-Setup... \ImageInstall\OSImage\InstallTo right-click, and select Add Setting To Pass 1 WindowsPE.
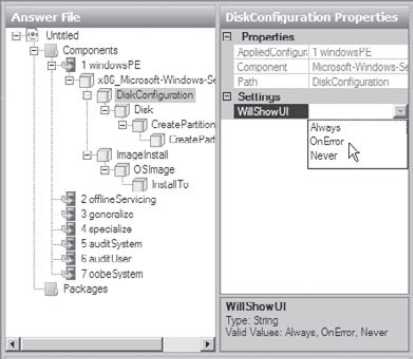
Use
the following steps to configure the answer file to wipe the disk clean
automatically, create a new 40GB partition, format it with NTFS, assign
it the letter C with the name Win7OS, and install the operating system
on the first partition of the first drive. Select
DiskConfiguration in the Answer File section and view the
DiskConfiguration Properties section. Select the drop-down box next to
WillShowUI and select OnError. Your display will look similar to the
following graphic.
Use the same procedure to modify the following settings in the Answer File section: Microsoft-Windows-Setup... \DiskConfiguration\Disk: Set the DiskID to 0. Set WillWipeDisk to True. Microsoft-Windows-Setup... \DiskConfiguration\Disk\CreatePartitions\Create Partition: Set Extend to False. Set Order to 1. Set Size to 40000. If you want a different size, change the number 40000 (for 40,000 MB or 40 GB) to a number of your choice. Set Type to Primary. Microsoft-Windows-Setup... \Disk Configuration\Disk\ModifyPartitions\ModifyPartition Set Active to True. Set Extend to False. Set Format to NTFS. Set Label to Win7OS. Set Letter to C. Set Order to 1. Set PartitionID to 1. Microsoft-Windows-Setup... \ImageInstall\OSImage Set WillShowUI to OnError. Microsoft-Windows-Setup... \ImageInstall\OSImage\InstallTo Set DiskID to 0. Set PartitionID to 1.
Select File => Save Answer File As. Browse to a location on your system, name the file Unattended, and click Save to save the file. Notice that it is saved as an XML file. Use Windows Explorer to browse to the location where you saved the file. Double-click the Unattended.xml file. This will open the unattended answer file in Internet Explorer so you can view it.
|
Although the Windows AIK
includes many valuable tools that can help with deployments, if you're
going to create and deploy images on a regular or recurring basis, you
should consider WDS.
