3. Adding and Configuring WDS
While none of the
individual steps required to add a WDS server are difficult, there are
nevertheless several steps. As a reminder, WDS is a free role that can
be added to a Windows Server 2008 or Windows Server 2008 R2 server. If
you have the server and your network includes a domain, DNS, and DHCP,
you can add it.
These are the overall steps required to add a WDS server:
NOTE
If you're unsure how to create a test bed, check out MCITP: Windows Server 2008 Server Administrator Study Guide:
(Exam 70-646) ISBN-10: 0470293152. It includes exercises to install
Windows Server 2008, promote the server to a domain controller, and
configure DNS and DHCP on the server. It also includes exercises to add
and configure WDS on the same server.
3.1. Adding the WDS Role
While it's not a requirement,
things work a little easier if you add your WDS server to the same
server that is hosting the DHCP role. The wizard will automate the
process of configuring the extra option needed by DHCP to inform PXE
clients that the WDS server has been added.
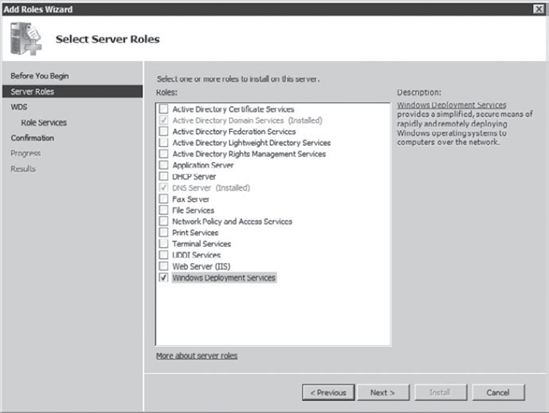
Log on to your Windows Server 2008 server with an administrative account. Launch Server Manager by clicking Start => Administrative Tools => Server Manager. In Server Manager, select Roles => Add Roles. On the Before You Begin page, review the requirements and click Next. On
the Select Server Roles page, select the check box next to Windows
Deployment Services. Your display will look similar to the following
graphic. Click Next.
Review the information on the Overview Of Windows Deployment Services page, and click Next. Verify
that both the Deployment Server and the Transport Server services are
selected on the Select Role Services page, and click Next. Click
Install on the Confirm Installation Selections page. The installation
will complete after a few minutes. When it is complete, click Close.
|
At this point, you'll have the WDS role added, but it won't do anything until it is configured and images are added.
3.2. Configuring the WDS Role
Once WDS role has been
installed, you need to configure it. A built-in wizard will lead you
through the process, and you have only a couple of decision points.
The most important decision is
related to DHCP. It's common for the DHCP server to be hosted on the
same server as the WDS server. When DHCP is hosted on the same server (a
recommended configuration), the WDS wizard will prompt you to configure
two settings. Both of these settings are necessary so that booting PXE
clients can find the DHCP server on the network and then find the WDS
server.
Do Not Listen On Port 67
The DHCP server listens
for DHCP Discover packets on UDP port 67 from DHCP clients. This setting
ensures that the WDS server doesn't listen for these packets and
interfere with the normal DHCP process.
Configure The DHCP With Option 60
DHCP option 60 is used
to notify a booting PXE client that there is a listening PXE server on
the network. Selecting the Do Not Listen On Port 67 option tells WDS not
to listen on port 67 because the DHCP server is listening on this port.
If the WDS server was not also a DHCP server, it would listen for WDS
packets on port 67.
You will not see these prompts if DHCP is not on the same server.
You'll also need to decide if
you want the WDS server to respond to clients right away or not. You'll
be prompted to choose one of three choices:
Do Not Respond To Any Client Computer
You can leave it
configured with this setting until you have completed the configuration
of WDS. This will prevent the Windows Deployment Services from
responding to any requests and ensure that images will not be deployed
by WDS. This WDS setting doesn't affect the DHCP service if it's hosted
on the same computer. The DHCP server will still respond to requests
from clients for TCP/IP leases.
Respond Only To Known Client Computers
Clients must be prestaged, or added to Active Directory, before the image is deployed.
Respond To All (Known And Unknown) Client Computers
WDS will deploy images to clients that are prestaged and to clients that aren't prestaged.
Launch WDS by clicking Start => Administrative Tools => Windows Deployment Services. In
Windows Deployment Services, select Servers. Select your server in
Windows Deployment Services. At this point, your server has a yellow
icon with an exclamation mark indicating that it hasn't been configured
yet. Right-click your server, and select Configure Server. Review the information on the wizard's Welcome page and click Next. Accept the default of C:\RemoteInstall
on the Remote Installation Folder Location page. Ideally, you would
select a partition that is not the same as the operating system.
However, for a test environment, it's okay to use the same partition.
Click Next. Note:
If you choose the same partition as the operating system, you will
receive a System Volume Warning. Read the warning, and click Yes to
continue. If
DHCP is installed on this server, the wizard will guide you through the
configuration of WDS and the DHCP server. If DHCP is not installed on
the server, this DHCP option page will not appear. On
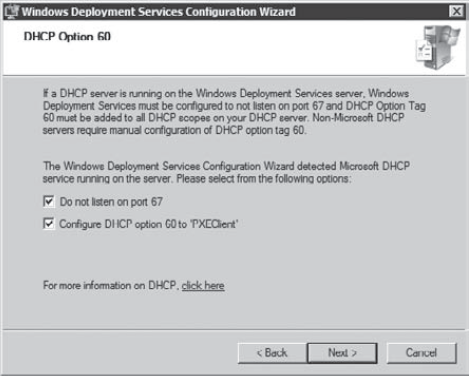
the DHCP Option 60 page, review the information. Because your server is
holding the role of a DHCP server, select both check boxes, as shown in
the following graphic.
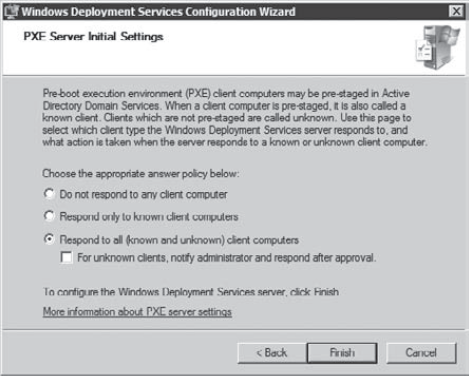
On
the PXE Server Initial Settings page, select Respond To All (Known And
Unknown) Client Computers, as shown in the following graphic.
In a production
environment, you may choose not to respond to any computers until
everything is configured. You can also choose the second option (Respond
To Only Known Client Computers), used if you prestage client computers.
Prestaging a client computer is done by creating a computer account in
Active Directory with the computer's GUID. Click
Next and then click Finish. After a moment, the configuration will
complete. Uncheck the box Add Images To The Windows Deployment Server,
and click Finish.
|
At this point, you have added
and configured the WDS server. However, it doesn't include any images.
The next section shows you how to add images to WDS.
3.3. Adding Images to WDS
You'll need to add both boot and install images to the WDS server. As a reminder, the boot image (contained in the boot.wim
file) includes the Windows PE, which provides enough of an operating
system so that the user can log on and pick an image to download. The
install images (contained in the install.wim file) include images of full operating system versions.
The boot image can be used for three purposes:
Creating a boot image
The boot image is
the primary Windows PE image downloaded to PXE clients. Once the image
is downloaded, the user at the PXE client is able to log in and select
an available image.
Creating a capture image
A capture image is created
from a boot image that has been added to a WDS server. It is used to
capture the image from a reference computer after Sysprep has been run.
Creating a discover image
A discover image is created from a boot image that has been added to a WDS server. The discover image is renamed as boot.wim and copied to the \sources
folder of bootable media. It can then be used to boot non-PXE clients. A
discover image is created for a specific WDS server and automates the
process of connecting to that WDS server; if the client can't reach the
WDS server, the process will fail.
While it's not common to
modify the boot image, you will often modify the install image. It's
very common to create a reference computer, add applications, and modify
the configuration of the computer for a custom install image. Once
you've tested this image and you're satisfied with the configuration of
the computer, you would run Sysprep and then capture the image.
Insert the Windows 7 installation DVD into your system's DVD drive. You will use the boot.wim and install.wim files located in the \sources folder of the DVD. If it's not already started, launch WDS by clicking Start => Administrative Tools => Windows Deployment Services. Use the following steps to add a boot image used to boot PXE clients. In WDS, right-click the Boot Images folder and select Add Boot Image, as shown in the following graphic.
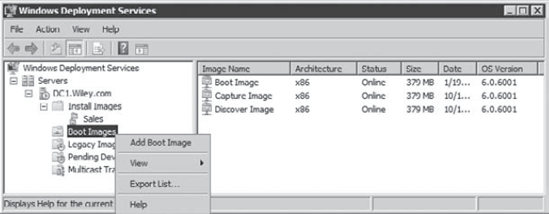
The graphic shows the results after the boot, capture, and discover images have been added. Browse to the \sources folder on the installation DVD, and select the boot.wim file. Click Open and then click Next. Change the Image Name to Boot Image and change the Image Description to Use To Boot PXE Clients. Click Next. Review the information on the Summary page and click Next. When the image is added, click Finish.
Use
the following steps to create a capture image. This image can be used
to capture images and store them on WDS so that they can be deployed to
other clients. Right-click the Boot Image created in the previous step and select Create Capture Boot Image. Enter the following text: Click Browse. Browse to the root of C: and click New Folder. Name the folder Images and click Open. Enter Capture as the filename and click Open. Click Next on the Capture Image Metadata page. When
the image is created, click Finish. While this creates the capture
image, you'll notice that it hasn't been added to the WDS server. Right-click the Boot Image folder, and select Add Boot Image. Browse to the Images folder and select the image named Capture. Click Next. Review the Image Name and Description, and click Next. Review the information on the Summary page, and click Next. When the image is added, click Finish.
Use
the following steps to create a discover image. This image can be used
for non-PXE clients. Once created, it needs to be added to bootable PE
media. Right-click the boot image created in the previous step and select Create Discover Boot Image. Enter the following text: Click Browse. Browse to the C:\Images folder. Enter Discover as the filename and click Open. Click Browse For The Windows Deployment Server To Respond. Enter the name of your server, and click Check Names. Click OK. Click Next on the Capture Image Metadata page. When the image is created, click Finish. You can use this image on any bootable media. Name the discover image boot.wim and replace the original boot.wim in the sources
folder of the bootable media with this file. When you boot, it will
automatically boot into Windows PE and connect to the WDS server.
Use the following steps to create an image group and add an install image to this group. Select the Install Images folder under your server in the Windows Deployment Services console. Right-click the folder, and select Add Image Group. Enter Sales
and click OK. This creates an image group named Sales. You can add
images to the group and restrict access to the group using permissions. Right-click the Sales image group, and select Add Install Image, as shown in the following graphic.

On the Image File page, click Browse. Browse to the \Sources folder on the installation DVD. Select the install.wim file and click Open. Click Next. Review
the images listed on the List Of Available Images. The images available
will be dependent on your installation DVD. You can add them all, but
to save yourself some time in this exercise, add only two. Deselect all
the check boxes except two. Deselect the check box Use Default Name And
Description For Each Of The Selected Images. Click Next. If desired, change the Image Name and Image Description. Click Next. Review
the information on the Summary page and click Next. When the image is
added, click Finish. This will take several minutes to complete.
|
At this point, you could boot a PXE client by pressing F12 to start the process and then pressing F12 again when prompted.
3.4. Restricting Access to Images with WDS
WDS includes a
security component, allowing you to restrict who can receive images. As a
reminder, users must have a domain account to be able to access install
images on WDS. If users can't log in during the Windows PE stage, WDS
won't provide access to any install images.
You can control who can
receive specific images by modifying the permissions of the images or by
placing images in image groups and modifying the permissions of the
groups. Image groups and images are assigned standard NTFS permissions
through WDS. Any permission assigned to an image group is inherited by
all the images within the group.
By default, each image
and image group assigns permissions to the Authenticated Users group. If
you right-click an image or an image group, you'll see a display
similar to Figure 3.
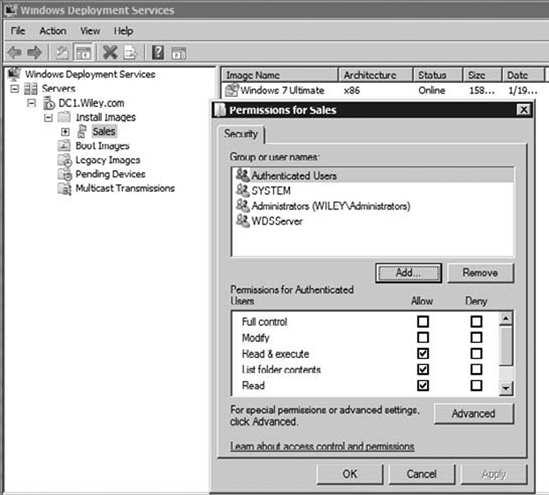
The WDS console shows the
NTFS permissions and gives you access to modify the NTFS permissions. Any user who successfully logs in to
Active Directory is automatically added to the Authenticated Users
group, so by default any user who logs in is automatically granted
access to all images hosted on a WDS server unless the default
permissions are modified.
If desired, you can
remove the Authenticated Users group and add any other group. For
example, your organization could have a group named G_Sales that
includes all the users in the Sales department. You could add the
G_Sales group and grant this group Read & Execute, List Folder
Contents, and Read permission.
With the Authenticated
Users group removed, only users in the G_Sales group will have access to
the image. Other users won't even see the image offered to them during
the WDS process.
3.5. Updating Images
Images that are served by a WDS
server are the same types of images that are deployed using the Windows
AIK, as discussed earlier. This allows you to use tools such as ImageX
and DISM to perform maintenance on the images. However, you do have a
couple of extra steps to perform first.
Disable the image
Before you can perform
maintenance on an image, you must disable it. You can do so by
right-clicking the image within WDS and selecting Disable.
Export the image
Next, you need to export
the image by right-clicking the image in WDS and selecting Export.
Browse to a location where you can copy the image, and click Save. This
creates a copy of the .wim file that can be manipulated.
Modify the image
Access the exported image
and make any modifications necessary. You can view and modify the image
file using tools within the Windows AIK. ImageX and DISM are the tools you'll probably use most often.
As an example, you might use DISM to add driver packages to the image.
You can also copy files to the image. Once you've completed the
modifications, you must commit the changes using either ImageX or DISM,
depending on which tool you used to mount it.
Add the image back to WDS
You can overwrite the
original image by right-clicking it and selecting Replace Image. Or, if
you want to retain the original image, you can right-click the image
group and select Add Image. Follow the same procedure as described
earlier to add an image. You need to enable the original image by
right-clicking it and selecting Enable.
3.6. Deploying Images with WDS
You have several
considerations when deploying images with WDS. A primary consideration
is the type of transmissions you'll use, such as unicast, multicast,
auto-cast, and scheduled-cast. You'll also need to decide when the
images are deployed.
If you're using WDS to deploy
only single images, the choices are clear. You'll simply use unicast
transmissions and deploy the images when needed. However, if you're
using WDS to deploy images to many different clients, you'll need to
know the different choices to help you plan more efficiently.
|
Multicast transmissions
are a significant benefit of WDS. When multicast transmissions are
enabled, the WDS server can transmit a single image to multiple clients
at the same time. On the other hand, if only unicast transmissions are
used, a separate copy of the image is transmitted for each client, which
can consume a lot more bandwidth. The Transport Server service (added
when the WDS role was installed) is needed to support multicasting.
|
|
3.6.1. Transmitting Images
Images can be sent as
unicast or multicast transmissions. The WDS server is configured to send unicast
transmissions. Multicast transmissions require a couple of extra steps.
As a comparison, the operations of unicast and multicast transmissions
are explained here:
Unicast transmissions
A single image is sent to a
single client. No additional configuration is necessary. If the PXE
client is able to connect to the WDS server and the user has a domain
account with permissions for an image, it can be selected and
downloaded.
Multicast transmissions
A single image is sent to
multiple clients. This is useful if the same image is being deployed to
multiple clients, and it takes significantly less bandwidth than
multiple unicast transmissions. A multicast transmission must be created
on the WDS server and configured before it will work. Multicast
transmissions require the Transport Server service, which is installed
when the WDS role is added.
As an example, imagine
you need to deploy Windows 7 Ultimate to 10 clients. If you used 10
unicast transmissions at the same time, the WDS server would try to send
10 different images to these clients. Each transmission would be
competing with the others for network bandwidth, and each would be
consuming additional resources on the server.
However, if you configured a
multicast transmission, you could deploy a single image to all 10
clients simultaneously. Only a single image is being sent over the
network and being processed by the server.
A neat feature
of multicast transmissions is that clients can even join the
transmission late and still receive the entire image. In other words,
imagine that 9 clients connected and the transmission started. Later,
the 10th client connects. It will start receiving the transmission at
whatever stage it joins. When the transmission completes for the other 9
clients, the 10th client would receive the beginning of the
transmission up to the point where it started.
Transmissions can also be configured as either auto-cast or scheduled-cast. Figure 4 shows the wizard screen used to choose the multicast transmission type.
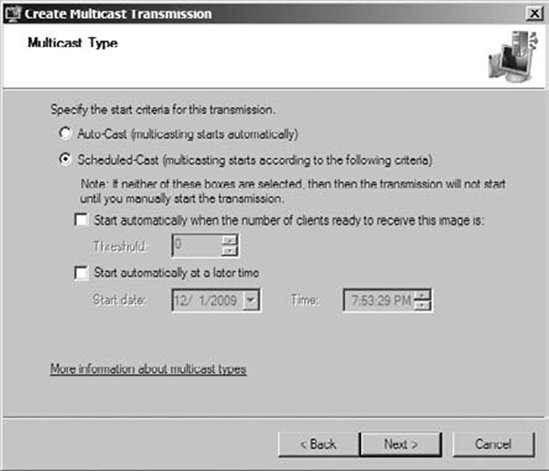
Auto-cast transmissions
An auto-cast transmission
will start automatically when a client connects. If an image is being
transmitted to 10 clients, it will start as soon as the first client
connects. Additional clients that connect will begin capturing the data
when they connect, and when the full image has been transmitted, it will
start again at the beginning, allowing the late clients to receive what
they missed.
Scheduled-cast transmissions
A scheduled-cast transmission
can start based on three criteria. A threshold (such as 10 clients) can
be set, and when the threshold is reached, the transmission starts. A
specific time can be set, and the transmission will start when the time
arrives. If neither of these choices is selected, an administrator must
manually start it by right-clicking the multicast transmission and
selecting Start after the clients connect.
3.6.2. Staggering Deployments
When deploying images with
WDS, you should consider staggering the deployments. In other words,
perform the deployments in stages where a percentage of the computers
are deployed at different times.
One of the primary benefits of
staggering deployments is that you can apply lessons learned from early
stages to later stages. No matter how much you test and plan, the
production environment has a way of throwing in unforeseen issues. These
issues can be identified and resolved in early stages and then
mitigated in the later stages.
Staggered deployments also help you address scheduling and network load issues:
Scheduling concerns
An important point to
remember is that computers are meant to be tools to help users do their
jobs easier, and IT departments have an integral goal of helping users
to use these tools. Part of this goal means that when scheduling
deployments, users' needs should be heavily considered. It's very common
for deployments to occur after hours to minimize the impact on end
users.
Network load considerations
Another important
consideration is the load the deployment will have on the network.
Again, deployments are frequently done after hours to minimize the
impact the deployment has on the network. Images are often several GB in
size, and custom images could easily be close to 10 GB. Even in the
best networks, transmitting a file this large will affect other
operations.
Because of the
different considerations associated with deploying images, some
organizations deploy images in isolated networks. For example, an IT
department may set up a single server running Active Directory, DNS, and
DHCP and hosting WDS. It could be configured in a single subnet
network, and when a client needs an image, an administrator plugs the
computer into this isolated network and downloads the image.
Once the computer receives the
image, the physical computer can be deployed to the end user. A primary
consideration when doing this type of deployment is the user's data.
