The Microsoft Deployment Toolkit (MDT) 2010
can be used capture and deploy images for both Lite Touch Installations
and Zero Touch Installations. It is used with WDS for LTI and with SCCM
for ZTI.
NOTE
The Microsoft Deployment
Toolkit (MDT) 2008 and Business Desktop Deployment (BDD) 2007 were
touted by Microsoft as tools to automate the deployment of Windows
Vista. However, I never really saw these tools take off. The MDT 2010 is
an upgrade to these tools. With the improvements and the expected
popularity of Windows 7, I expect that MDT may be more widely used than
it was in the past. Either way though, you should understand the
capabilities for the 70-686 exam.
One of the primary tools
you'll use with MDT is the Deployment Workbench. It's installed with MDT
2010, and it includes the ability to create deployment shares, add
images, create task sequences, and more.
Task sequences are an
important element of MDT 2010. You use these to identify all of the
steps of an installation, and they can include steps to add
applications, drivers, or just about anything you might need within an
application. However, instead of including these extras within the
image, they are referenced and available on the deployment share created
with MDT 2010.
MDT 2010 refers to images as thin images, thick images, and hybrid images.
Thin image
A thin image
is a basic Windows installation with very little customization.
Applications, updates, and settings are then deployed and configured
using other network tools such as through Group Policy, SCCM, and WSUS.
This reduces the size and complexity of the images, making the imaging
solution easier to maintain.
Thick image
A thick image
is customized with applications, device drivers, and updates. Creating
thick images increases the need to have multiple custom images because
it's harder to create a one-size-fits-all solution.
Hybrid image
Just as it sounds, a hybrid image
is a cross between a thin and a thick image. It can include additional
applications, but instead of including the applications in the image, a
MDT 2010 task sequence includes references to them on a network share
(referred to as the deployment share by MDT 2010). Applications are
deployed from network shares, and scripts can be used to identify which
applications to deploy to which clients.
Just as you'd run Windows
Deployment Services from a server, MDT 2010 is intended to be run from a
server. In other words, it should be installed on a server. If you're
using it with WDS, install it on the WDS server. If you're using it with
SCCM, install it on the SCCM server.
|
MDT 2010 requires Windows
PowerShell to run. This is installed by default in Windows Server 2008
R2, but if you're installing MDT 2010 on Windows Server 2008, you'll
need to add the Windows PowerShell feature through Server Manager.
|
|
MDT 2010 is a free download. You can get it by accessing Microsoft's download site (www.microsoft.com/downloads)
and searching for "Microsoft Deployment Toolkit (MDT) 2010." It comes
in both x86 (32-bit) and x64 (64-bit) versions. Download the version to
match the server where you'll install it.
After installing MDT 2010,
you'll need to complete these big-picture steps. Most of this work is
done within the Deployment Workbench.
Create a deployment share
The Deployment Workbench is
used to create a deployment share. This is a folder shared as a network
share, and the Deployment Workbench builds the underlying structure and
adds several different scripts and other files used for deployments.
When complete, this share will include all the resources needed to build
and modify an image, including the operating system source files, any
desired applications, device drivers, and packages.
Add operating system files to the deployment share
Operating system files
are added to the deployment share using the Deployment Workbench. Older
operating systems are added by copying the source files (such as the i386 folder for Windows XP and Server 2003). Windows Vista, Windows 7, and newer operating systems are added by adding the .wim files. The Deployment Workbench has the capability to extract all of the individual images from the .wim file and make them available for deployments.
Create a task sequence
A task sequence
is used to define a specific set of steps that need to be run during an
installation. Several task sequence templates are available, and this
makes this process much quicker. As an example, the Standard Client Task
Sequence template includes about 50 individual tasks organized in
phases from Initialization to State Restore. Task sequences are
associated with an unattended.xml file and an operating system image.
Update the deployment share
When the deployment share
is updated, it updates the boot image and boot image settings used for
deployments. A wizard leads you through this process, and it will create
multiple files that can be used to create bootable media.
|
When creating deployment
shares and images, you need to match the architecture for the entire
process. In other words, if you're using a 64-bit edition image, other
elements must also be 64-bit. However, both editions of MDT 2010 (32-bit
and 64-bit) can work with both types of images. You just need to ensure
that the x86 edition is installed on a 32-bit OS and the x64 edition is
installed on a 64-bit OS.
|
|
1. Installing MDT 2010
Browse to the location where you downloaded the MDT .msi installer file and double-click it. When prompted to run the file, click Run. The Microsoft Deployment Toolkit Setup Wizard will begin. Click Next. Review the license agreement, select I Accept The Terms In The License Agreement, and click Next. Accept the default Custom Setup selection, which will install the entire MDT on your system, and click Next. Click Install. If prompted by User Account Control, click Yes. When the wizard completes, click Finish.
|
At this point, a
Microsoft Deployment Toolkit folder will be added to the All Programs
menu. It will include the following items:
Configure ConfigMgr Integration
If you're using MDT with
SCCM, you need to run this tool to integrate the features of MDT into
SCCM. It will copy the appropriate files to the Configuration Manager
server. It will also add Windows Management Instrumentation classes for
the custom actions that are possible with MDT.
Deployment Workbench
This is the primary tool
you'll use to assist with deployments. It includes a full set of tools
and documentation used to automate deployments.
Microsoft Deployment Toolkit Documentation
This launches the Microsoft Deployment Toolkit Documentation Library, which is a help file.
Release Notes
This help file includes
information on the usage of MDT. If you used MDT 2008 or BDD 2007 and
have installed MDT 2010 on the same system that held the previous
editions, you should read this document thoroughly because of known
issues with the older versions.
Remove WDS PXE Filter
If you used MDT 2008 and
installed the PXE filter with it, it should be removed. This menu item
allows you to launch a wizard to remove it. If you've never installed
MDT 2008 on the computer where you're installing MDT 2010, you won't
need this tool.
With MDT 2010 installed, you
can now start creating the pieces for a deployment. The first step is to
create a deployment share using the Deployment Workbench.
2. Creating a MDT 2010 Deployment Share
The deployment share is a
shared folder created on the server. The Deployment Workbench does most
of this under the hood, so you don't really see what is occurring.
The $ symbol will
hide this share to prevent users from accidentally stumbling onto it,
but if the path name is known and permissions have been assigned, users
will be able to connect even if it is hidden. If the server name is
WDS1, the UNC path is \\WDS1\DeploymentShare$.
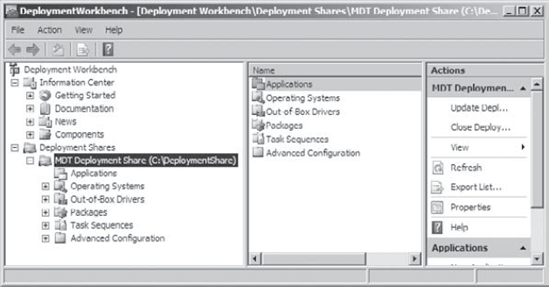
Launch the MDT Deployment Workbench by clicking Start => All Programs => Microsoft Deployment Toolkit => Deployment Workbench. Right-click Deployment Shares, and select New Deployment Share. Accept the default Path of C:\DeploymentShare and click Next. The default Share Name is DeploymentShare$. Click Next. Click Next to accept the default Deployment Share Description. On the Allow Image Capture page, leave the selection Ask If An Image Should Be Captured checked. Click Next. Leave
the selection Ask User To Set The Local Administrator Password
unchecked. This will prevent users from accessing the local
administrator account. Click Next. Leave the selection Ask User For A Product Key unchecked and click Next. Review the information on the Summary page and click Next. When complete, click Finish. Click the plus sign to open the deployment share you just created. It will look similar to the following graphic.
Launch Windows Explorer and browse through the C:\DeploymentShare folder. You'll see that it includes several folders, and some of the folders (such as the Scripts folder) have files within them.
|
Leave the Deployment Workbench open to complete the next exercise.
2.1. Adding Operating System Files to the Deployment Share
Once you create the
deployment share in MDT 2010, you'll need to add at least an operating
system before anything can be deployed. When you launch the wizard to
import operating systems, it will give you the following choices:
Source Files
For operating systems
before Windows Vista and Windows Server 2008, the operating system was
deployed using a source directory, often labeled I386. You can add the entire source directory to the deployment share, which will include the source files.
Custom Image File
Any .wim file can be added here. Although the wizard labels it as a custom image file, you can import the install.wim standard image file on the installation DVD and use it as a thin image if desired. If the .wim
file includes multiple images, all of the images will be imported.
After the images are imported, individual images can be deleted.
Windows Deployment Services Image File
Any images that have been captured using WDS can be imported to MDT 2010.
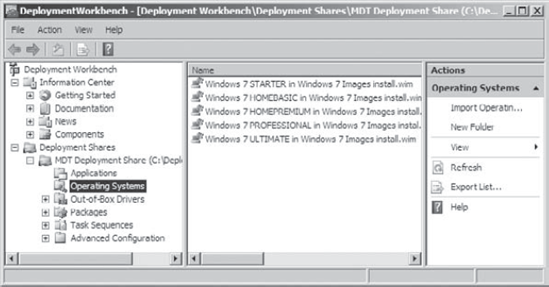
You add Windows 7 to the Operating Systems folder by adding the .wim file.
Select Operating Systems in the deployment share that you created in the previous exercise. Right-click Operating Systems, and select Import Operating System. Select Custom Image File and click Next. Insert the Windows 7 installation DVD, and browse to the \Sources folder. Select the install.wim file and click Next. Accept the default of Setup And Sysprep Files Are Not Needed and click Next. Change the Destination Directory Name to Windows 7 Images and click Next. Review the Summary page and click Next. The Progress page will appear and display progress as the images are imported into the MDT folder. When the import completes, click Finish. Your display will look similar to the following graphic:
Use Windows Explorer to browse to C:\DeploymentShare\Operating Systems\Windows 7 Images. You'll see the install.wim file and a language configuration file (lang.ini).
|
Leave the Deployment Workbench open to complete the next exercise.
In addition to adding
images, you can add applications, drivers, and other packages to the
deployment share. Any applications that are added to the share can be
selected during the installation.
After adding the image (and any
optional applications, drivers, or other packages), you'll need to add a
task sequence to specify the order of the installation.
